It was a rainy day yesterday. I was glad that the rain had cooled our apartment down a bit while I was preparing the Chocolate Hazelnut Sables. But it was certainly not cool enough for the dough. They had to rest in the fridge for at least 4 hours before shaping and cutting.
 This is the sable dough after resting, I keep them in the freezer instead of fridge, to shorten the resting time and also to prevent them from melting before I sliced all of them down into individual sables.
Quite unlike most of the cookies I baked in the past, these sables are delightfully tender,crumbly and buttery. Because this recipe used almost a pound of butter, they are hardly considered healthy. And since butter plays such an important role in this case, the quality of butter used really counts. I like how short the ingredients list is, eventhough the making process is a real pain.
But why should I be surprise? Most of the french pastries usually called for great attention for details and immaculate precision. And inevitably, such precision always lead to delightful results.
 I will need this when I attend culinary school one day. But for now, more practices are needed. My sables didn't turn out as uniform as I wanted.
 Since I was baking the sables, I decided to bake some nibby hazelnut cookies using the dough I left from last time. Surprisingly, the flavor improved a lot. There's a faint note of cocoa in the cookies which I didn't detect in the first batch. I hope it wasn't just my imagination.

Chocolate Hazelnut Sables
Adapted from Pierre Herme's Chocolate Desserts
2 cups (300g) all purpose flour
1/4 cup (25g) Dutch processed cocoa powder, preferably Valrhona
2 sticks plus 1.5 tbsp (8 3/4 ounces,250g) unsalted butter), at room temperature
1 cup (100g) confectioners' sugar, sifted
pinch of salt
2 large eggs, at room temperature
1 cup (140g) hazelnuts, toasted, skinned and halved or quartered
1/2 recipe sweet tart dough chilled and ready to roll (see recipe below)
Sift the flour and cocoa powder and set aside. Working in a mixer fitted with the paddle attachment, beat the butter until it is soft and smooth.Add sugar followed by salt, and continue to beat, scraping the bowl as needed for 3 minutes, or until the mixture is light, pale and creamy. Add 1 of the eggs and beat to incorporate. At this point, the mixture should be light and fluffy. Set the mixer to low, add the sifted dry ingredients and mix until they disappear into the dough. Take care not to overwork the dough. Stir in the toasted hazelnuts.
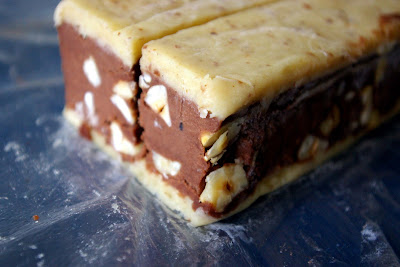
Turn the dough out onto a smooth working surface- marble is ideal- and shape it into a 6 x 7-inch (15 x 18cm) rectangle that's 1 inch (2.5 cm) high. Put the chocolate dough in the refrigerator while you work on the tart dough. (The dough can be made ahead,wrapped airtight, and keep refrigerated for 2 days or frozen for a month.)
Beat the remaining egg with 1 teaspoon of cold water and keep this egg wash close at hand. Also have 2 sheets of parchment paper and a baking sheet nearby.
Working on a lightly floured work surface, roll each disc of tart dough into a rectangle, that's a scant 1/4 inch (7 mm) thick (the thickness is important here) and slightly larger than 6x7 inches (15x18 cm. Put one piece of the rolled out dough on one sheet of parchment and brush the surface with egg wash, the glue that will keep the multi layers together. Center the chocolate dough on the tart dough, then, using a sharp knife, cut away the excess tart dough. Brush the top of the chocolate dough with egg wash and place the second sheet of tart dough over the cookie dough. Top this setup with the second piece of parchment paper, flip everything over, and remove the top sheet of parchment. Trim the excess tart dough so that it's even with the two layers. Slide the package (still sitting in the parchment) onto a baking sheet, cover it well and chill for at least 4 hours. (wrapped airtight, the package can be frozen for up to a month, defrost in the refrigerator before baking.)
Preheat the oven to 325F (165C). Have another parchment-lined baking sheet at the ready. Using a sharp thin blade knife, working from one 7-inch (18cm) side of the dough package to the other, cut 6 even strips of dough, then cut each strip into 1/4-inch (7mm) wide cookies. Arrange the cookies on two baking sheets, leaving a 1/2-inch (1.5cm) between the cookies.
Bake for 20 to 24 minutes, or untl the cookies are firm, and the tart dough is lightly browned, rotate the baking sheets half way, around 10 minutes. Transfer cookies to rack to cool.
The baked cookies can be kept at room temperaure for 3- 4 days in an airtight tin. The dough can be made ahead, wrapped airtight and keep refrigerated for 2 days, or frozen for 1 month.
Make about 150 cookies.
Sweet Tart Dough
2.5 sticks (10 ounces, 285g) unsalted butter, at room temperature
1.5 cups (150g) confectioners' sugar, sifted
1/2 cup (lightly packed)(3 1/4 ounces, 100g) finely ground almond powder or finely ground blanched almond
1/2 tsp salt
1/2 tsp vanlla bean pulp or pure vanilla extract
2 large eggs, at room temperature, lightly beaten
3.5 cups (490g) all purpose flour
Place the butter in the bowl of a mixer fitted with the paddle attachment and beat on low speed until creamy. Add the sugar, almond powder, salt, vanilla, and eggs and still working on low speed, beat to blend the ingredients, scraping down the paddle and the sides of the bowl as needed. The dough may loo cuddled- that's all right. With the machine on low, add the flour in three or four additions and mix only until the mixture comes together to form a soft, moist dough- a matter of seconds. Don't overdo it.
Gather the dough into a ball and divide it into 3 or 4 pieces: 3 pieces for 10 inch (26cm) tarts, 4 for 9 inch (24cm) tarts. Or, press the dough into one big disk and cut off as much as you need at the time that you need it. gently press the dough into disks and wrap them in plastic. Allow the dough to rest in the refrigerator for at least 4 hours or up to 2 days , before rolling and baking. Alternatively, the dough can be freeze for up to 1 month.
To roll and bake:
For each tart, place a buttered tart ring on a parchment lined baking sheet and keep close at hand. Work with one piece of dough at a time, keep the remaining dough in the refrigerator.
Working on a lightly floured surface (marble is ideal), roll the dough to a thickness of between 1/16 and 1/8 inch (2 and 4 cm), lifting the dough often and making certain that the work surface and the dough are amply floured at all times. (a well floured area makes rolling this rich dough easier) Roll the dough up around your rolling pin and unroll it onto the tart ring. Fir the dough into the bottom and up the sides of the ring, then run your rolling pin across the top of the ring to cut off the excess. If the dough cracks or splits as you work, don't worry- patch the cracks with scraps abd just certain not to stretch the dough that's in the pan. Prick the dough all over with fork (unless the tart will be filled with a runny custard or other loose filling) and chill it for at least 30 minutes in the refrigerator.
Preheat the oven to 350F (180C) and fit a circle of parchment paper or foil into the crust and fill with dried beans or rice.
Bake the crust for 18-20 minutes, just until it is very lightly coloured. If the crust needs to be fully baked, remove the parchment and beans and bake the crust for another 3 to 5 minutes, or until golden. Transfer the crust to a rack to cool.
Read more...


 I don't post about them nowaday simply because they are all simple dishes, and I wonder if people will cover their mouth to conceal a chuckle if I even post the recipe up. Anyway, I guess I will just upload some photos to record what we have been eating, without the recipes.
 We also find that going to Chinese grocery store helps to stretch our money further. Fresh prawn for example, is two dollar cheaper per pound than the usual store we go to. So are some of the staples required in a Chinese pantry. Of course they also have the Pocky and prawn crackers that I can't find any where else.
 Insteads of thinking about fanciful recipes, I am more interested to find ways to transform the leftovers into another meal. After a night of eating baked curry drumsticks with roasted veggies, I used the leftover chicken and rice to make curry baked rice. That is a balanced meal for the next night.


 I am glad that there's still a long dough of sable au citron tugged safely in my freezer.
 Anyway, I digress. There's a recipe from Pierre Herme's book that involved lemon and easy to make. I decide to start my adventure of "Pierre Herme's Desserts" here. I even bought a tiny pint of fresh raspberries that was required in the recipe. A big deal, because it's an expensive ingredient after the cocoa powder and cocoa nibs.
 Because of my mood of loving everything small at the moment, I decided to make them in my muffin pan rather than in a 10-inch springform pan as stated in the recipe, which I don't have anyway. Turned out that the recipe can make more than 12 little cake because mine came out half inch taller than the mold after baked.
  The Ligurian Lemon Cake wasn't the most lemony cake I have tasted, but it was pretty good after resting overnight in the oven. A nice addition to the dessert tray when it's tea time. Although the Ligurian Lemon Cakes can be served unadorned, but I prefer the meringue topped version. It added an element of elegance to the little cakes, although mine didn't turn out the way they should.
 A word of caution: Frost the cake on the day you intend to serve it (if you decided to give it a try). The frosting will soften after one day, because this is a moist cake. It will still taste nice, only not so appealing to the eyes.
 Yay! Thank God It's Friday. Although I no longer work now and can sleep till whatever time I want (theoretical, I normally wake up once OCT's up), I still look forward to weekends. We have been going to the cute Italian neighbourhood called

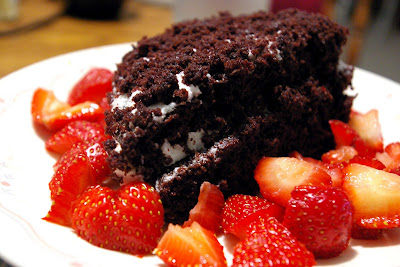
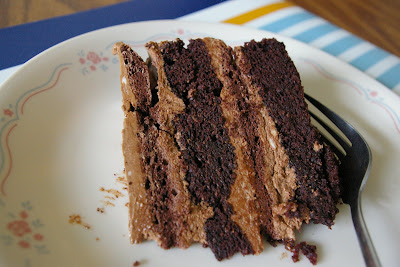 The cake has an intriguing texture, thanks to the 3 different components. The moist and intensely chocolate devil cake paired well with the chewy meringue and smooth buttercream. I especially like the devil's food cake, and wouldn't mind to make it again with other fillings. I think this is my favorite so far, after trying


 As last week simply flew past with a blink of an eye, dinners were the usual fare without much fuss. I managed to try a new dish though. It was good enough that OCT had the delusion of hearing it called his name on our vegetarian night.
 I also made the bacon with miso glazed corn, which I like. And ready made Japanese Vegetable Curry! Actually it was an accident. I thought I bought the curry paste. But turned out that it's an all in one instant japanese curry with vegetable. It wasn't too bad and the gravy went well with rice. .
 Hopefully, there will be more new recipes coming up on my blog this week.


 The crust was thin and crispy, which we like better than the thick, bread-like version.
 That was the best way to end the week, in my opinion. But it wasn't the case for OCT, who was nursing a mouth ulcer. I have totally forgotten about it. Or I would have cooked something else for him. In the end, he cooked and ate instant noodle for dinner. Ouch...
 Such is the magnitude of "advertisement". When you see something often enough, you will unconsciously crave for it. In my case, I started to crave for cocoa nibs. Or any pastries consists of cocoa nibs. So obsess till the point of taking a 40 minutes ride to the neareast Whole Food just to buy a packet of this.
 Once home, I carefully scanned through the myriad of cocoa nibs related recipes, and decided to commemorate my first cocoa nib's experience with Alice Medrich's recipe called Nibby Hazelnut Cookies. The original recipe used pecan, but I like hazelnut better, so I went ahead to use just that.
  The cookies turned up just the way the recipe promised, tender and crunchy. And the flavor of the cocoa beans developed and infused over time, according to the recipe. But apparently, cocoa nibs tasted just like toasted nuts. I didn't get the intense chocolate flavor that I anticipated. The flavor that I conjured in my mind. In fact, Alice Medrich has warned me in her book-


 And for the expiring yogurt and peanut chocolate chips, I made a batch of the usual banana bread and sent them away to OCT's lab too. If I get some yogurt again this week, I can forsee myself making another batch of the banana bread. ...