Tuesday, October 30, 2007

Can you keep a secret?

Mosaic Biscotti


What is your favorite kind of cookies? For me, I can't resist biscotti. Chocolate biscotti, to be specific. The first thing I see on the biscotti recipe is not the description one provides, but the ingredient list. I want to know whether butter is used in the process.

Called me stubborn, or even ignorant, but I steer myself clear from biscotti made with butter. I don't care what others say about the crispier texture when butter is used. It just doesn't feel right for me. I think it has to do with one article I read couple years ago before I started baking biscottis. It mentioned that the "real deal" is made without butter. Ironically, I can't even remember where I saw that article, let alone its authenticity. But the message somehow stuck in my illogical brain.

Having established my weird logic on biscotti recipe, it should not catch you by surprise that this batch of biscotti is made without butter. And the means of how this recipe travel from the book onto this blog is quite embarrassing, if not scandalous.

It was on a sunny morning after I walked OCT to school and decided to spend some leisure time browsing the new cookbooks in the nearby Barnes & Nobles. The sparkling new Dolce Italiano that was displayed on the feature rack caught my eyes. I picked up the book and found a quiet spot. Sitting on the comfortable couch, I started to peruse the book. Little did I know when I picked up the book that the authour- Gina DePalma, is the pastry chef of Mario Batali's Babbo Restaurant! (Ok, I am ignorant) Unlike many dessert books in the market, DePalma has a clear vision and sharp focus on what she wanted to convey. And it was Italian desserts. Not only did she manage to cram so many delicious sounding recipes in the book, it is also packed with stories and information. I think it will serve as a great reference for anyone who is interested in making or simply wanting to know more about Italian desserts.

Mosaic Biscotti

Usually, I could easily finish reading a cookbook in one sitting. But not this book! I had a hard time digesting all the information the book offers. It feels almost like lovers who haven't met and talked for a decade! So I decided not to rush through it, and skipped to the section where the biscotti recipes are. And I did something that may not gain your approval. I copied the recipe of this biscotti. A very rough guide though, which consists of the ingredient list and simple instructions. Such is the distance I would go, to give you, my friends, the recipe of this fantas-bulous biscottis. I hope you will keep it to yourself. But certainly make it and share it with your loved ones.

Just save the part where your friend here risked being scorned by the store manager and other medical students to bring this recipe to you. Oh, and please, by all means, get a copy of Dolce Italiano. After trying the Mosaic Biscotti, I would strongly recommend this book to anybody who have a passion for Italian desserts.


mosaic biscotti


Here's goes the gist of the recipe and my modified instructions:
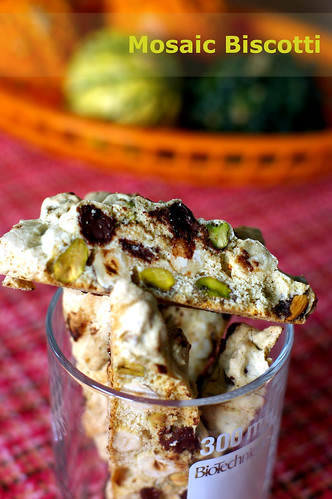
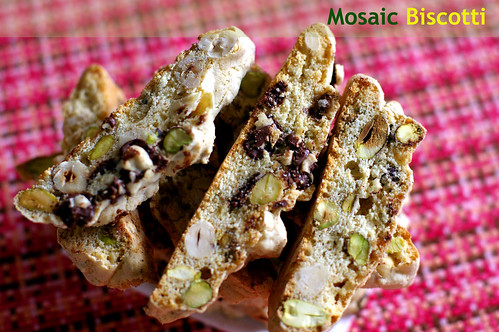
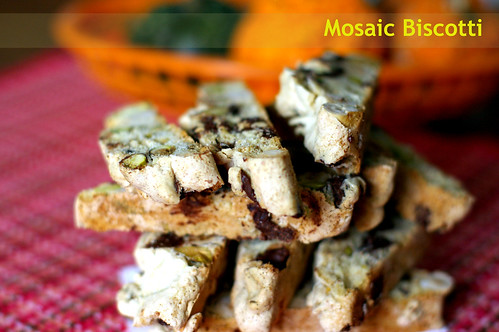
Mosaic Biscottis
adapted from Dolce Italiano

3.5 cups unbleached all-purpose flour
2 cups granulated sugar, 1 tsp granulated sugar for glaze (I used 1.5cups and it's the right sweetness for me)
1 tsp baking powder
1 tsp kosher salt
2 cups of pistachio, coarsely chopped
2 cups of hazelnuts, corsely chopped (I used 1.5 cups, because that's what I have left)
12 oz semisweet or bittersweet chocolate (I used 1 pack (11.5oz)of Ghiradelli Bittersweet Chocolate chips because I got it on offer :))
4 large eggs, at room temperature
2 eggyolks, plus 1 eggwhite for glaze (optional), at room temperature
2 tsp vanilla extract

Preheat oven to 325F.Line two large baking sheet with parchment paper. Set aside.

In a bowl of electric mixer fitted with whisk attachment, beat the whole eggs, eggyolks and granulated sugar until the mixture holds a ribbon-like trail on the surface for a few seconds when you raise the whisk.

Switch to the paddle attachment. With mixer on low speed, add the vanilla extract and the flour mixture. When it's well combined, add in the nuts and chocolate and stir by hand, using a large spatula.

Using the spatula as a guide, drop the dough by spoonful into a 2.5-inches wide and 18-inches long log directly onto the parchment paper. Slightly flatten it to 1/2-inch thick. Leave 2 inches space between logs.*** Brush eggwash over logs. Sprinkle with granulated sugar, if using.

Bake, rotating pan halfway through, until logs are just firm to the toch, 20-24 minutes. Transfer baking sheets to a wire rack to cool completely, about 40 minutes.

Lower the oven temperature to 200F. (I wasn't very patient, so I stick with 300F. This way the biscottis will dry fasterin the second bake)

When the logs are cool enough to handle, use a serrated knife to cut biscotti log on the diagonal, into 1/4-inch thick, or if you like, 3/4-inch thick (which is more durable to be send off as care package.

Arrange slices on the baking sheet and bake until biscottis are firm to the touch and completely dry. 10 to 12 minutes. Carefully turn the biscottis to the other side and bake for another 10 to 12 minutes, or until dry.

Remove pans from the oven;Let biscottis cool completely on the rack. They can be kept in an airtight container at room temperature for up to 2 weeks. I keep them in the freezer when I don't feel like sharing with others. They can be kept there for months.

*** Note: you can also shape the dough into individual log before baking. But I find it easier to just drop the dough onto the parchment paper to form a log. It's less messy this way. Especially when the dough is sticky.

Tip: If you have baking racks, you can also place the biscottis on them for the second bake. This way, you don't need to turn them when one side has dried.

Suppose to make 4 dozen biscottis, (I have more than that!)

Read more...

Friday, October 26, 2007

Penne with Roasted Vegetables & Goat Cheese

Penne with roasted vegetables & goat cheese


As an effort to maintain a healthy diet, I try to make vegetarian meal once a week. Unfortunately, we haven't been able to adhere to this regime the past weeks for some reasons. Ok, they are mostly excuses, so I shall not bore you with the detail.

This week however, I am determine to stick with this resolution. As I was looking for a tried and tested recipe for our vegetarian meal, I came across one listed by Robyn1007 on the Cookinglight bulletin board. Although it called for yellow squash and zucchini which I didn't have on hand, I thought I could swap it with other vegetables. In my case, I used red bell pepper and eggplant. The result is one hearty satisfying meal. The transformation of the few humble vegetables after roasting is simply amazing. I like the fact that they are easy on the waist but huge in flavor.

I can't stop raving about my love of roasting vegetable! Whenever I find a vegetable that I don't like, I would just roast it. And then, they will be welcome as VIP on my favorite list. Like cauliflower. I only eat it when it's roasted with garlic, salt and lemon juice.(yum!) Using the roasting method, I have recently became acquainted with sweet potato too. My mum would be so proud of me. She couldn't persuade me to try her favorite purple sweet potato the last time I was home.

wvd_small_by_coffeeandvanillaNote: I am excited to learn from the lovely Anh that Morgot of Coffee and Vanilla is hosting the Vegetarian Awareness Month in October. I am sure there will be more vegetarian ideas for me come early November.(When the roundup is up!)Oh, and I shall not forget to submit this pasta dish as my contribution for the Vegetarian Awareness Month.

Penne with Roasted Vegetables & Goat Cheese


Penne with Roasted Vegetables & Goat Cheese
Adapted from Cookinglight.com

1/2 pound uncooked penne (tubular-shaped pasta)
1 medium eggplant,cubed
1 large red bell pepper, remove seed and roughly chopped into cubes
1 cup thinly sliced red onion, separated into rings
1 tablespoon olive oil
1/2 teaspoon salt
1/2 teaspoon pepper
1 garlic clove, minced
A handful of cherry tomatoes
1 1/2 tablespoons balsamic vinegar
1 cup (4 ounces) goat cheese
3 tablespoons chopped fresh basil
1 1/2 tablespoons chopped fresh thyme


Preheat oven to 475°.

Cook pasta according to package directions, omitting salt and fat. Drain, and set aside.

Combine eggplant and next 6 ingredients (squash through garlic) in a large bowl; toss well to coat. Arrange vegetables in a single layer in a jelly-roll pan. Bake at 475° for 20 minutes, stirring after 10 minutes.Add the cherry tomatoes to the jelly roll pan. Roast until all vegetables browned. Drizzle vinegar over vegetables; toss well.

Combine pasta, vegetable mixture, goat cheese, basil, and thyme in a large bowl; toss well.

Yield
4 servings (serving size: 1 1/2 cups)

note: the original recipe uses 2 cups of sliced zucchini and sliced yellow squash respectively.

Read more...

Wednesday, October 24, 2007

Birthday Mango Cream Cake

mango cream cake

I have just gone through some of the recipes I made but have not published on this blog yet. And I am now torn between blogging about something new or something old. I guess it won't really matter to you, so here's what I made last week for OCT's birthday. A Mango Cream Cake. Mango cake holds a special place in our household. We don't normally bake it because of the lack of good sweet mango here. And I also can't seem to find a reliable recipe on mango cake. The only time it graces our dining table is either OCT or my birthday.

These are time when I am more adventurous and not stress about the outcome. Unlike baking cakes for friends' birthdays when I have to pray hard for the cakes to turn out well. Luckily most of them request for chocolate cakes, which I am quite competent now. Our birthdays, as it turns out is the best time to experiment. To be fair, I did ask OCT what cake he wanted for his birthday. The answer was consistent all the time, and he said he only wanted mango cake. Even if there's a possibility of having an "inedible birthday cake". You can probably tell that OCT is quite a mango aficionado now.

With that in mind, I started to creat one cake based exclusively on trial and error. With the exception on the cake base. I used a base I had tried with good result before. Strictly speaking, I only need to get the mango cream filling and topping right to fulfill my husband's birthday wish. Even if it turned out miserable, I guess we can still scrap out the yummy cake base to eat.

mango cream cake


Because I wasn't sure how much filling I would need, I ended up making a lot more than required. As a result, the birthday cake turned out having a bulging top.Maybe if I didn't try to be creative and used lady fingers to line up the pan and dropped in a can of lychee, there would be more room for the mango cream. But both the lady fingers and lychee proved to be worthy for the space they occupied. They just added so much interesting flavors to the cake.

For the decoration, I initially wanted to pipe "happy birthday" only. But then I melted too much chocolate and I didn't want to waste it. So it ended up on the cake, as you can see in the picture below. I simply pipe whatever I could think of. And the result was a casual and messy cake. I probably would have made the cake more formal and piped "OCT" instead of "Baby" if we invited other friends. But since it's just the two of us, I guess I can call him whatever I want. :)

mango cream cake

Before OCT was home, I tied the cake with a satin ribbon, so it would look like a present. I feel rather guilty for not getting him anything because he always shower me with gifts on birthdays and anniversaries. Anyway, he said he wanted no present and a low key birthday. So I guess I have to grant the birthday boy his wish!

Mango Cream Cake

I am also submitting this mango cream cake as my entry for the latest edition of "Waiter, there's something in my....Layered Cake", which is hosted by Andrew of Spittoon Extra. Be sure to check out the round up later on Andrew's blog.

Mango cream cake


Mango Cream Cake

For the cake
2 cups cake flour
2 teaspoons baking powder
1/8 teaspoon baking soda
1/4 teaspoon salt
1 1/4 sticks(10 tbsp) unsalted butter, at room temperature
1 cup sugar
3 large eggs
1 large egg yolk
1 1/2 teaspoons pure vanilla extract
3/4 cup buttermilk

For the filling and topping ***(see note below for suggestions of the amount of ingredients used)
About 2 pounds of mango flesh
2 cups of heavy whipping cream
sugar to taste
2 packets of gelatin powder
1 can of lychee in syrup, with lychee drained and roughly chopped; reserve syrup

lady fingers
melted dark chocolate

To make the cake base,
Center a rack in the oven and preheat the oven to 350F. Butter two 9x2 inch round cake pans, dust the inside with flour, tap out the excess and line the bottoms of the pan with parchment or wax paper. Put the pans on baking sheet.

Sift together the cake flour, baking powder, baking soda and salt.

Working with a stand mixer, fitted with a paddle attachment, or with a hand mixer in
a large bowl, beat the butter on medium speed until soft and creamy. Add the sugar and beat for another 3 minutes. Add the eggs, one by one, and then the yolk, beating for one minute after each addition. Beat in the vanilla; don't be concerned if the mixture looks curdled. Reduce the mixer speed to low and add the dry ingredients alernately with the buttermilk. adding the dry ingredients in 3 additions and the milk in 2 (begin and end with the dry ingredients); scrape down the sides of the bowl as needed and mix only until the ingredients disappear into the batter. Divide the batter evenly between the two pans and smooth the tops with a rubber spatula.

Bake for 28 to 30 minutes,rotating the pans at the midway point. When fully baked, the cakes will be golden and springy to the touch and a thin knife inserted into the centers will come out clean. Transfer the cakes to a rack and cook for about 5 minutes, then run a knife around the sides of the cakes, unmold them and peel off the paper liners. Invert and cool to room temperature right side up.

To make mango filling and topping,
Puree mango flesh with some sugar syrup from canned lychee. Taste and adjust sweetness accordingly.Pour out the pureed mango into a large bowl.

Sprinkle 2 packets of gelatin powder with 1/4 cup of sugar syrup from the canned lychee. Heat the mixture in microwave for 30 seconds until the gelatin solution dissolves and turns clear. Leave to cool slightly.

Using a stand mixer with whip attachment, beat whipping cream until stiff.

Slowly dribble gelatin solution into pureed mango.Stir to mix well. Set aside 1/2 cup of mango mixture in another medium bowl for topping. Fold some whipped cream into the remaining mango mixture to lighten. Continue to fold the remaining whipped cream thoroughly but lightly into the mango mixture.

To assemble
Carefully place one cake layer on the bottom of a 9-inch springform pan or a cake ring. Brush the top of the cake with some sugar syrup from canned lychee. Scatter the chopped lychee on top of the cake.Brush one side of the lady fingers with the same syrup before lining them on the sides of the ring. Brushed side facing inward.

Carefully pour in the mango cream and top with the second cake layer. Brush the top with syrup. Pour the rest of the mango cream on top.Followed by the reserved topping.

Chill overnight before decorating.

***Note: you will have way too much mango cream using the above recipe.1 cup of whipping cream and 1 packet of gelatin powder, with the same amount of mango flesh (2 pounds) should yield a more intense mango flavored cream. Having said that, I have not tried out this combination yet.

Read more...

Monday, October 22, 2007

Dinner from Scratch

The crisp Fall weather has certainly put me in a cooking and baking mood. Unlike summer when I prefer dinner to be ready in less than 30 minutes, I love lingering in the kitchen longer now.

That also means I am more receptive to the ideas of making elaborate, labor intensive recipes and meals. Not that I am connoting these descriptions with the recipes below. In contrary, I have a recipe which I would consider as comfort food for OCT and myself.

From the tropical countries we come from, comfort food means something that's light and preferably not piping hot. That's comfort food for a country with summer weather 365 days a year. A hearty sandwich in my opinion fits the bill.

Because of my weakness in resisting a good seafood(especially shrimps!) recipe, I have my eyes on the Shrimp Rémoulade Po'boy recipe from Cookinglight magazine and a hamburger bun recipe from a blog I like. I think I would call this concortion a Shrimp Rémoulade Sandwich since the authentic Po'boy uses french bread/Baguette. Making this meal certainly requires some planning. Especially when you want to pair the freshly baked bun with the Shrimp Remoulade filling.

Shrimp Remoulade Po'boy


I started my bun making in the early afternoon and had them ready before I prepped the shrimp. According to Joe, the hamburger buns freeze well. It eliminated my worry for having to finish a dozen of them in one meal.

If you have baked bread before, you would understand the moment of joy when the bread comes out of the oven. Because I substituted whole wheat flour for some of the all purpose flour required, mine turned out slightly fibrous. Not exactly the kind you would expect in a soft storebought hamburger bun. I prefer it this way though as it stands up to the Rémoulade sauce without making the whole thing soggy.

I also made a fresh corn salad, which unfortunately was not memorable. If you must try, the recipe is here.

Shrimp Remoulade Po'boy with Corn Salad


Shrimp Rémoulade Sandwich
adapted from Cookinglight, July 2007 and hamburger bun from this blog

Rémoulade sauce:
1/3 cup reduced-fat mayonnaise
2 tablespoons finely chopped onion
2 tablespoons finely chopped celery
2 tablespoons finely chopped green bell pepper
1 tablespoon prepared horseradish
2 tablespoons ketchup
1 teaspoon minced fresh basil
2 teaspoons lemon juice
2 teaspoons Worcestershire sauce
1/8 teaspoon freshly ground black pepper
1 small garlic clove, minced

Remaining ingredients:
24 large shrimp, peeled and deveined
Cooking spray
4 (3-ounce) French bread loaves, sliced horizontally (I used homemade hamburger buns)
1 cup chopped iceberg lettuce
1 cup chopped tomato


To prepare sauce, combine first 11 ingredients in a medium bowl. Chill.
Prepare grill.

Thread shrimp onto 4 (10-inch) skewers. Place skewers on grill rack coated with cooking spray; grill 2 minutes on each side or until shrimp are done.

Preheat oven to 350°.

Hollow out bread halves, leaving a 1-inch-thick shell. Place bread on a baking sheet; bake at 350° for 5 minutes. Place 1/4 cup lettuce, 1/4 cup tomato, and 6 shrimp in bottom half of each loaf. Spoon 1/4 cup sauce over each sandwich. Cover with top bread halves.
*I used homemade hamburger buns in place of the french bread. See recipe below.
Yield
4 servings (serving size: 1 sandwich)

Hamburger Buns

1 cup milk
1 cup water
2 tablespoon sugar
2 tablespoons butter
1 1/2 teaspoon salt
5 1/4 cups all-purpose flour, divided ( I substituted 1 cup of all purpose flour with whole wheat flour)
2 1/4 teaspoons instant yeast

Egg wash

1 large egg yolk
1 tablespoon water

In a small saucepan, add milk, 1 cup water, sugar, butter and salt. Heat over low just until the butter melts - cool to lukewarm.

In a medium bowl, whisk together 3 cups flour with the yeast.

Pour the milk mixture into a large mixing bowl. Mix in the flour/yeast mixture, 1 cup at a time, until all 3 cups are in, beating until smooth. Stir in enough of the remaining flour to make stiff dough.

Scoop the dough onto a lightly floured surface. Knead until smooth and elastic (about 8-10 minutes), adding enough of the remaining flour to prevent the dough from sticking to your hands. Move dough into a large bowl lightly coated with cooking spray. Cover and let rise until doubled, about 60 minutes.

Uncover and punch down the dough. Evenly divide into 12-16 pieces, depending on how large you want the buns to be. Form each piece into a tight ball and place about 2" apart on a parchment lined baking sheet - you may need to use 2 sheets depending on the size. Slightly flatten each ball. Cover and let rise until doubled - another 30 to 45 minutes.

Preheat oven to 400.

In a small bowl, whisk together egg yolk and water. Gently brush egg wash over each bun.

Bake about 20-25 minutes, until golden and they sound hollow when tapped on the bottom. Transfer to a wire rack and cool completely.

Read more...

Tuesday, October 16, 2007

Warming up the oven with M&M Cookie Bars

M&M cookies bar


I am home! Although we are only away for 4 days, I feel like we have left for a long time. And the feeling of returning home is comforting. No more map navigating and eating out daily for awhile.

And here we are. Finally coming to the end of a series of interview processes. All the possibilities have been unfolded, and it's up to OCT to decide where we are going to call home next.Of course that has to be a place which best matches his career interest. Unfortunately, it has become apparent that we will not be going to Seattle, although both of us have left our hearts there. Too bad one can not make his career move based on where the best croissants (or coffee)are served.

Oh well, we won't be moving until next year, so I shouldn't be thinking too much about that now. When we touched down at St Louis last Saturday, we were greeted with a pleasantly cooler weather before we left. That made me miss my oven, and I couldn't wait to heat it up and bake a batch of something. But what should I bake? While we were in Atlanta, OCT teased me that I better bake/cook something or I would have nothing to update my blog. "You better do some experiments, or you won't have materials to publish!" He assimilated my blog to his research work.

M&M cookies barI decided to bake a batch of M&M cookie bars as home welcoming treats for us. Besides, I am looking for an opportunity to use up some of the pink M&Ms I bought. They are available this time of the year in support of the Susan G. Komen Breast Cancer Foundation and National Breast Cancer Awareness Month. Being a woman and having an aunt suffered from breast cancer, the National Breast Cancer Awareness Month holds a special place in my heart.

Seeing my aunt braved herself for the chemotherapy sessions and suffered the side effects from it, lossing her weights, hair and appetite; it saddened all our family members. How I wish she had armed herself with more information about breast cancer earlier and know to seek treatment sooner. She was diagnosed more than 2 years ago and started chemotherapy right away. Because of that, she couldn't attend my wedding. And I couldn't tell you how sad and disappointed I was, not having my favorite aunt there with me, on my big day.

So here's my contribution for the National Breast Cancer Awareness Month, and my wish that there will be better cure for the disease, and awareness of the disease among women around the world.

M&M cookies bar


M&M Cookie Bars

As seen in Joe's blog- Culinary in the Country

2 3/4 cups all-purpose flour, sifted
2 1/2 teaspoons baking powder
1/2 teaspoon salt
2/3 cup butter, melted (I let it go on the stove until it started to turn a little brown and nutty)
2 1/4 cups brown sugar
3 large eggs
1 teaspoon vanilla extract
2 cups M&M's

Preheat the oven to 350. Lightly spray a 10 X 15" jelly roll pan with non-stick spray.

In a large bowl, combine the flour, baking powder, and salt.

In another large bowl, combine the melted butter and brown sugar, stirring until evenly distributed. Allow to cool slightly. Add the eggs, one at a time, beating very well after each one. Mix in vanilla extract. Stir in the flour mixture and when combined add in the M&M's. Spread the batter into the prepared pan.

Bake for 24-26 minutes, until they are shiny and golden brown on top. Try not to overbake these or they will be dry. A cake tester will most likely not come out clean. Remove from the oven and cool completely before cutting.

*****Note: I cut the recipe in half and bake it in a 9x9 square baking pan. It takes 20 minutes to bake. Because I used 2 eggs, the texture of the cookie bars turned out on the cakey side.

Read more...

Monday, October 08, 2007

Where have I been?

Chocolate and Matcha Cupcakehey friends, I am so sorry to leave you without a word for such a long time. I had shamelessly tagged OCT along on his interview trip to Seattle. And since we made a trip there, we decided to spend a couple more days in that wonderful city. You know, sipping lattes and eating as much as we could, especially croissant, which we are seriously deprived of, here in St Louis. Well I hope I would plucker up enough courage to tackle that recipe when the weather gets cooler. Anyone wants to do this together? It's one of my to do list, along with losing weights. What an irony. ha!

So, that explained part of the reason of my absense and lack of entry. Another part was because I was down with flu. I call it the full package covering each and every spectrum of flu symptoms. Certainly that includes fever, sore throat, runny nose, coughing and lethargy. I spent a week having a good time in Seattle and another week a dreadful time, mostly on bed. And with this, I hope you will forgive me for not being able to visit and leave comments on your blogs and response promptly on the comments you left here.

Although I have not fully recovered, I am happy to inform that I am 90% there. And by Wednesday, I expect a full recovery. I HAVE to. Because I am tagging along for ANOTHER interview trip. This time, we are going to Atlanta. Even though it's a short trip. Hopefully we get to see, or rather, EAT as many yummy local cuisine as possible.

Chocolate and Matcha CupcakeBut I digress. The purpose of this post is to share with you another variation of my favorite low fat marble cake. I marbled two of my favorite ingredients: matcha and cocoa to produce these green and brown cupcakes. The matcha powder that I used was potent, so a teaspoon for a cup of batter (see recipe below) produced my desired color and taste. It has a clean green tea flavor without overpowering, in perfect harmony with its chocolate marbled half.

I have bought another 2 tiny tins of matcha powder from Seattle, enough to experiment with more ideas I have in mind!

Chocolate Matcha Marble Cake/Cupcake


2 cups cake flour
1 teaspoon baking powder
1/2 teaspoon baking soda
1/2 teaspoon salt
1 teaspoon instant espresso or coffee powder
1/3 cup dutch-process cocoa powder
1 1/3 cups sugar
1 whole egg
1 egg white
6 Tablespoons unsalted butter
1 cup low fat yogurt
1 teaspoons vanilla extract
1.5 teaspoons matcha powder

Have all ingredients at room temp. Preheat oven to 350 degrees with rack in the lower third of the oven. Spray 8-10 cup tube pan with cooking spray.

Use a whisk to combine four, baking powder, baking soda, and salt. Sift together. Set aside. In a small bowl combine the espresso powder, cocoa and 1/3 cup of the sugar with 1/4 cup of water. Whisk until smooth. Set aside. In another small bowl, whisk whole egg with egg white. Set aside.

Cut the butter into pieces and place in an electric mixing bowl. Beat for 1 minute to soften. Gradually add remaining 1 cup of sugar and beat at high speed for about 3 minutes. Dribble eggs in slowly, about 1 T at a time, beating constantly for about 2 minutes. On low speed, beat in a third of the flour mixture. On medium-high speed, beat in half of the yogurt. On low speed, beat in half of the remaining flour. On high speed, beat in the rest of the yogurt and the vanilla. On low speed, beat in the remaining flour.

Measure out 1 1/2 cups of yogurt batter and mix into the cocoa mixture. Set aside. Add matcha powder to the rest of the yogurt batter in the mixing bowl.

Use a large spoon to fill the bottom of the pan with about three quarters of the green batter placed in dollops. Cover the green batter with dollops of chocolate batter. Top the chocolate batter with small dollops of green batter spaced so that the chocolate batter shows through. Use a table knife to marble the batters together with a circular or zigzag motion; be careful not to blend them too much.

For cupcakes, scoop a heaping tablespoon of either green or brown batter into each paper liner, and cover it with the alternate batter. Marbling the batter with a knife is optional. If you do not marble the batter, you will get a two tone cake instead of a marble cake. Which I think looks equally elegant and appealing.

Bake for 45-50 minutes for cake, (20-25 minutes for cupcakes) or until the cake starts to pull away from the sides of the pan and a toothpick inserted in comes out clean.

Cool for 10-15 minutes on a rack. Unmold the cake. Cool completely before serving or storing.

Read more...
Related Posts with Thumbnails