Monday, December 31, 2007

Happy New Year!

Dear family and friends,

happy 2008!


Just want to wish you a blessed and happy new year on my last post in 2007! Thank you for your visits and support for the past year, I greatly appreciate all the kind comments and heart-warming encouragement.

2007 has been a great year. We are now looking forward to 2008, excited with prospects of moving to Atlanta and the opportunities/challenges that lie ahead.

chocolate santas

"opps, seems like we are late! Hope you have had a great Christmas!"

I hope that 2008 is a smashing good year for everyone!

I promise there will be more delicious recipes coming on this blog next year.

Read more...

Saturday, December 22, 2007

Daring Bakers December Challenge : Yule Log

yule log

I am excited when I knew that we are making Yule Log for our December Daring Baker challenge.I have been toying with the idea of making one for Christmas since November but just isn't sure if I will have the determination to follow through. Since our hosts Ivonne and Lis have chosen Yule Log as our December challenge, I have no reason not to make it this year!

yule log


After much procastination, I made my yule log last Monday for OCT department Christmas party on the next day. Initially I was planning to play around with the filling, but I love coffee flavor so much that I decided to just stick with the coffee buttercream as filling and frosting. I added Kahlua in the buttercream instead of brandy, which the recipe suggested. I also added a thin layer of Nutella in the filling to make it extra decadent. That was the creativity I have left after many rounds of cookie recipes testing.

The Yule Log was well received at the party and I wished I brought my camera along. The meringue mushrooms piqued the interest of a few children in the party and they are intrigued by its appearance and "melt in the mouth" texture.

yule log


The Yule log is a fun and rewarding challenge and I can't wait to meet the other 400+ yule logs. Be sure to check out the Daring Bakers Blogroll to see other beautiful creations my fellow Daring Bakers come up with! Maybe you will get inspired to make one for Christmas too.

IMGP6302

Genoise cooling and waiting to be filled

I wish I could tell you more about this month challenge, but time is of the essence around here. There's a cheesecake baking in the oven and many cookies that needed to be decorated and packed for our party tomorrow. OCT is helping me pack some of the cookies while I sneak out to blog here. I should have started the cookies baking earlier. Maybe I will start in October next year.Or maybe June, given my snail-like speed.


Yule Log
from Perfect Cakes by Nick Malgieri and The Williams-Sonoma Collection: Dessert

Plain Genoise:

3 large eggs
3 large egg yolks
pinch of salt
¾ cup of sugar
½ cup cake flour - spoon flour into dry-measure cup and level off (also known as cake & pastry flour)
¼ cup cornstarch
one (1) 10 x 15 inch jelly-roll pan that has been buttered and lined with parchment paper and then buttered again

(note: I made a chocolate genoise. To make a chocolate genoise, use 1/3 cup cake flour, 1/3 cup corn starch and 1/4 cup cocoa powder)

1.Set a rack in the middle of the oven and preheat to 400 degrees F.

2.Half-fill a medium saucepan with water and bring it to a boil over high heat. Lower the heat so the water is simmering.

3.Whisk the eggs, egg yolks, salt and sugar together in the bowl of a heavy-duty mixer. Place over the pan of simmering water and whisk gently until the mixture is just lukewarm, about 100 degrees if you have a thermometer (or test with your finger - it should be warm to the touch).

4.Attach the bowl to the mixer and, with the whisk attachment, whip on medium-high speed until the egg mixture is cooled (touch the outside of the bowl to tell) and tripled in volume. The egg foam will be thick and will form a slowly dissolving ribbon falling back onto the bowl of whipped eggs when the whisk is lifted.

5.While the eggs are whipping, stir together the flour and cornstarch.

6.Sift one-third of the flour mixture over the beaten eggs. Use a rubber spatula to fold in the flour mixture, making sure to scrape all the way to the bottom of the bowl on every pass through the batter to prevent the flour mixture from accumulating there and making lumps. Repeat with another third of the flour mixture and finally with the remainder.

7.Scrape the batter into the prepared pan and smooth the top.

8.Bake the genoise for about 10 to 12 minutes. Make sure the cake doesn’t overbake and become too dry or it will not roll properly.

9.While the cake is baking, begin making the buttercream.

10.Once the cake is done (a tester will come out clean and if you press the cake lightly it will spring back), remove it from the oven and let it cool on a rack.

Coffee Buttercream:

4 large egg whites
1 cup sugar
24 tablespoons (3 sticks or 1-1/2 cups) unsalted butter, softened
2 tablespoons instant espresso powder
2 tablespoons rum or brandy (I used Kahlua)

1.Whisk the egg whites and sugar together in the bowl of an electric mixer. Set the bowl over simmering water and whisk gently until the sugar is dissolved and the egg whites are hot.(around 160F)

2.Attach the bowl to the mixer and whip with the whisk on medium speed until cooled. Switch to the paddle and beat in the softened butter and continue beating until the buttercream is smooth. Dissolve the instant coffee in the liquor and beat into the buttercream.


Meringue Mushrooms:

3 large egg whites, at room temperature
¼ teaspoon cream of tartar
½ cup (3-1/2 ounces/105 g.) granulated sugar
1/3 cup (1-1/3 ounces/40 g.) icing sugar
Unsweetened cocoa powder for dusting

1.Preheat the oven to 225 degrees F. Line 2 baking sheets with parchment. Have ready a pastry bag fitted with a small (no. 6) plain tip. In a bowl, using a mixer on medium-low speed, beat together the egg whites and cream of tartar until very foamy. Slowly add the granulated sugar while beating. Increase the speed to high and beat until soft peaks form when the beaters are lifted. Continue until the whites hold stiff, shiny peaks. Sift the icing sugar over the whites and, using a rubber spatula, fold in until well blended.

2.Scoop the mixture into the bag. On one baking sheet, pipe 48 stems, each ½ inch (12 mm.) wide at the base and tapering off to a point at the top, ¾ inch (2 cm.) tall, and spaced about ½ inch (12 mm.) apart. On the other sheet, pipe 48 mounds for the tops, each about 1-1/4 inches (3 cm.) wide and ¾ inch (2 cm.) high, also spaced ½ inch (12 mm.) apart. With a damp fingertip, gently smooth any pointy tips. Dust with cocoa. Reserve the remaining meringue.

3.Bake until dry and firm enough to lift off the paper, 50-55 minutes. Set the pans on the counter and turn the mounds flat side up. With the tip of a knife, carefully make a small hole in the flat side of each mound. Pipe small dabs of the remaining meringue into the holes and insert the stems tip first. Return to the oven until completely dry, about 15 minutes longer. Let cool completely on the sheets.

Assembling the Yule Log:

1.Run a sharp knife around the edges of the genoise to loosen it from the pan.

2.Turn the genoise layer over (unmolding it from the sheet pan onto a flat surface) and peel away the paper.

3.Carefully invert your genoise onto a fresh piece of parchment paper.

4.Spread with half the coffee buttercream (or whatever filling you’re using).

5.Use the parchment paper to help you roll the cake into a tight cylinder.

6.Transfer back to the baking sheet and refrigerate for several hours.

7.Unwrap the cake. Trim the ends on the diagonal, starting the cuts about 2 inches away from each end.

8.Position the larger cut piece on each log about 2/3 across the top.

9.Cover the log with the reserved buttercream, making sure to curve around the protruding stump.

10.Streak the buttercream with a fork or decorating comb to resemble bark.

11.Transfer the log to a platter and decorate with your mushrooms and whatever other decorations you’ve chosen.

Read more...

Wednesday, December 19, 2007

More Cookies: Nutella Two Tone Cookies + Cherry Garcia

Are you done with your Christmas cookies yet? I hope your answer is no. Because I haven't either. Although I have baked some cookies earlier to send to a special friend, and test baked a few batches of various recipes to see if they were good. I haven't really make any progress on the actual cookies I am going to give away yet!

nutella two tones cookies


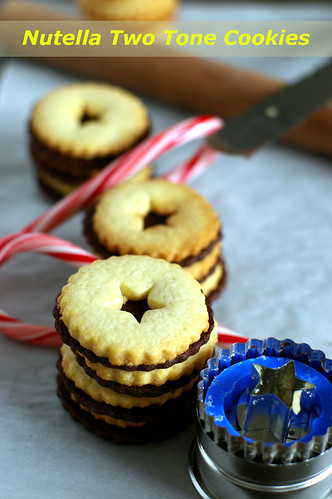
What a procastinator I am. Luckily for me, all the new recipes I tried so far have turned out pretty well, and I know I will be proud to give them away. Among them are these "Nutella Two Tone Cookies". The inspiration comes from the December issue of Bon Appetit magazine. When I saw the chocolate rolled out cookies recipe, I liked it immediately. Because it incorporated melted chocolate in the dough.Yum!

To make it extra special, I decided on a two tone cookies theme, using the chocolate rolled out cookies recipe and the vanilla rolled out cookies from the same issue. The filling will be Nutella, my favorite chocolate hazelnut spread. Voila, there you have it, another cookie recipe for the cookies tray.

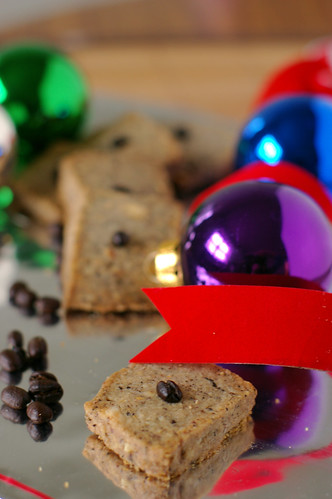
Another type of cookies, which is a must for me, is biscotti. I recently found a new recipe that I really enjoy on Nicole's blog-Baking Bites. She named the biscotti- Cherry Garcia, after one of Ben & Jerry famous ice cream flavor. I added a handful of chopped pistachio to the dough for color, and the test batch was sent off to a far away destination. Another batch of these biscottis have just came out from the oven. In my opinion, Nicole's Cherry Garcia tastes so much better than the B&J's ice cream itself. Now I am debating if they should be given away, or I could save them for myself!

Cherry, chocolate and pistachio biscotti


Nutella Two Tone Cookies
inspired by Bon Appetit Dec 2007

1 batch of vanilla rolled out cookies (recipe below)
1 batch of chocolate rolled out cookies (recipe below)
Nutella

Bake and cool the cookies as instructed. Sandwich a thick layer of Nutella in between the cookies.

For vanilla rolled out cookies:
adapted from Bon Appetit Dec 2007

10 tablespoons (1 1/4 sticks) unsalted butter, room temperature
1/2 cup sugar
1/4 teaspoon salt
1 large egg
1 1/4 teaspoons vanilla extract
2 cups all purpose flour

Using electric mixer, beat butter in large bowl at medium speed until smooth and creamy, about 2 minutes. Add sugar and salt and beat until pale and fluffy, about 2 minutes. Add egg; beat until well blended, about 1 minute. Reduce speed to low and beat in vanilla. Add flour and beat on low speed just to blend. Gather dough into ball; divide in half. Form each half into ball and flatten into disk. Wrap disks separately in plastic and chill until firm, at least 4 hours. DO AHEAD: Can be made 2days ahead. Keep chilled.

Position rack in center of oven; preheat to 350°F. Line 2 baking sheets with parchment paper. Working with 1 disk at a time, roll out dough between 2 sheets of waxed paper to 1/8-inch thickness for smaller (2-inch) cookies and 1/4-inch thickness for larger (3- to 4-inch) cookies. Using decorative cookie cutters, cut out cookies and transfer to prepared sheets, spacing 1 inch apart. If cookies become too soft to transfer to baking sheets, place in freezer on waxed paper for 5 minutes before continuing. Gather scraps, roll out dough, and cut more cookies, repeating until all dough is used. If not icing cookies, decorate with sprinkles or other sugar toppings, if desired.

Bake 1 sheet at a time until cookies are firm on top and golden around edges, about 10 minutes for smaller cookies and up to 14 minutes for larger cookies. Cool completely on rack.

For Chocolate Rolled Out Cookies:
adapted from Bon Appetit Dec 2007

2 1/2 cups all purpose flour
1/4 cup unsweetened cocoa powder ( I used Dutched Processed Cocoa)
1/2 teaspoon baking powder
1/2 teaspoon salt
1/4 teaspoon baking soda
1/2 teaspoon ground cinnamon (optional)
3 ounces bittersweet chocolate, chopped
1 cup (2 sticks) butter, room temperature
1 1/3 cups sugar
1 large egg
1/2 teaspoon vanilla extract

Sift first 5 ingredients and cinnamon, if desired, into medium bowl. Stir chocolate in metal bowl set over saucepan of simmering water until melted and smooth. Set aside. Using electric mixer, beat butter in large bowl at medium speed until smooth and creamy, about 2 minutes. Add sugar and beat until mixture is pale and fluffy, about 2 minutes. Add egg; beat until well blended, about 1 minute. Reduce speed to low and beat in vanilla and chocolate. Add flour mixture and beat on low speed just to blend. Gather dough into ball; divide in half. Form each half into ball and flatten into disk. Wrap disks separately in plastic and chill until firm, at least 4 hours. DO AHEAD: Can be made 2 days ahead. Keep chilled. Let stand at room temperature 30 minutes before rolling out.

Position rack in center of oven; preheat to 350°F. Line 2 baking sheets with parchment paper.

Working with 1 disk at a time, roll out dough between 2 sheets of waxed paper to 1/8-inch thickness for smaller (2-inch) cookies and 1/4-inch thickness for larger (3- to 4-inch) cookies. Using waxed paper prevents you from adding too much flour, which will make the cookies tough.

Using decorative cookie cutters, cut out cookies. Cold dough is much easier to work with. If it gets warm as you're cutting out the cookies, place the dough—waxed paper and all—in the freezer for about 5 minutes.

Use an offset spatula to peel away the excess dough and transfer the cookies to parchment-lined baking sheets, spacing 1 inch apart. Gather scraps, roll out dough, and cut more cookies, repeating until all dough is used. If not icing cookies, decorate with sprinkles or other sugar toppings, if desired.

Bake 1 sheet at a time until cookies are firm on top and slightly darker around edges, about 9 minutes for smaller cookies and up to 12 minutes for larger cookies. Line baking sheets with fresh parchment as needed. Cool completely on rack.

Cherry Garcia Biscottis
adapted from Baking Bites

2 1/2 cups all purpose flour
1/2 tsp baking soda
1/2 tsp baking powder
1/2 tsp salt
pinch freshly grated nutmeg
3 large eggs, room temperature
1 cup sugar
1 1/2 tsp vanilla extract
1/2 cup dried bing cherries, roughly chopped
1/2 cup dark chocolate chunks/chocolate chips
1/2 cup pistachio, roughly chopped

Preheat oven to 350F. Line a baking sheet with parchment paper.

Whisk together flour, baking soda, baking powder, salt and nutmeg in a medium bowl.
In a large bowl, beat eggs, adding sugar gradually, at medium speed until smooth and fluffy, 2-3 minutes. At low speed or by hand, stir in flour mixture followed by cherries, pistachio and chocolate.

Drop spoonfuls of batter into long lines on prepared baking sheet and, with well floured hands, shape the irregular lines into rectangular logs about 1/2 inch high. Length and width are your prerogative, and you can use more than one baking sheet, if necessary. Bake at 350F for 20 minutes, until logs are a light gold color and are fully set (they will spring back slightly when touched with a finger).

Slice logs into 1/3-1/2 inch thick slices (1-1.5 cm) and lay flat (on their sides) on baking sheet.

Lower oven temperature to 300F. Bake sliced cookies for 15 minutes, flip them and bake for an additional 15 minutes. If cookies are not firm, depending on how thickly they were sliced, turn again and bake for 10 more minutes. Remove to a wire rack to cool. Store in an airtight container.

Makes about 4 dozen.

Read more...

Friday, December 14, 2007

Christmas Cookies from other blogs

I was talking with OCT yesterday about our Christmas cookies project. I suggested that he bakes and decorates a batch of cookies we intend to give away. The scientist who works so efficiently on complicated zillion steps experiments gave me the excuse that it is too tough! And guys are not good at making cookies, etc. Excuses, excuses.

So I guess I have to do the baking and let him be the critic: " Hmmmm, this cookie is good, this one is too ugly, this one tastes too complicated, I think this is too hard". Sigh....

Anyway, back to the cookies. I have already tried out a few recipes, and are quite pleased with how they turned out. Meanwhile, here's the first cookies for the Christmas season:

hot chocolate cookies


When I first saw it on Joe's blog: Culinary in the Country , I know I wanted to make it. Not only does the cookies look irresistible, it is also a good use for the long forgotten Godiva Milk Chocolate Cocoa mix I have somewhere in the carbinet. And to be perfectly honest, I find it too sweet to my taste. Great, the Cocoa mix has a better place to go than into the bin! Win-win situation.

In my opinion, what makes these cookies special, are the marshmallows and chocolate drizzle on top. I like the nice contrast of crisp cookies and soft marshmallow, sweetness from the cookies and marshmallow, and the bitterness from 72% melted chocolate. The flavor is balanced in an interesting way. It takes slightly more time than the usual drop or slice cookies, as you have to bake the cookies half way through, and add the marshmallow on top towards the end. After that, they have to be cooled before the melted chocolate can be drizzled. But they are real treats.

hot chocolate cookie


I think I will try it with the dark cocoa mix when I make it next time.

The second recipe is a simple recipe with simple ingredients and pure flavor. Perfect accompaniment with a cup of coffee after dinner. I am talking about the Coffee Hazelnut Cookies from Alice Medrich's latest book "Pure Dessert", which I first saw it on Cenk's beautiful blog-Cafe Fernando. Cenk is a real artist. He can make any food looks good. Go to visit his blog if you haven't already!

coffee hazelnut cookies


Taking a glance at the ingredients list, I know this is the kind of cookies I would enjoy. Freshly grounded coffee beans and grinded hazelnuts is a flavor combo for success. The cookies are a real treat: nutty with a hint of coffee. I don't think I like it on the first bite, but as I continue chewing the cookies and allow the flavor to fill my orifice, I suddenly understand the depth and sophistication of the cookies I have just eaten. Wow. I like it.

When I served it to friends on another night, I dipped them in some chocolate gananche, leftover from a cake. I think I like the version with gananche better. Chocolate, coffee and hazelnut. My adulterated version of the "Pure Dessert".

coffee hazelnut cookies


I baked half a batch of the cookies and have half a batch of dough in the freezer. I will dip them on some tempered chocolate when I am playing with chocolate next week. (I shouldn't have used gananche because it doesn't harden and certainly isn't too impressive to look at.... )

Anyway, I am looking forward to playing with more sugar and trying my hands at candy making next week! But now, I have to think of what to bring for OCT department Christmas party next Tuesday. Arghhh...

logoI am submitting these cookies recipes to Susan's Eat Christmas Cookies event. Remember to check out her blog for more Christmas cookies ideas! And better yet, join in the fun and submit a cookie recipe, she has decided to award the best cookie with Sherry Yards' latest cookbook:Desserts by the Yard: From Brooklyn to Beverly Hills: Recipes from the Sweetest Life Ever . She is such a generous girl.


Hot Chocolate Cookies
Adapted from Land O Lakes, via Culinary in the Country
makes about 48 cookies.

For the cookies:

1 3/4 cups all-purpose flour
1 cup instant hot chocolate cocoa mix - I used a milk chocolate variety
1 teaspoon baking soda
1/2 teaspoon salt
12 tablespoons unsalted butter, softened
1/2 cup granulated sugar
2 large eggs
1/4 cup milk
1 teaspoon vanilla
24 large marshmallows, cut in half crosswise

For the chocolate drizzle:
1.5 ounces of bittersweet chocolate, chopped


Preheat oven to 350.

In a medium bowl, whisk together flour, cocoa mix, baking soda and salt.

In a large mixing bowl, beat together butter and sugar until creamy. Add the eggs, one at a time, mixing until combined after each. Mix in milk and vanilla. Add the dry ingredients and mix just until combined.

Using a teaspoon cookie scoop, drop the dough onto parchment lined baking sheets. Bake until the cookie are set, about 8 minutes. Remove and carefully place a marshmallow, cut side down, in the center of each cookie. Place back in the oven and continue baking until the marshmallow begins to look puffy, about 1 to 2 minutes. Remove and let cookies sit on the baking sheet for 1 minute before moving them to a wire rack to cool completely.

To make the chocolate drizzle:

Melt the chopped chocolate in microwave on high for 30 second.

Pour the melted chocolate into a zipper bag, and cut a slit at one corner. Unleash the Picaso in you and pipe away!


Coffee Hazelnut Cookies
adapted from "Pure Dessert", via Cafe Fernando

Makes 45 2-inch cookies

Ingredients

2 cups all purpose flour
1 cup hazelnuts (whole)
3/4 cup sugar
1/4 tsp salt
2 tsp fresh finely ground medium-roast coffee beans, plus 45 whole beans
14 tbsp unsalted butter
1 1/2 tsp pure vanilla extract


Combine the flour, hazelnuts, sugar and salt in the bowl of a food processor and pulse until the hazelnuts are finely ground. Add the ground coffee and pulse to mix. Add the butter and pulse until the mixture is crumbly.

Drizzle in pure vanilla extract and pulse until the dough begins to clump up around the blade.
Remove the dough and press it into a ball. Knead a few times to complete the mixing.
At this point, you can either roll the dough into a 12×2 inch log or divide the dough in half and form into 2 flat patties.

Wrap it and refrigerate at least two hours (or overnight).

Preheat the oven to 350 F.

If you rolled the dough into a log, cut into 1/4 inch slices and place on ungreased sheets 1 inch apart. Press a coffee bean into the center of each cookie.

Or if you formed the flat patties, roll the dough between two pieces of wax paper to a thickness of 1/4 inch. Using cookie cutters, cut out cookies and place on ungreased sheets 1 inch apart.
Press a coffee bean into the center of each cookie.
Bake until golden at the edges, 14-16 minutes. Let cookies firm up at room temperature before you transfer to a rack.

Cookies can be stored in an airtight container for at least a month.

Instruction for people without a food processor and mixer:
Mix all the dry ingredients well in a large bowl. Grind the hazelnuts in batches, (depending how large your grinder is.Mine is a small one)add it to the flour, followed by grinding the coffee beans.

Mix all the dry ingredients well with a spatula.

Cut the butter into dry ingredients using a pastry cutter, add in the vanilla. Continue to work at it until it becomes a clump.(you can use two forks too if you don't have a pastry cutter)

Remove the dough and knead a few times to complete the mixing. Follow the recipe above to chill, shape and bake the cookies.

Read more...

Tuesday, December 11, 2007

Peppermint Cookie and Cream Brownies

peppermint cookie & cream brownies


I couldn't believe Christmas is only 2 weeks away, and I haven't even started baking a single cookies yet. Must be the old man winter that makes me feel really moody and lethargic. I have been craving for other kinds of comfort food, such as hot soup, noodle and dark chocolate instead of cookies.

Having said that there are some recipes that are so good that beckon to be made immediately. I am talking about the Peppermint Cookie and Cream Brownies on Nicole's Blog- Baking Bites, which is inspired by Trader Joe's Peppermint Jo Jo. If you are lucky to see this stuff in your local Trader Joe, grab one. Or better, 2 or 3 or 4 or forget it- make it a dozen. You can use some to make this fantastic brownies .

peppermint cookie & cream brownie


I couldn't stop munching the cookies ever since I bought a pack of Trader Joe's Peppermint Jo Jo last week. Just when I almost finished half of the cookies on the first day, I saw Nicole's brownie recipe on her blog. Without a second of hesitation, I got up from my seat and made the brownie.

peppermint cookie & cream brownies


The brownie was just as Nicole described :"Fudgy. Rich. Intense. Chocolaty. Pepperminty. Amazing." Perfect dessert to be shared with others. I packed some for the staff from my apartment building and some for OCT's colleagues.

Of course I saved a few pieces for myself too, it's perfect with my favorite Japanese Green tea!

brownie and tea

I think I better start going through the Christmas Cookies I have bookmarked to. Stay tune for cookies recipes ahead!


Peppermint Cookie and Cream Brownies
as seen on Baking Bites


1 cup butter
6 oz. unsweetened chocolate, chopped
3 cups sugar
1/2 tsp salt
2 tsp vanilla extract
4 large eggs, room temperature
1 2/3 cups all purpose flour
1/3 cup unsweetened cocoa powder (I used Dutched Processed Cocoa)
3 cups roughly chopped peppermint oreo-type cookies (approx 18)

Preheat oven to 350F. Line a 9×13-inch baking pan with aluminum foil, and grease lightly.

In a medium-large saucepan over low heat, melt together butter and chocolate, stirring occasionally. Whisk in sugar, salt and vanilla, then turn off heat. Whisk in eggs one at a time, waiting until each is fully incorporated before adding the next. Stir in flour and cocoa powder until mixture is uniform. Stir in peppermint oreo cookies and pour batter into prepared pan. Crush 3-4 additional cookies finely and sprinkle on top of batter, if desired.

Bake for about 35 minutes, until a toothpick inserted into the center comes out with moist crumbs, but not coated with batter.

Cool brownies in pan for about 20 minutes, then lift brownies in the foil out of the pan and place on a wire rack to cool completely before slicing.

Makes 36 brownies (or 48 bite-sized brownies).

Read more...

Wednesday, December 05, 2007

An apple a day...

autumn apple cheesecake


I bought a huge bag of apples the week before thanksgiving for munching and baking. OCT and I love eating the honey crisp out of hand and Fuji in a Chinese dessert soup.(See photo at the bottom of this post) While I used most of the apples in the Normandy Apple Tart, I found 3 Granny Smith sitting awkwardly in the fridge a few days ago.

If they can think, they must be wondering when will be their turn to shine, like their cousins Jonathan, golden delicious and MacIntosh in the gorgeous Normandy Apple Tart. The thing I like about apples is, they have a long fridge life. There was once I bought some apples and totally forgot about them until a month later. They were tranformed into an apple pie and tasted just as delicious as those plucked from the tree one hour ago.

I asked the Granny Smiths if they wanted to be apple pie in their afterlife, but they promptly declined. They wished to be something sophisticated. "How about cheesecake?" I suggested. "Sounds yummy" Granny Smith granted me their approvals.

apple cheesecake


So apple cheesecake it is. I turned to the one apple cheesecake recipe I have bookmarked since last year and started to peel, core and slice the apples. They were then tossed with lemon juice to prevent discoloring. In the original recipe, cinnamon graham crackers are used for crust. But I opted for the vanilla wafers because I have some approaching expiring. Crushing them with my pestle in a mixer bowl until they become fine crumbs. I consider this as my dose of exercise for the day while watching Rachael Ray cooked on TV.

crushed vanilla wafers for cheesecake


Next, I sauted the apple while leaving the crust to bake in a 350F preheated oven. When the crust has turned a golden hue after about 10 minutes, I removed it from the oven and turned the temperature to 325F. A higher temperature, as most experienced bakers would know will cause the cheesecake to crack, and lend it an unappealing look.

When the apples are soft and slightly caramelized, I let it cool on a spot near the window before laying them on the crust. Moving on to the cream cheese filling, I creamed 2 blocks of 1/3 Less Fat Neufchâtel cream cheese and one block of original cream cheese instead of using 3 blocks of original cream cheese. This is to save myself and other eaters some calories, so that we can have a bigger serving. After creaming the cream cheese + sugar mixture, I hesistated for 30 seconds, debating with my unadventurous self if I should add the 1/4 tsp of ground ginger into the mix. As much as I love using fresh ginger in my savory dishes, I am not familiar with its ground version. I dumped it in nevertheless, hoping that Tish Boyle is right.

At this point, the crust and cooked apples are cooled and ready to be used. I tasted one slice of the apples, find them addictively tasty and reached for second. Then I remembered I was supposed to line them on top of the crust..Opps. Luckily I have enough apples to cover the naked crust. Cream cheese filling was then poured in before I sent the cake into the 325F sauna oven.

According to the recipe, the cake is to be baked in a hot water bath but my roasting pan was already packed after Thanksgiving, ready to be given away. So I improvised by adding a pan of hot water in the 9x9 inch square baking pan on the lower rack.

Fast forward 40 minutes later, when I went back to check, the cheesecake cracked in the center, and all around its sides! I suspect my oven temperature is a bit off after working incessantly for the past years. I doubted the past tenants have it worked as hard as I do. Anyway, I make a mental note to get an oven thermometer soon.

Cracked cheesecake


I did my best to cover up the crack in the center with the remaining cooked apple slices, and rendered it a rustic look (cracked sides and all). Appearance aside, the apple cheesecake was surprisingly delicious. I am not blowing my own trumpet, it is afterall, Tish Boyle's brilliant recipe.

apple cheesecake

The cinnamon and ground ginger added a subtle but intriguing warm undertone to the cheesecake, while the cooked apple, slightly tart granny smith, cut through the creamy cheesecake and bear the reminiscent of an apple pie. My mouth is salivating while recounting the flavor of the cheesecake. I know my descriptions simply doesn't do it justice. So I urge you to give this cheesecake a try, if I may be ever so pushy. The granny smith hiding somewhere in your fridge will thank you.

Apple Cheesecake


Even better if you have that fancy schmancy butane/propane torch. For the original recipe - Apple Cheesecake Brulee has a layer of caramelized sugar covering the top. I can only imagine how fantas-licious it would be. I have to add the torch in my Christmas wishlist.


Other desserts that I made with the mixed bag of apples:

apple white fungus tongsui


A refreshing and nourishing apple dessert soup I learned from my ex-housemate. Piggy also made a more elaborate version with recipe, here.

apple tong sui


And of course, most of the apples went into this Normandy Apple Tart

Normandy Apple Tart


Apple Cheesecake
adapted from Tish Boyle's- The Cake Book


apple layer
2 medium Granny Smith apples
1 tablespoon freshly squeezed lemon juice
2 tablespoons (1 oz/28g) unsalted butter
2 tablespoons (0.9 oz/ 25g) granulated sugar
3 tablespoons (45ml) heavy cream

Vanilla Wafer Crust
1 1/4cups (5.3 oz/150g) vanilla wafer
3 tablespoons (1.3 oz/ 37g) granulated sugar
4 tablespoons (2 oz/57g) unsalted butter, melted

Cream Chesse Filling
3 blocks of cream cheese (1 original and 2 1/3 Less Fat Neufchâtel ), softened.
1 1/2cups (10.5 oz/300g) granulated sugar
2 teaspoons vanilla extract
Pinch of salt
1/4 tsp ground cinnamon
1/4 tsp ground ginger
1/2 cup (4.2 oz/ 121g) sour cream, at room temperature
1 tablespoon cornstarch
4 large eggs, at room temperature

Brulee topping (optional)
1 1/2 tablespoons granulated sugar

Position a rack in the center of the oven and preheat the oven to 350F. Grease a 9x3 inch springform pan and wrap the sides with heavy duty aluminium foil.

To make the apple layer,
Peel, core and slice the apples into 1/4-inch. Toss with lemon juice until all slices are evenly coated.

Melt butter in a large skillet over medium heat. When the butter is bubbling, add the apple and saute for 2 minutes. Sprinkle the sugar over apple and continue to cook, stir frequently until the apple slices are nicely browned, about 5 minutes. Add in cream and cook until apples are tender,about 10 minutes. Remove from heat and set it aside to cool.

To make the crust,
In a medium bowl, combine the crumbs, melted butter and granulated sugar. Pat the mixture evenly into the bottom of the prepared pan. (I like to use a 1/4 measuring cup for this task.) Bake for 8 minutes until the crust turns golden.

Reduce the oven temperature to 325F after the crust is baked.

Let the crust cool on wire rack while working on the cream cheese filling.

When the apples are cool, arrange a tight circle of slices, without overlapping them, around the edge of the pan, on top of the crust. Arrange another circle of slices in the center, covering the crust completely. (Save the remaining apples for garnish/ camoflauge the cracks later)

To make the filling,
In a bowl of an electric mixer, using the paddle attachment, beat the cream cheese at medium low speed until creamy and smooth, about 2 minutes. Gradually add granulated sugar and beat until blended. Add the vanilla extract, salt, cinnamon, ground ginger, sour cream and cornstarch and mix until well blended. At low speed, add in eggs, one at a time, mixing well after each addition and scraping down the sides of the bowl with a rubber spatula as needed.

Scape the batter over the apple layer. Place the pan in a roasting pan or a large baking pan. Pour enough hot water into the roasting pan to come about 1 inch up the side of the springform pan. Bake the cake in the water bath for 70 to 80 minutes (Mine was not baked in a water bath and hence was done in about 45 minutes.) until the center is set but slightly wobbly (the cake will continue to set as it cools). Remove the pan from the water bath, if using, and set it on a wire rack to cool completely.

Refrigerate the cheesecake for at least 4 hours before serving.

To make the topping (optional),
Let the cheesecake chilled for at least 4 hours. Run a knife between the edges of the pan and the cake to loosen. Remove the side of the pan. Sprinkle the sugar over the top of the cake, covering it with a very thin, even layer. Caramelize the sugar using a butane or propane torch, holding it about 2 inches from the surface of the cake and slowly moving it over the top until the sugar melts and turns golden brown (the sugar will not brown evenly; be patient- this process can take a while, depending on the kind of torch you use)

Read more...

Monday, December 03, 2007

OCT cooks: Pineapple Fried Rice

This article is brought to you by OCT. It is his first attempt at writing a food related article, which I certainly hope won't be his last!

pineapple fried rice


It has been ages since I last made something for Mandy, or for that matter, cook in the kitcken. I consider myself very lucky to come home every evening to either new menu or tasty meals. The days where I have to reheat my 3 day old food seems a distant memory.

Occupied with work, the time I have with Mandy is mostly spent on meals and grocery shopping. The latter is what I look forward to most every weekend. There were lots of pineapple in Soulard market that Saturday, and we decided we would like to make pineapple fried rice.

Pineapple Fried Rice


Before Mandy came to St. Louis, pineapple fried rice was my favorite dish for any Singaporean gathering. However, I used to cook with canned pineapple and ready-made seasoning packet (from Asian Gourmet).

Pineapple


Here, we used fresh pineapple and Mandy prepared her own seasoning for the fried rice. Mandy is quite good in making sauces that often taste "multi-dimensional". I am more obessed in food presentation, as you can see from all the finely minced vegetable and meat ingredients.

Ingredients for pineapple fried rice


A big wok on direct fire stove would be ideal for frying rice. Unfortunately we only have a medium size non-stick pan on electric stove. As a result, I have to fry the various ingredients separately to saute the meat and caramelise the vegetables. Shrimps, sliced sausages and imitate crab meat were pan-fried in oil with garlic and shallot. They were set aside as I continued frying the carrot and asparagus. Frying in batches imparts more flavour to the food and prevent them from being overcooked. The cooked vegetables were removed from the heat as I proceeded with the rice.

The key to flavorful rice lies in controlling the temperature of the ingredients in the pan. I learnt from a cook show that 3 cycles of "cold & hot" treatment is critical. Briefly, the first cycle is to add cold rice (refrigerated cooked rice) to a hot pan of garlic and oil and fried until the rice became hot. The next cycle is to add the sauce onto the rice. The mixture was cooked until the sauce became evenly distributed and dried. The smell of evaporated sauces and wine indicates that the pan has reached the desired heat. The third cycle ends with the adding of minced pineapple onto the rice. The rice was fried again until it became dried. It is important that the steamed rice is cold. Although considered as "cold step", the sauces and pineapple can be at room temperature.

Pineapple Fried Rice


Finally, the vegetables and meats were added onto the rice and fried for several minutes. I admit that the frying process was quite a strenous exercise and two spatulas were used all the time to ensure complete mixing of all the ingredients. The point when the rice looked dried and some of them beginning to get charred indicates that the dish is done. This usually takes about 5-8 minutes. Last but not least, we put peanuts (Planter's party peanuts) and pork floss onto the fried rice.

I thought it really tasted good...hmm I am feeling hungry again as I typed. Mandy really has the sauces blending well with the pineapple. If you have time, we would suggest you replacing sausages with chicken. The reason being sausages tend to dominate other ingredients with their strong taste.


Edit: Upon finishing his debut entry, OCT is now munching on the lemon lavender cake Mandy made last Friday.

OCT's Pineapple Fried Rice

2.5 cups cooked rice
1/2 cup cubed imitation crab
4 oz sliced sausages
8 large shrimps, shelled, deveined (5 oz/150g
1/2 cup pineapple chunk
vegetable oil
1 tbsp chopped garlic
1/2 tbsp sambal oelek (or more)
1 small shallot, minced
1 cup of finely diced carrot
3 tbsp soya sauce
2 tbsp fish sauce
1/4 cup pineapple juice from the pineapple
1/2 tsp black pepper
1/3 cup roasted unsalted peanut
1/2 cup sliced asparagus
2 stems green onion, thinly chopped
strips of red pepper
pork floss and sesame seed for garnish (optional)


Heat 2 tablespoons of oil in a wok (or a large frying pan) until it is just about to smoke. Add carrot, stirfry for about 1 minutes, until it slightly caramelised. Add garlic and shallot and stirfry for 30 seconds.Remove from pan.

In the same frying pan, add 1 tbsp oil, add sausages and shrimps and stirfry for 1-1.5 minutes, until the prawns turn pink and edges of the sausages brown, remove the ingredients from pan, then decrease heat to medium high.

Add the cold rice to the pan,breaking it up with the wooden spoon.Add sambal oelek, soy sauce,pineapple juice and fish sauce on the rice and then using a shoveling motion to combine the sauce and rice, making sure that all the rice has broken into individual grains and covered with sauce. Toss the carrot, garlic, shallot, shrimp, sausages and imitation crabs back to the pan, and stirfry for another minute.Toss stirring from the bottom up so that all the rice has a chance to fry in the oil and everything is integrated.

Sprinkle black pepper on the rice and add peanut, green onion and the reserved pineapple chunks. Toss-stir for 1- 2 minutes, folding the new ingredients into the rice .Taste, if it's not salty enough, add some salt. Think the rice tasted a bit bland, try adding one/two tablespoons of rice vinegar and one tablespoon of sugar. Continue to stirfry and taste until satisfy. Remove fom heat. Transfer to a serving dish (in this case, it's the hollowed pineapple halve) and top with red pepper strips.

Garnish with more peanuts,pork floss and sesame seed. Serve immediately.

Serves 2-4

Note: This is a guestimated recipe. We used fresh pineapple for this dish, but the canned one works in a pinch.You can easily swap with other meat and veggies you have on hand.Use the ingredient list as a guideline and season the fried rice to suit your taste.

Read more...

Saturday, December 01, 2007

Lemon Lavender Cake, the real deal.

lemon lavender cake


Remember the lemon lavender cake I blogged about two weeks ago? That was my attempt of recreating the one we have at Macrina Bakery & Cafe in Seattle last September. Apparently, the recipe can be found in the one of the Macrina cookbooks. Unfortunately, I have no luck locating it in Barnes & Noble or Borders. Being a smart consumer (ahem), I am not going to make a purchase through Amazon without having a glimpse of the layout and contents of the cookbook.

lavender lemon cake


So, I sent out an "SOS" asking for help on the Cookinglight Bulletin Board. Within an hour, I got the recipe from two members, Felice and Dorothy. Their response meant a world to me, and I could not describe how grateful I felt towards their effort in providing me the recipe. For that, I decided to bake the cake the next day, even though I have just finished making another dessert. I think I could always give some to our friends.

Lemon Lavender Coffee Cake


The taste of the cake reminded me of the one I have in Seattle, simply delicious! I omitted the glaze to cut down on the overall sweetness of the cake. Apart from that, its texture was as fine as the one we ate at Macrina. According to the owner Leslie Mackie, the lemon lavender coffee cake is an adaptation of their popular Lemon sour cherries coffee cake. The dried tart cherries is swapped with one tablespoon of dried lavender. I am going to give the famed recipe a try one day, but meanwhile, the lemon lavender coffee cake taste heavenly with a cup of honey lemon tea!

lemon  lavender love


If lemon + lavender is your cup of tea, do give this recipe a try. The smell of lavender while the cake is baking in the oven is the best aromatherapy I could ask for! Of course if you stay in Seattle, you can always get your fix at Macrina Bakery & Cafe.


Lemon Lavender Coffee Cake
adapted from Macrina Bakery and Cafe Cookbook via Felice.

For the batter
1 tbsp dried lavender (swap 1½ cups dried tart cherries for lemon-sour cherries coffee cake)
4 cups unbleached all-purpose flour
1 tablespoon baking powder
½ teaspoon baking soda
½ teaspoon salt
8 ounces (2 sticks) unsalted butter, at room temperature
2 ¼ cups granulated sugar
3 tablespoons freshly grated lemon zest
5 eggs
¼ cup freshly squeezed lemon juice
1 cup plain yogurt ( I used sour cream)

For the glaze
1 cup powdered sugar
2 teaspoons freshly grated lemon zest
2 tablespoons freshly squeezed lemon juice
1 teaspoon dried lavender

Preheat the oven to 325F. Oil a 12-cup bundt pan.

Preparing the batter
(If making lemon sour cherries coffee cake:Place dried cherries in a medium bowl and cover with hot tap water. Let soak and plump for 10 minutes, then drain thoroughly and check for pits.)

Sift flour, baking powder, baking soda,and salt into a large bowl. Add in the dried lavender. Toss with your hands and set aside.

Combine butter, sugar, and lemon zest in the bowl of a stand mixer. Using the paddle attachment, mix on medium speed for 5 to 8 minutes. The mixture will become smooth and pale in color. Add eggs, one at a time, making sure each egg is fully mixed into the butter before adding another. After the last egg is incorporated, slowly add the lemon juice and mix for 1 more minute. Scrape down the sides of the bowl and mix for 30 seconds to make sure all of the ingredients are fully incorporated. Remove the bowl from the mixer.

Alternately add small amounts of the flour mixture and the yogurt to the batter, mixing with a wooden spoon just until all dry ingredients are incorporated into the batter.(If making the sour cherries cake: Set aside 10 to 12 cherries for garnish and gently fold the remainder into the batter, taking care not to overmix.) Pour batter into prepared bundt pan, filling two thirds of the pan. Bake on center rack of oven for 1 hour and 10 minutes, or until the top is golden brown. Check the center of the coffee cake with a skewer. It will come out clean when the cake is finished. Let cool in the pan on a wire rack for at least 20 minutes.

Loosen the sides of the cake with a sharp knife. Place serving plate, upside down, on the top of the cooled bundt pan and invert the pan to remove the cake. Let cake cool completely.

Glazing the cake
Sift powdered sugar into a medium bowl, then add lemon zest and lemon juice. Mix with a spoon until smooth. Drizzle glaze over the cooled coffee cake and top with reserved dried lavender (or plumped cherries).

Note: I used a 10-cups bundt pan, there's some leftover batter that was enough to make 3 cupcakes.

IMGP5972

The cake is so good...even lion wants a slice.

IMGP5977


Disclosure: Ok, these playmobils are OCT's. They are lying around, so I decided to borrow them as props. Sometime I wonder if OCT is my husband or my son?!

OCT: "You missed the sword!"

Read more...

Monday, November 26, 2007

My first DB Challenge: Tender Potato Bread!

tender potato bread


Yes, with the christening of this potato bread, I am now a proud member of Daring Bakers! The fabulous online baking community that doesn't require further introduction, in my opinion. If for any reason you haven't heard of them, click here.

pink_sil


I am just happy that I finally get my act together and join these amazing bunch of bakers in the DB family. As for my first challenge, I completed it in record time. Not that I completed it the first week when I learn of the challenge, but it was actually the third week when I dug my hands deep into the sticky potato bread dough. Not exactly prompt compared to lots of DBers, but hey, for those who know me personally (like OCT and my previous sales managers), they know what a procastinator I am! I almost always complete whatever assignments at the very last minute. So, completing this first challenge a week ahead of the deadline is a major improvement for me. :)

On top of becoming a better baker, I think I have become a better person, which is a double bonus for joining Daring Bakers.


tender potato bread


Now let's get on to the Potato Bread, shall we? Instead of a sweet recipe, Tanna of My Kitchen in Half Cups has chosen a savory bread recipe as the November challenge. Honestly, it is a relief to me. Knowing that I will certainly be baking a few sweet recipes in November, I can definitely use a break from all the butter and sugar.

When I told OCT about this month's challenge and asked if he had eaten a potato bread before, he surprised me by saying yes! So has mum, who told me that it was one of grandma's favorite bread. I can't help but wonder if I was the last person alive who have never eaten a potato bread before. Even thoughI have read about potato bread from other's blogs, I keep missing the opportunity to attempt one myself. In fact, I have to confess that I am somewhat intimidated by yeast. And as such, would usually hide behind layers of cakes and tarts when the suggestion of baking bread arises.

But being a Daring Baker to me, is about confronting and conquering my fear. It also helps that they are lots of experienced and helpful bakers, who shared their experiences on the daring bakers blog. All these make the process less intimidating and so much more fun. I enjoy the "sneak previews" everyone posted after their breads were out from the oven.


potato roll


After seeing the many excellent "previews", I tackled my challenge on an early Monday morning. The dough as the rest have warned, was a sticky one. And one shall resist the temptation to add more flour to it. I think I managed pretty well with the help of a bench scraper. Instead of quick to dig my fingers into the sticky dough, I used the scraper to mix and knead the first few turns. I used about 5.5cups of flours, from the 8 cups of flour allowed.


Potato foccacia


As you can see, I shaped my dough into some dinner rolls and a large focaccia with red onion, rosemary and sea salt. The end products were tender, with a bit of chew and flavorful. I am quite surprised that there isn't a faintest hint of potato in the potato bread! I used 10 oz of potato in my batch from the 8-16 oz potato suggested. I believe the inclusion of potato played an important role in keeping the tender texture of the breadrather than exerting its flavor. With the abundance of sweet potatoes at the farmer's market this time of year, I wonder if that would work as an substitute? I shall undertake it as the next potato bread project. It will be interesting to see how the sweet potatoes manifest in potato bread.

foccacia


This recipe yields quite a large batch of bread for a small family like ours. We ate 1/3 of the focaccia with some Tom Yum tuna filling as dinner on the first night, and I nibbled a few pieces after slicing some for photo shoot. The dinner rolls which I sneaked in some muenster cheese in them were saved as our breakfast and lunch on the subsequent days. OCT brought half of the foccacia as lunch the next day and we still have some in the fridge now, waiting to be transformed into a yummy sandwich. I think I will top it with slices of tomatoes, avocados and the leftover turkey from Thanksgiving.

pink_db


To read more about the other Daring Bakers' take on this month challenge, please visit The Daring Bakers Blogroll. I can't wait to see what the rest have come up with!


For the recipe of this month's Tender Potato Bread challenge, check out Tanna's post

Read more...

Sunday, November 25, 2007

My third Thanksgiving in St Louis

turkey

Time flies and last Thursday marked my third Thanksgiving in St Louis. It seems only like yesterday when I confronted my first turkey breast. Although it was only 7 pounds, it was nonetheless the biggest piece of meat I have ever handled.

resting turkey

I remembered back then I was hesitant to invite anybody over as I wasn't sure my first turkey would be edible at all. When we finally decided to extend the invitations to friends, we didn't have a particular menu in mind. Needless to say, our first Thanksgiving meal wasn't a conventional one. Turkey breast with ready-made gravy and stuffing, uneven chunks of "mashed" potato, steamed vegetables and two quiches. I cannot recall what was dessert although I suspect it must be something made of chocolate.

Asparagus


That was how it began. That Thanksgiving dinner marked the beginning of many parties at our little one bedroom apartment, and the revelation of my pleasure from caring and serving others with home-cooked meals.

Thanksgiving is also a time I reflect on the kindness others have showered me, and their acceptance of me into their lives. I count my blessings and thank God for friends and family in my life. With that, I cooked and baked for the people I care. It has always been my way to say "Thank you" and "I love you".

normandy apple tart

These feelings were epitomized with the Normandy Apple Tart. The apple sauce was made painstalking by sieving over my only strainer, which was unfortunately too fine for such a task. The resulting apple sauce used for the filling of the tart was very smooth, making me feel that all the time and effort spent were worthwhile. I first saw the Normandy Apple Tart in Dorie Greenspan'sBaking: From My Home to Yours, and subsequently saw it made by Anita and Christine. Their beautiful tarts and the abundance of apples at the farmer's market inspired me to overcome my inertia to finally making it.

Normandy Apple Tart

Although mine didn't turn out as stunning as theirs, I gave myself a pat on the shoulder when our friends commented that the tart was delicious. The credit was all Greenspan's, who came up with the recipe; and of course the farmer who grew the apples.

Normandy Apple Tart

This Normandy Tart is not a difficult recipe, I believe anybody can make it with some prior planning and lots of patience. Although one can use the store-bought apple sauce, I agree with Greenspan that homemade apple sauce, (especially in this time of year) made a difference in the Normandy Tart. I don't have a mandoline, so I used a very sharp knife to finely slice the apples for topping.

Normandy Apple Tart

I baked the tart on the Thanksgiving morning, and believe that it would taste even better if I have the time to bake and serve it straight from the oven. The filling was a bit loose, but can easily be disguised with some fine ice cream (which I did!)

Normandy Apple Tart

Seeing that the topless tart has been selected as the theme for this month's "Waiter there's something in my ..." by Cooksister, I am submitting the Normandy Tart as my entry.

In case you want to know, these are what we had on Thanksgiving. The mostly Gourmet inspired recipes:
Stuffed Turkey with Lemon, Oregano and Red Onion (I used rosemary in place of oregano, and added in some white wine in the basting liquid)
Make Ahead Mashed Potato
Quick Stovetop Gravy
Roasted Japanese Sweet Potato with Scallion Butter
Italian Sausage and Bread Stuffing
Roasted Asparagus
Normandy Apple Tart
Alice Medrich Fastest Fudge Cake (as a backup in case the Normandy Apple tart was inedible ;p)

Asparagus


No photos on the meal, as I was a little behind the schedule, and I couldn't bring myself to let the guests wait on hungry stomachs!

Normandy Apple Tart
Adapted from Dorie Greenspan'sBaking: From My Home to Yours and as seen in Dessert First and Hot.Sour.Salty.Sweet and Umami

Pâte Sablée

1 1/2 cups flour
1/2 cup confectioner's sugar
1/2 teaspoon salt
9 tablespoon butter, very cold, cut into small pieces
1 egg yolk

Applesauce
2 pounds baking apples,(about 6 medium) such as Empire, Cortland, McIntosh, or Pippin
1/4 cup water, or more
1 tablespoon (packed) light brown sugar
1-4 tablespoons sugar (optional)
1/2 teaspoon pure Vanilla extract (optional)

Topping
2 medium-sized, firm apples,(preferably firm Golden Delicious or Granny Smith, not the mealy type you used for applesauce)
1 egg, beaten with 1/2 teaspoon water, for egg wash
1/3 cup apple jelly for glaze (I used apricot jelly)

To make the applesauce:
Peel and core the apples, and cut into chunks. Toss them into a 2-3 quart, heavy-bottomed saucepan. (or leave the skin on for a rosier color) . Add in the water and brown sugar, and stir to combine.

Cover the saucepan and cook the apples over the medium-low heat.Don't go far from the stove and stir the apples from time to time to keep them from scorching.

If the water is boiling away too quickly, add more by driblets. When the apples are soft enough to be mashed with a spoon, about 20-25 minutes, remove the pan from heat and pass the apples through a food mill or press them through a sturdy strainer into a bowl.

If the applesauce seems thin (if liquid accumulates around the edges), return the sauce to the pan and cook, stirring constantly, for a few minutes, until the sauce is just thick enough to sit up on a spoon. Taste the sauce , adding granulated sugar if you think it needs it (bearing in mind that the applesauce for this tart was not very sweet)and vanilla, if you want it.

Pour the applesauce into a container, press a piece of plastic wrap to the surface, and refrigerate until it is no longer warm before using. (The applesauce can be kept in the refrigerator for up to 4 days.)

For the tart shell:
Combine the flour, confectioner's sugar, and salt in a food processor and pulse a few times to combine. Add the pieces of cold butter and pulse until the butter is cut into pea-sized pieces. Add the egg yolk and combine in several pulses until the dough starts to become clumpy. Taking care not to overwork the dough. Turn the dough out onto a work surface, knead dough lightly to incorporate any dry ingredients that escaped mixing.

If you are using a pastry cutter, combine all dry ingredients and cut butter into the sizes of peas. Add in eggyolk and mix until all ingredients come together into a ball. Add in one or two tablespoons of cold water if the ingredients is too dry.

Butter a 9-in fluted tart pan with removable bottom.Lightly press the dough evenly over the bottom and up the sides of the pan, using all but one little piece of dough, which you should save in the fridge to patch any cracks after the crust is baked.

Freeze the tart shell for at least 30 minutes, preferably longer. Bake it in a 375 degrees.

To partially bake the tart shell:
Butter the shiny side of a piece of aluminium foil and fit the foil, buttered side down, tightly against the crust. Place the tart shell on a baking sheet and bake for about 25 minutes, until the shell is dry and lightly colored. If any places have cracked, repair with the extra dough. Let cool on a rack until room temperature.

For the tart:
When ready to finish baking the tart, preheat the oven to 400 degrees F.

Fill the tart shell almost to the top of the rim with the applesauce and smooth the top. Place the tart on a baking sheet lined with parchment or a silpat.

For the topping:
Peel,core and quarter two apples. Cut each apple quarter into about 7 slices.

Arrange the apple slices over the top of the applesauce in any pattern that strike your fancy, overlapping slices slightly as they will shrink a little after baking.
Make a egg wash by beating the egg with a teaspoon of water. Using a pastry brush,paint the egg wash over the sliced apples.

Bake the tart in the oven for about 50 minutes- it will look as though the applesauce and apples have risne a bit. The apple should be golden, a little burnt around the edges and soft enough to be pierced easily with the tip of a knife. If you'd like to enhance the color around the edges of the apples, run the tart under the broiler just unitl you get the color you're after. Transfer the pan to a cooling rack.

To make the optional glaze:
Bring the jelly and water to a boil. When the jelly is liquefied, brush a thin layer over the topof the tart with a pastry brush. Return the pan to the rack and cool the tart until it is just warm or at room temperature.

The tart can be served when it is only just warm or when it reaches room temperature. Try to eat it as soon as it is baked,to prevent it from getting soggy.

Read more...
Related Posts with Thumbnails