Monday, January 28, 2008

Daring Bakers do Lemon Meringue Pie : Sunshine on a winter day

IMGP6888


Because I will be vacationing until mid Feb, I completely this month's challenge the week before we left. I am glad that our host for this month- Janet of Canadian Baker has chosen Lemon Meringue Pie as January challenge. As much as I love lemon, I have never made lemon meringue pie before. So this is indeed a great challenge to conquer.


Since we have an early morning flight to catch, I will cut short the rambling and get straight to my experience with this month's challenge.


making lmp


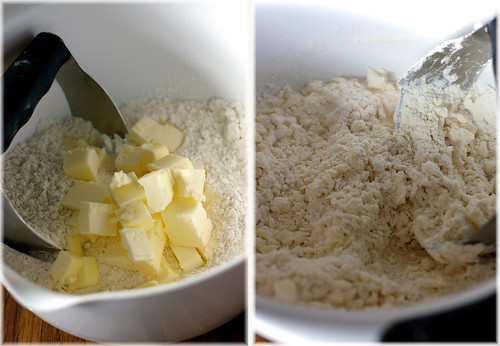
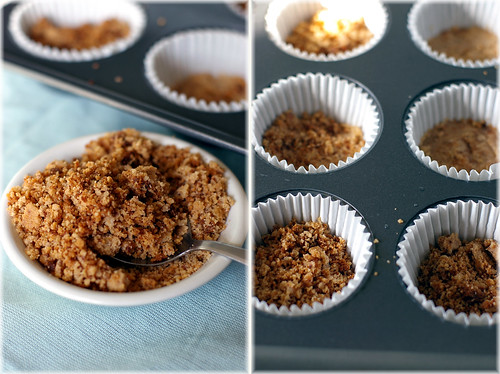
The recipe is a straightforward one, although it involves 3 steps: crust, filling and meringue. It should be a breeze if I wasn't feeling unwell. I suspect I may have added 1 cup more of flour while making the crust. My crust turns out dry and hard.


lmp process


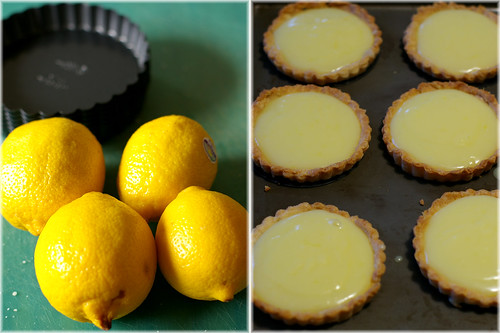
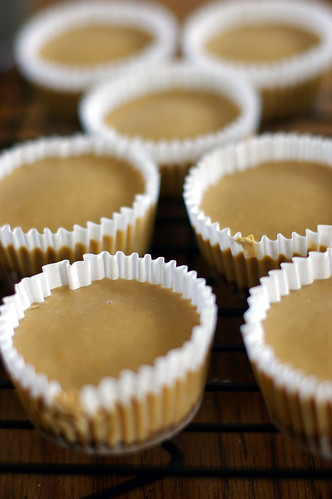
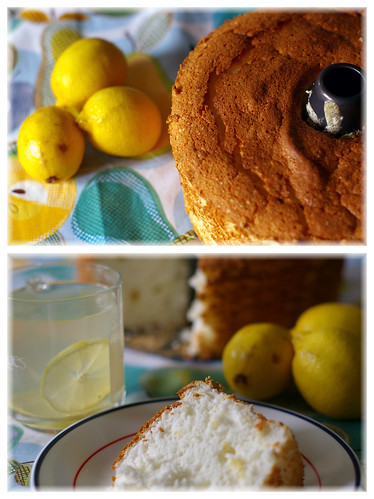
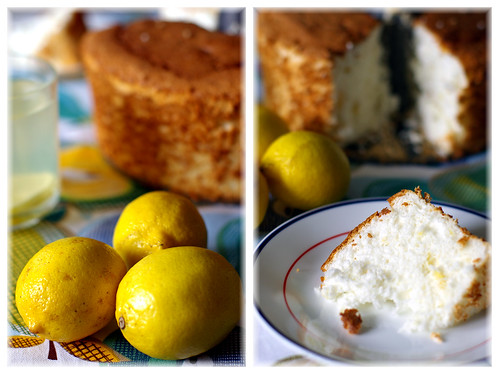
The filling is on the loose side, but firm up upon cooling. Although I find the filling too sour initially, upon topped with meringue, the tart has the perfect balance of flavor.Surprisingly the sweet meringue pairs really well with the tart filling.

Instead of making one big lemon meringue pie, I opt for the mini version and make 6 3-inches tarts. OCT ends up passing two tarts to a stranger who asks him for change to buy food. I am not entirely sure if it's because the tart doesn't appear to him or he is just a kind person. :)


IMGP6891


As I have limited internet access, I will have to check out the rest of the Daring Bakers' Lemon Meringue Pies when I return from vacation. You can check out my fellow Daring Bakers lemon meringue pies by clicking the pink Daring Bakers logo on my right side bar. These pies have brighten up my otherwise gloomy winter day, and I hope they would do the same to you too!


lmp cut section


Lemon Meringue Pie
Makes one 10-inch (25 cm) pie

For the Crust:
3/4 cup (180 mL) cold butter; cut into ½-inch (1.2 cm) pieces
2 cups (475 mL) all-purpose flour
1/4 cup (60 mL) granulated sugar
1/4 tsp (1.2 mL) salt
1/3 cup (80 mL) ice water

For the Filling:
2 cups (475 mL) water
1 cup (240 mL) granulated sugar
1/2 cup (120 mL) cornstarch
5 egg yolks, beaten
1/4 cup (60 mL) butter
3/4 cup (180 mL) fresh lemon juice
1 tbsp (15 mL) lemon zest
1 tsp (5 mL) vanilla extract

For the Meringue:
5 egg whites, room temperature
1/2 tsp (2.5 mL) cream of tartar
1/4 tsp (1.2 mL) salt
1/2 tsp (2.5 mL) vanilla extract
3/4 cup (180 mL) granulated sugar

To Make the Crust:
Make sure all ingredients are as cold as possible. Using a food processor or pastry cutter and a large bowl, combine the butter, flour, sugar and salt.Process or cut in until the mixture resembles coarse meal and begins to clump together. Sprinkle with water, let rest 30 seconds and then either process very briefly or cut in with about 15 strokes of the pastry cutter, just until the dough begins to stick together and come away from the sides of the bowl. Turn onto a lightly floured work surface and press together to form a disk. Wrap in plastic and chill for at least 20 minutes.

Allow the dough to warm slightly to room temperature if it is too hard to roll. On a lightly floured board (or countertop) roll the disk to a thickness of 1/8 inch (.3 cm). Cut a circle about 2 inches (5 cm) larger than the pie plate and transfer the pastry into the plate by folding it in half or by rolling it onto the rolling pin. Turn the pastry under, leaving an edge that hangs over the plate about 1/2 inch (1.2 cm). Flute decoratively. Chill for 30 minutes.

Preheat oven to 350ºF (180ºC). Line the crust with foil and fill with metal pie weights or dried beans. Bake for 20 to 25 minutes. Carefully remove the foil and continue baking for 10 to 15 minutes, until golden. Cool completely before filling.

To Make the Filling:
Bring the water to a boil in a large, heavy saucepan. Remove from the heat and let rest 5 minutes. Whisk the sugar and cornstarch together. Add the mixture gradually to the hot water, whisking until completely incorporated. Return to the heat and cook over medium heat, whisking constantly until the mixture comes to a boil. The mixture will be very thick. Add about 1 cup (240 mL) of the hot mixture to the beaten egg yolks, whisking until smooth. Whisking vigorously, add the warmed yolks to the pot and continue cooking, stirring constantly, until mixture comes to a boil. Remove from the heat and stir in butter until incorporated. Add the lemon juice, zest and vanilla, stirring until combined. Pour into the prepared crust. Cover with plastic wrap to prevent a skin from forming on the surface, and cool to room temperature.

To Make the Meringue:
Preheat the oven to 375ºF (190ºC). Using an electric mixer beat the egg whites with the cream of tartar, salt and vanilla extract until soft peaks form. Add the sugar gradually, beating until it forms stiff, glossy peaks. Pile onto the cooled pie, bringing the meringue all the way over to the edge of the crust to seal it completely. Bake for 15 to 20 minutes, or until golden. Cool on a rack. Serve within 6 hours to avoid a soggy crust.


Free-Style Lemon Tartlets
(from "Ripe for Dessert" by David Lebovitz)

Prepare the recipe as above but complete the following steps:

To roll out tartlet dough, slice the dough into 6 pieces. On lightly floured surface, roll each circle of dough into a 5 inch disk. Stack the disks, separated by pieces of plastic wrap, on a plate, and refrigerate for 30 minutes.

To bake the dough, position rack in oven to the centre of oven and preheat to 350ºF (180ºC). Place the disks of dough, evenly spaced, on a baking sheet and bake for 20 to 25 minutes, until golden brown. Cool completely.

To finish tartlets, first place oven rack in the upper third of the oven and increase heat to 425ºF. Divide the lemon filling equally among the disks, mounding it in the centre and leaving a 1-inch border all the way around. Spoon the meringue decoratively over each tartlet, right to the edges, in dramatic swirling peaks.

Return tartlets to oven and bake for about 5 minutes, until the meringue is golden brown.

Read more...

Thursday, January 24, 2008

Meet the rest of the little fellas...

After a 26 hours of grueling travel, I am happy to report that we have safely arrived at the sunny Singapore, the first leg of our home visit. The long haul flight was undoubtedly exhaustive, but the joy of meeting our loved ones is priceless.

While I am happily catching up with friends, family and delicious local food, here's the recipes of another two little fellas from Junior's Cheesecake Cookbook, which I promised to share earlier. Although there are other drool-worthy cheesecakes in the book, I ended up making another two recipes of mini cheesecakes, otherwise known as little fellas. I am simply hooked with the neatness of baking the cheesecake into individual portion. They are the perfect sizes for this baker who is still trying to shed some festivities pounds but couldn't say no to dessert. :) I love the fact that they take lesser time to bake and don't crack as easily as their bigger brother.

Little Fellas Raspberry Swirls

So far, I have tried four recipes from the Juniors Cheesecakes Cookbook, and I must admit that I am totally sold on their claim to make "The World's Most Fabulous Cheesecake". These are really the creamiest and tastiest cheesecakes I have ever eaten.

litte fella- chocolate swirl


Little Fella Chocolate Swirls
adapted from Junior's Cheesecake Cookbook: 50 To-Die-For Recipes for New York-Style Cheesecake (Juniors)

two 8-ounce packages Philadelphia Cream Cheese (use either full fat or 1/3 less fat Neufchtel), at room temperature
2/3 cup sugar
2 tablespoons cornstarch
1 tablespoon pure vanilla extract
2 extra large eggs (I used large eggs)
1/2 cup heavy whipping cream
1.5 tablespoons unsweetend cocoa powder
Chocolate curl (optional, for decoration)
One 12-ounce jar hot fudge ice cream topping (optional), warmed

Preheat oven to 350F. Line 12 standard muffin cups with silicone, foil, parchment, or paper liners.

Put one package of cream cheese, 1/3 cup of sugar, and the cornstarch in a large bowl. Beat with an electric mixer on low until creamy, about 3 minutes, scraping down the bowl a few times. Blend in the remaining cream cheese and 1/3 cup sugar, then the vanilla. Blend in the eggs, one at a time, beating well after adding each one. Beat in the cream just until it's completely blended. Be careful not to be overmix. Remove 3/4 cup of the batter and stir in the cocoa.

Divide the white batter among the 12 muffin cups. Drop a heaping teaspoon of the chocolate batter in the center of each, pushing each down slightly. Using a small knife or skewer, cut through the batter until dark swirls appear.

Place the muffin tin in a large shallow pan and add hot water until it comes about 1 inch up the sides of the tin. Bake the cakes until set and slightly puffy, about 30-45 minutes, depending on how hot your oven is. Remove the cakes from the water bath, transfer the tin to a wire rack, and let cool for 2 hours.*Transfer the cake to a container and chill for at least 4 hours.
*note: instruction from the book: After 2 hours of cooling, cover cake with plastic wrap (do not remove from the tin) and put in the freezer until cold, at least one day.

To remove the cakes, lift them out with your hands and peel off the liner. Although I find it more convenient to hold and eat it with the liner on. For a dressier version, place the cakes, top side up, on a serving platter or individual dessert plates, Top with the chocolate curls if you wish and refrigerate. Serve drizzled with the hot fudge sauce, if you wish. If there are any cakes left, cover with plastic wrap and store in the refrigerator or wrap and freeze for up to 1 month.

Little Fellas Raspberry Swirls


Little Fella Raspberry Swirls
adapted from Junior's Cheesecake Cookbook: 50 To-Die-For Recipes for New York-Style Cheesecake (Juniors)

1/3 cup raspberry preserve
two 8-ounce packages Philadelphia Cream Cheese (use either full fat or 1/3 less fat Neufchtel), at room temperature
2/3 cup sugar
3 tablespoons cornstarch
1 tablespoon pure vanilla extract
2 extra large eggs (I used large eggs)
1/2 cup heavy whipping cream
13 fresh raspberries (large and pretty ones)

Preheat oven to 350F. (I used 325F) Line 13 standard muffin cups with silicone, foil, parchment, or paper liners.(if you have only 12, use a custard cup for the thirteenth one. I use the Reynold's disposable aluminium foil cups.)

Put one package of cream cheese, 1/3 cup of sugar, and the cornstarch in a large bowl. Beat with an electric mixer on low until creamy, about 3 minutes, scraping down the bowl a few times. Blend in the remaining cream cheese and 1/3 cup sugar, then the vanilla. Blend in the eggs, one at a time, beating well after adding each one. Beat in the cream just until it's completely blended. Be careful not to be overmix.

Divide the batter among the 13 muffin cups(fill each one almost up to the top). Drop a heaping half teaspoon of the raspberry preserve in the center of each, pushing each down slightly. Using a small knife or skewer, cut through the batter until raspberry swirls appear.Do not mix in the puree completely or the cakes will turn pink and the swirls will disappear.

Place the muffin tin in a large shallow pan and add hot water until it comes about 1 inch up the sides of the tin. Bake the cakes until set and slightly puffy, about 30-45 minutes, depending on how hot your oven is. Remove the cakes from the water bath, transfer the tin to a wire rack, and let cool for 2 hours.*Transfer the cake to a container and chill for at least 4 hours.
*note: instruction from the book: After 2 hours of cooling, cover cake with plastic wrap (do not remove from the tin) and put in the freezer until cold, at least one day.

To remove the cakes, lift them out with your hands and peel off the liner. Although I find it more convenient to hold and eat it with the liner on. For a dressier version, place the cakes, top side up, on a serving platter or individual dessert plates, Top with fresh raspberries if you wish and refrigerate. If there are any cakes left, cover with plastic wrap and store in the refrigerator or wrap and freeze for up to 1 month.

Read more...

Saturday, January 19, 2008

The tale about some little fellas called Cappuccino

IMGP6681


I have made grand plan when I saw two granny smith apples sitting forlornly in the fridge a few days ago. I told them that they were going to be transformed into Mozart. No, not that musician you have heard of. I am referring to Pierre Herme's creation in his book -Desserts by Pierre Herme. Grand plan indeed and I can almost sense the apples' excitement, especially after they have been deemed as good looking last month. They simply couldn't wait to show off again.

Unfortunately, the Mozart endeavor met its hurdle in the beginning stage and had to be abandoned. For some unfathomable reason, the cinnamon crust required in the recipe turned out all cracked up and thus, spelled the end of project Mozart.

Now what? I end up with lots of cookie crumbs. Delicious crumbs I must add. Call me unimaginative, the only way I could think of to effectively utilize these crumbs would be making cheesecake. Or cheesecakes. So I turn to my favorite cheesecake book for the time being for inspiration.

IMGP6667

I settle for the Cappuccino little fellas in the end, because I love any baked goods with coffee in it. Making little fellas which are basically mini cheesecakes make sense, because they are handy to share with friends as opposed to one big cake which I will inadvertently carve out a bigger piece for myself before cutting it for others. By making it into muffin cup size, this possibility could be eliminated.

making crust

The original recipe is one without the cookie base, but not wanting to waste my delicious crumbs, I simply fill each muffin liners with one heaping tablespoon of crumbs and press it lightly into place, just like one would for a classic cheesecake base. The cookie bases are then baked in a preheated 350F oven for 5-7 minutes until they looked dry and golden in color. I used lesser cheesecake filling in each molds, and came up with a total of 17 little fellas.

Cappuccino Cheesecake

Of course you can follow the original recipe sans crust, you should be able to get 12 to 13 little fellas with more fillings than mine. As you may have guessed, both versions are equally delicious, and would stand in nicely in place of the real McCoy after a meal. In fact the recipe could easily be doubled and kept in the freezer for any dessert emergency. According to the author, the little fellas freeze exceptionally well. I have yet to try that out myself.

Cappuccino cheesecake


Cappuccino Little Fellas
adapted from Junior's Cheesecake Cookbook: 50 To-Die-For Recipes for New York-Style Cheesecake (Juniors)

1 tablespoon instant freeze-dried espresso or instand coffee or instant espresso powder
1 tablespoon hot water (I need 1.5 tablespoons)
two 8-ounce packages Philadephia Cream Cheese (the recipe says full fat only but I used 1/3 less fat Neufchtel, without any problem), at room temperature
2/3 cup sugar
3 tablespoons cornstarch
1 tablespoon pure vanilla extract
2 extra large eggs (large eggs are fine too)
1/2 cup heavy whipping cream
Chocolate curls
1 tablespoon unsweetened cocoa powder

Preheat oven to 350F. (I used 325F) Line 12 standard muffin cups with silicone, foil, parchment, or paper liners.Dissolve the instant espresso in the hot water in a small cup and let stand.

Put one package of cream cheese, 1/3 cup of sugar, and the cornstarch in a large bowl. Beat with an electric mixer on low until creamy, about 3 minutes, scraping down the bowl a few times. Blend in the remaining cream cheese and 1/3 cup sugar, then the vanilla. Blend in the eggs, one at a time, beating well after adding each one.Stir the dissolved coffee into the cream and beat in the cream just until it's completely blended. Be careful not to be overmix.

Divide the batter among the 12 muffin cups. Place the muffin tin in a large shallow pan and add hot water until it comes about 1 inch up the sides of the tin. Bake the cakes until set and slightly puffy, about 30-45 minutes, depending on how hot your oven is. Remove the cakes from the water bath, transfer the tin to a wire rack, and let cool for 2 hours.*Transfer the cake to a container and chill for at least 4 hours.
*note: instruction from the book: After 2 hours of cooling, cover cake with plastic wrap (do not remove from the tin) and put in the freezer until cold, at least one day.

To remove the cakes, lift them out with your hands and peel off the liner. Although I find it more convenient to hold and eat it with the liner on. For a dressier version, place the cakes, top side up, on a serving platter or individual dessert plates, Top with chocolate curls and dust with a little cocoa if you wish and refrigerate. If there are any cakes left, cover with plastic wrap and store in the refrigerator or wrap and freeze for up to 1 month.

Read more...

Wednesday, January 16, 2008

Some Happy News

dmblgit_badge_pink


As some of you may already know, my Normandy Apple Tart has been awarded the "Winner of Edibility" in December 2007 DMBLGIT, hosted by Dayna of Food and Photogaphy.

Although I have won twice in the past, I was nonetheless ectatic when my sweet friend Helen left a congratulatory comment to inform me the results were in! I was almost going to shut down my laptop when the news came. Needless to say, I was a happy girl that night, and went to bed wearing a broad grin.

Normandy Apple Tart


The second piece of happy news: We are going back to Singapore and Malaysia on next Monday morning, which is less than 5 days from now! We will be home for 3 weeks, spending Chinese New Year with our families.

The night after we bought our airtickets, I was too excited about our trips that I had insomia. It persisited for the next few nights. I think my mind must be too busy planning on meeting friends, buying hard to find ingredients back to US, baking up a storm in my mum's new kitchen, learning some dishes from my mother in law and most importantly eating the local food! I will bring my camera back,in the hope of capturing some tasty meals I take to share with you. But I can't promise. It's too hard a task. The last time I brought my camera along to take some food shots, I managed to have totally forgotten about it until my stomach was full and the plates were mobbed clean!!

No recipe for this entry, but may I tease you with some cheesecakes? These are some cheesecakes I have made from Junior's Cheesecake Cookbook. A great book for anybody who love cheesecakes! I love all four of the cheesecakes I made from this book. Stories and recipes coming up soon!


Cheesecake Craze

Read more...

Monday, January 14, 2008

Light Dessert : Lemon Angel Food Cake

lemon angel food cake

Dear friends who are trying to lose weights:

Some said there's a season for everything. And eating seasonal is the way to go. So what has the angel food cake has anything to do with seasonal eating? Everything!

Remember your new year resolutions to lose weights? This is also the time of the year I pulled out my tube pan and make angel food cake, the fat-free dessert I adore. Combined with my favorite citrus, I don't mind eating it whether I am on diet or not. Come to think of it, I don't remember myself being on diet before, except for the two weeks leading to my wedding. The stake of not able to fit into the custom-made wedding gown was far too high!

lemon angel food cake

Anyway, my point is- whether you are on a diet or not, don't skip desserts! At least I won't. All we (I mean, you who are staring at this screen have considered of losing weights after the festive eating, no?) need is a good strategy. No point eating a bite of brownie which make you crave for more, (and end up doing just that) or a tiny sliver of cheesecake which could easily be blown away by the strong gush winter wind. I rather have a healthy serving of a piece of this. This airy, flavorful, fat free, good for you angel food cake!

lemon angel food cake

Since new year is about a healthier, slimmer and prettier you, where not pair the angel food cake with a cup of warm honey lemon drink? Some experts claim that it's good for detox. There are some really gluesome regimes for body detox, but for me, honey lemon drink is a sweeter way to do it.

IMGP5603

If lemon is not your thing, you can easily substitute it with orange, lime or grapefruit. I am sure you can also try clementine and tangerine, although the flavors may not be as assertive as the rest. I am waiting for the meyer lemon season to come, so that I can make a Meyer Lemon Angel Food Cake.

IMGP5608


Lemon Angel Food Cake
adapted from The Best Light Recipe (The Best Recipe)

1 cup (4 ounces) cake flour
1.5 cuos (10.5 ounces) sugar
12 larg eggwhites, at room temperature
1 teaspoon cream of tartar
1/4 tsp salt
2 tablespoons juice from 1 lemon
1/2 tsp vanilla extract
2 tbsps grated lemon zest

Adjust the oven rack to the lower middle position and preheat the oven to 325F. Have ready an ungreased 9-inches, 16 cups tube pan.

Whisk flour and 3/4 cup sugar in a small bowl, set aside. In a dry, clean electric mixer bowl, beat eggwhites on low speed until foamy. Add in cream of tartar and salt, and increase speed to medium high. Continue to beat, adding the remaining 3/4 cup sugar, 1 tablespoon at a time, untill all the sugar is added and the whites are shiny and form soft peaks. Beat in the lemon juice, vanilla extract, lemon zest until just blended.

Sift the flour mixture over the whites, about 1/4 cup at a time, and gently fold it in using a large rubber spatula. Gently scrape the batter the batter into the pan and smooth the top with a spatula. Give the pan a couple of raps on the counter to release any large air bubbles. Bake until cake is golden brown and the top springs back when pressed firmly, 55 to 60 minutes.

If the cake pan has prongs around the rim for elevating the cake, invert the pan onto them. If the pan does not have prongs, invert the pan onto the neck of a bottle or funnel. Let the cake cool completely upside down.

To unmold, run a knife or long offset spatula around the edges of the cake pan, being careful not to separate the golden crust from the cake. You can either loosen the cake from the center with a wire cake tester, skewer or offset spatula.Slide the cake with the removable cake bottom out of the pan . Run a knife between the cake and the pan bottom to loosen, then gently flip the cake onto a platter, bottom side facing up. (which is also the more presentable side)

The cake tastes best when served the same day it is made. But we enjoy it just as much in the following few days.

Serves 16.

Per serving: cal 150; fat 0 g; Sat Fat 0 g; Chol 0 mg; Carb 33 g; Protein 4 g; Fiber 0 g; sodium 105 mg

Edit: I have added the nutritional info per serving as provided by the recipe for those who are interested. Note that although the cake is fat free and taste really yummy, don't attempt to finish it in a day on top of other tempting food you are already eating. :)

Read more...

Wednesday, January 09, 2008

Favorite Dim Sum item: Golden Crisp Daikon Cake

golden daikon cake


Not long after moving to US I developed a sudden craving for certain Malaysian/Singaporean food that I wasn't particularly crazy about back home. Is there a medical term for such condition? I generally called it home sick.

Back in the days when I was sharing an apartment with my friend Ying, she occasionally brought back homemade goodies made by her "considerate and caring" colleague. The thing is, most of the stuffs she made were, (erm, is there a way to put it mildly) didn't taste like what they were supposed to be. Most of th time, the items would vague resembled what she was trying to make, but taste nothing like it. But they were made with love nonetheless, so I admired her generosity. There was one thing however, that I think she made really well, and that was the steamed golden daikon cake.

I was always glad to see Ying came home with a packet of her colleague's golden daikon cake, as opposed to the "skinny version of chinese egg tarts". Being a good friend and a competent cook Ying would then sliced and lightly panfried them with lots of garlic, shallots and sometime toss in an egg or two. Those were the days.

golden daikon cake

The last time when we ordered the golden daikon cake at a local Chinese restaurant, we were appalled to see my beloved dimsum item came drenched in oil, (literally) and fell apart like a piece a soft tofu when I tried to pick it up.

I know I am on mission to look up for the recipe of a perfect daikon cake if I want to eat one. The first resource, is of course to ask mum. When mum gave me a somewhat vague recipe, I turned to OCT's mum. The thing about Asian mums when one inquires of certain recipes- they will inevitably provide one of the following answers:

"Oh, it's very EASY, just use some X, a little bit of Y, Z, W, X, mix together, then steam. Very EASY. Anybody can make it."

"Why don't you just eat/buy from the restaurant? Or just use the ready-mix?"


Everything is guesstimated, nothing specific. They presume you have certain level of experience and understanding of how things work. Like them. But I am not good at following vague instructions, although I prescribe them freely to friends who asked me for recipes all the times!

Long story short, I tried out a few recipes from Chinese websites which each gives very different directions but none worked. Finally, I stumble one in Bon Appetit. Ah, the end of my daikon cake quest. The recipe provides very clear steps and precise amounts of different ingredients. With some tweaking, it becomes my go-to recipe for golden daikon cake now.

Golden Daikon Cake

To make the golden daikon cake, one has to begin with a trip to the Asian grocery stores. A lot of the ingredients such as dried shrimp, chinese sausages, dried shiitake mushroom and rice flour are not readily available at the neighborhood grocery stores, no matter how well stocked they are. While you are there, do check out the snack section, where you can stock up on Pocky, Calbee's Shrimp flavored chips (I like the wasabi ones), japanese rice crackers, Nissin Ramen Pork Tonkatsu, Shin Spicy Ramen and a thousand and one types of condiments.

Well I digress. Once the said ingredients are assembled, here comes the hard work. Using a box grater, grate the required amount of daikon using the side with biggest holes. Time yourself and see how long it takes you to grate 1.5 pounds of daikon. It counts towards your cardio exercise. If you have a food processor, spend some time to decide which finger needed to exercise most, and use it to press the grate button.

Next, dice the rest of the ingredients. The original recipe doesn't include dried shiitake mushroom but a lot of daikon cake I ate in the past had it as one of the ingredients. So I usually throw in 4 to 5 mushrooms in mine.

Stirfry everything, until fragrant. (this is the simplified expression. Ha! See the recipe below for the detail instructions)

IMGP5176

In the same skillet, stirfry the grated daikon until it turns translucent. (like onion).

IMGP5178

Mix all ingredients together and continue to stirfry, until everything is well mixed. Don't worry about overmix, or overcook, this is not a cake (or scones ;p)

IMGP5180

Stir in the rice flour + water mixture after the daikon mixture has softened. With lower heat, quickly fold in the rice flour mixture. The whole thing will turn into a huge mass of glue in no time. Very quickly, season with salt and pepper before transferring your batter to an oiled pan for steaming.

Now you can rest for 40-50 minutes while the daikon cake is steamed.

When the daikon cake is cooked, cool and refrigerate overnight before panfrying. We like to pair the daikon cake with hot chilli sauce. Spicy and delicious!

golden daikon cake


Golden Crisp Daikon Cake with Spicy Herb Sauce
adapted from Feb 2007 Bon Appetit

1 1/2 pounds daikon (Asian white radish),* peeled, cut into 1-inch pieces
2 Chinese sweet pork sausages (lop chong),* cut into 1/4-inch cubes (about 3 ounces)
1/2 cup finely chopped green onions (about 3 large)
2 tablespoons small dried shrimp,* finely chopped
1 small shallot, finely diced
1 1/2 cups water, (squeeze the diced daikon to extract some of the liquid, and top up the volume with water)
4-5 pieces of dried shiitake mushrooms, reconstituted in hot water for 30 minutes.
Nonstick vegetable oil spray
1 1/2 cups rice flour*
1 cup soy sauce
1 tablespoon Asian sesame oil
2 tablespoons (or more) vegetable oil, divided
1 cup fresh cilantro leaves
1 tablespoon grated peeled fresh ginger, juices included
2 small Thai red chiles*, halved lengthwise, seeds removed, thinly sliced crosswise or 1 tablespoon hot chili sauce (such as sriracha)*
1 tablespoon sesame seeds, toasted

Fit processor with large-hole grating disk. Working with a few pieces of daikon at a time, place daikon pieces in feed tube and process until coarsely grated. Transfer daikon to bowl. Replace grating disk in processor with metal blade. Return daikon to processor and finely chop, using on/off turns.

Heat heavy large skillet over medium-high heat. Add sausage cubes to skillet and sauté until fat renders and sausage browns, about 5 minutes. Add green onions, shallot and dried shrimp; stir 1 minute. Add daikon and cook until daikon is soft and transparent, stirring frequently,about 20 minutes.

Meanwhile, spray 9-inch-diameter cake pan with 1 1/2-inch-high sides with nonstick spray. Whisk rice flour and water in large bowl until well blended. Pour into the daikon mixture. Season to taste with salt and pepper. Spread daikon mixture evenly in prepared pan. Place cake pan on bamboo steamer rack set over wok filled halfway with simmering water or on metal rack set over simmering water in pot. Cover with lid; steam over medium heat until cake is set and firm to touch, occasionally adding more water to wok or pot as needed, about 45 minutes. Remove pan from steamer; cool cake in pan 1 hour. Cover and refrigerate daikon cake in pan overnight.

Whisk soy sauce and sesame oil in small bowl. Heat 1 tablespoon vegetable oil in small skillet over medium heat. Add cilantro, ginger with juices, and chiles or hot chili sauce; stir 30 seconds. Mix ginger mixture into soy sauce mixture. DO AHEAD Daikon cake and sauce can be made 2 days ahead. Cover separately and refrigerate.

Run small knife around daikon cake to loosen. Invert onto cutting board. Cut cake into 1/2-inch-thick slices (not wedges), then cut each slice crosswise into 2-inch-long pieces.

Heat 1 tablespoon vegetable oil in large nonstick skillet over medium-high heat. Working in batches, add daikon cake slices to skillet and cook until golden brown, adding more oil to skillet for each batch as needed, about 5 minutes per side. Transfer slices to platter. Sprinkle with sesame seeds. Serve herb soy sauce alongside for dipping.

Read more...

Saturday, January 05, 2008

Let's play pretend

Can we pretend that it's still Christmas for 10 minutes? I know I need to move on and head to the gym instead of urging you to play this silly game with me. But I have my reason for that. As embarassing as it may sound, I have procastinated once again and let some Christmas cookies recipes and photos left unpublished. I have been wanting to do that before new year actually, but decided to take a break from blogging. Excuse, excuse. I can almost see you shaking your head through my monitor screen. I wonder if one day the google search of "procastination" would link you to my blog.

Christmas cookies


Let's talk about these cookies shall we? The one on the top left is Rugelach. The first time I saw them on Dorie Greenspan's Baking: From My Home to Yours, I didn't think much about the mini crescent looking cookies. One look at the recipe further dissuaded me from attempting it. The recipe is simply too "time consuming". One has to first, make the dough; chill it for 2 hours,then top it with warmed and cooled jam and nuts, shape (which is an elaborate process), chill again and FINALLY bake it.

rugelach


So what prodded me to make Rugelach? I don't know. Maybe I wanted to make something different from last year. Or I was simply out of ideas of what to bake! In any case, I am glad I made them. They are de.li.cious! In a way I have never expected a mini crescent lookalike would taste. I could taste the flaky and buttery dough which enclosed the delicious apricot preserve, chopped dried cherries and chocolate chunks in every mouthful. Rugelach is undoubtedly one of the great cookies I discovered in 2007.

pinwheel cookies


The Pinwheel Cookies used the leftover chocolate dough from the Nutella Two Tone Cookies I made and some sweet tart dough which I happened to have in the freezer.Honestly, I think they are just ok. Not the kind of cookies I would write home about.

snow flake sugar cookies


The snowflakes cookies used the leftover from the vanilla dough of Nutella Two Tone Cookies. It was a good base for cut-out cookies, as the dough didn't spread much during baking.

homemade rocky road


This Christmas season I also attempted chocolate tempering for the first time. It wasn't as hard as I had envisaged it. Although it certainly took a bit of patience. These rocky roads, with 60% bittersweet chocolate, brazil nuts and marshmallows were part of my goodies packages. OCT and I felt that there was too many marshmallows in the rocky road, and we will probably cut that by half next time. I was too lazy to make my own marshmallows and resorted to the store bought version. I am sure the homemade marshmallow will most definitely enhance the yum factor of the rocky road. Maybe next time....

Now that the Christmas cookies are out of my system, I can move on to embrace 2008!

p/s: do you remember these cookies I submitted to Susan's Eat Christmas cookies event? The hot chocolate cookies has been shortlisted as one of the ten cookies which stands a chance to win Sherry Yard's latest book "Desserts by the Yard"! I feel really honored to be one of the finalists, considering there are 212 absolutely droolworthy entries. And if you love the idea of a crispy chocolatey cookie with a pillowy marshmallow topping, drizzled with decadent melted bittersweet chocolate, would you cast a vote for me? :)If my hot chocolate cookies doesn't appeal to you, do check out the rest of the cookies, and vote for one that calls out to you.

Rugelach
adapted from Baking: From My Home to Yours

4 ounces cold cream cheese, cut into 4 pieces
1 stick (8 tablespoons) cold unsalted butter, cut into 4 pieces
1 cup all-purpose flour
1/4 teaspoon salt
1/4 cup chopped pecans (you can use walnuts or almonds)
1/4 cup dried cherries
4 ounces bittersweet chocolate, finely chopped, or 2/3 cup store-bought mini chocolate chips

For the Glaze

1 large egg
1 teaspoon cold water
2 tablespoons sugar, preferably decorating (coarse) sugar

For the Filling

2/3 cup raspberry jam, apricot jam or marmalade
2 tablespoons sugar
1/2 teaspoon ground cinnamon


TO MAKE THE DOUGH BY HAND:

Let the cream cheese and butter rest on the counter until very soft but not melted.They should be spreadable.

Put the flour and salt in a large mixing bowl, dump in the butter and cream cheese. With a wooden spoon or silicon spatula, mix everything until well combined. You can use your hands to combine the last few stubborn grains of flour into the dough. Be gentle with the dough!

Turn the dough out, gather it into a ball and divide it in half. Shape each half into a disk, wrap the disks in plastic wrap and refrigerate for at least 2 hours, or up to 1 day.

TO MAKE THE DOUGH BY FOOD PROCESSOR:
Let the cream cheese and butter rest on the counter for 10 minutes — you want them to be slightly softened but still cool.

Put the flour and salt in a food processor, scatter over the chunks of cream cheese and butter and pulse the machine 6 to 10 times. Then process, scraping down the sides of the bowl often, just until the dough forms large curds — don't work it so long that it forms a ball on the blade.

Turn the dough out, gather it into a ball and divide it in half. Shape each half into a disk, wrap the disks in plastic wrap and refrigerate for at least 2 hours, or up to 1 day. (Wrapped airtight, the dough can be frozen for up to 2 months.)

TO MAKE THE FILLING: Heat the jam in a saucepan over low heat, or do this in a microwave, until it liquefies. Mix the sugar and cinnamon together.

Line two baking sheets with parchment or silicone mats. (Silicone baking mats are great for rugelach.)

TO SHAPE THE COOKIES: Pull one packet of dough from the refrigerator. If it is too firm to roll easily, either leave it on the counter for about 10 minutes or give it a few bashes with your rolling pin.

On a lightly floured surface, roll the dough into an 11- to 12-inch circle. Spoon (or brush) a thin gloss of jam over the dough, and sprinkle over half of the cinnamon sugar. Scatter over half of the nuts, half of the cherries and half of the chopped chocolate. Cover the filling with a piece of wax paper and gently press the filling into the dough, then remove the paper and save it for the next batch.

Using a pizza wheel or a sharp knife, cut the dough into 16 wedges, or triangles. (The easiest way to do this is to cut the dough into quarters, then to cut each quarter into 4 triangles.) Starting at the base of each triangle, roll the dough up so that each cookie becomes a little crescent. Arrange the roll-ups on one baking sheet, making sure the points are tucked under the cookies, and refrigerate. Repeat with the second packet of dough, and refrigerate the cookies for at least 30 minutes before baking. (The cookies can be covered and refrigerated overnight or frozen for up to 2 months; don't defrost before baking, just add a couple of minutes to the baking time.)

GETTING READY TO BAKE: Position the racks to divide the oven into thirds and preheat the oven to 350 degrees F.

TO GLAZE: Stir the egg and water together, and brush a bit of this glaze over each rugelach. Sprinkle the cookies with the sugar.

Bake the cookies for 20 to 25 minutes, rotating the sheets from top to bottom and front to back at the midway point, until they are puffed and golden. Transfer the cookies to racks to cool to just warm or to room temperature.

STORING: The cookies can be kept covered at room temperature for up to 3 days or wrapped airtight and frozen for up to 2 months

makes about 32 cookies.

Homemade Rocky Road
adapted from The Great Book of Chocolate

1-1/4 pounds 70% Cacao Bittersweet or 62% Cacao Semisweet Chocolate, chopped
1-1/2 cups roasted brazil nuts (you can also use unsalted peanuts or almonds, toasted)
1 pound of mini marshmallow
1/2 cup roasted Cacao Nibs (optional)


Chop up all the chocolate. Place 16 ounces of the chocolate in a heatproof bowl and melt it over simmering water, stirring frequently, until it is fully melted and smooth.

Remove the bowl from over the simmering water and stir in the remaining 4 ounces of chocolate. Let stand, stirring occasionally, until the temperature falls to the low 80 degree F range.

"Flash" the bowl over the simmering water by putting it back over the water for 3 to 5 seconds at a time, stirring frequently, until the temperature reads between 88 degrees F and 91 degrees F (using care if using a breakable glass thermometer). You’ll need to flash it several times to get it to the correct temperature. Don’t be tempted to keep the chocolate over the heat until it reaches the proper temperature; it will continue to rise after you remove the bowl from the heat. (If the temperature rises over 91 degrees F, you’ll need to begin the process all over again.)

Test the chocolate by spreading a thin layer on waxed paper, aluminum foil or a plate. Let it cool for a few minutes. If it hardens within that period of time, it is tempered. If it stays wet or gets grainy, then it is not properly tempered.

Once you have tempered the chocolate, immediately toss the marshmallows, nuts and cacao nibs into the tempered chocolate until just coated, stirring as little as possible because the chocolate cools as it is stirred and will set up quickly.

Heap the Rocky Road on the lined baking sheet, spread just a bit, and then chill until firm.

Cut the Rocky Road into irregular pieces and serve.

The candy can be stored at room temperature in an airtight container for up to 2 weeks.

Read more...

Tuesday, January 01, 2008

It has been a delicious year indeed!

A year of good eat


I decided to make the above collage after seeing this and this. What a neat idea to record what I have conjured in 2007.

This will also be a convenient space to refer friends and family, who wonder how I gain so much weights over a year. :)

Read more...
Related Posts with Thumbnails