


I was too lazy to cook a full meal yesterday and hence decided to play around with pasta. A simple chow mein was what I made. It certainly lack all the qualities of a good chow mein. I think I will be more generous with the hoisin sauce and hot sauce next time. I only marinated the chicken breast with ground coriander for a few minutes before stir fry. But OCT liked it nevertheless. He added a lot of chilli to the chow mein, and ate quite a big portion.(to the point of bloated-ness when we went to bed at night)He said it was nice. Weirdo.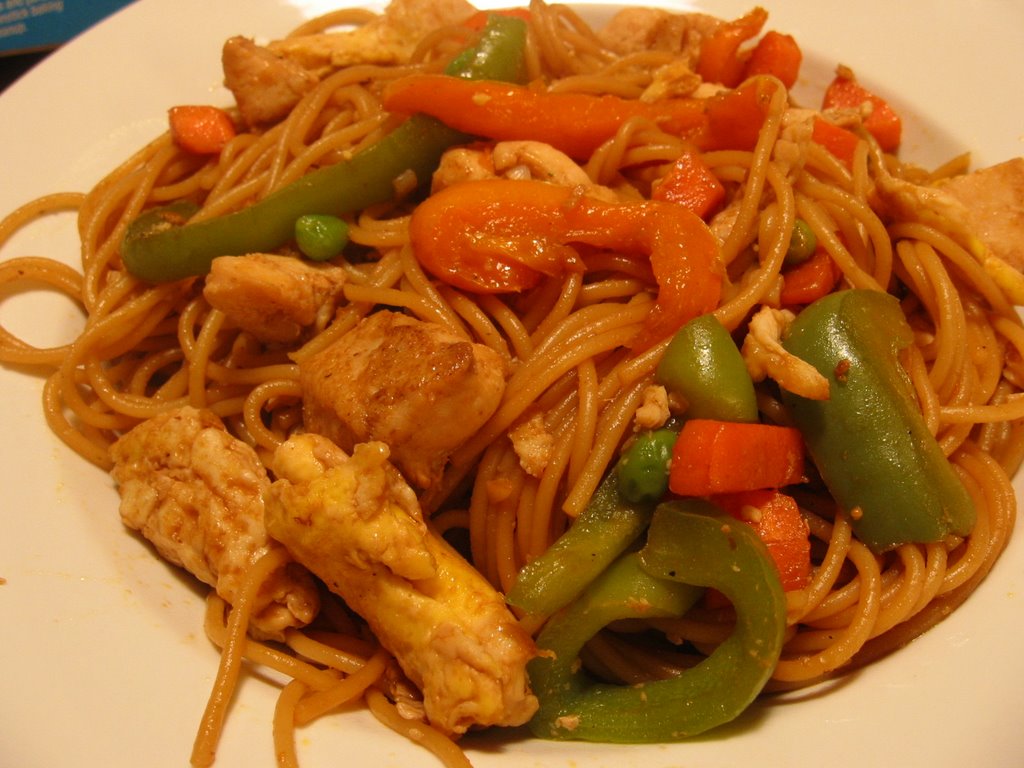
Thursday, August 31, 2006
Chow Mein my way
Wednesday, August 30, 2006
More recipe from Rachel Ray
After yesterday positive review on tomato basil pasta nest, I tried another new pasta recipe from Rachel Ray's 365: No Repeat, together with a roasted potato salad which I always wanted to try. Since it was raining, and the weather actually cool down quite a bit, I was courageous to turn the oven knob to 450F.
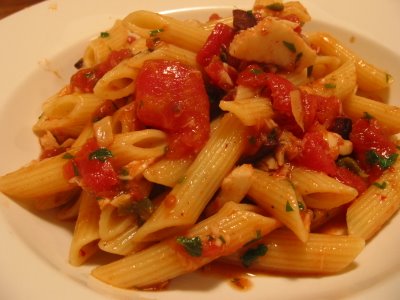
The pasta-Spicy Shrimp and Penne with Puttanesca Sauce actually has an interesting story behind it. The very fishy sauce was made by ladies and intentionally left on the brothel window to attract fishermen in like strayed cats . After they finished their business, the Puttanesca sauce would be tossed with pasta, and served as supper or breakfast. I didn't make this up. This was what Rachel Ray said. Anyway, I didn't make this recipe with any bad thought in mind. This was simply a recipe I set out to try.
I think it was pretty good. But OCT thought the taste was a bit too exotic for him. I know what he meant. He saw me cooking. And he knew that I added anchovy and kalamata olive to the sauce. Both of which were new to him. His brain instinctly told him not to like the dish. Sometime it's funny how our brain can trick us. I think the brain can decide for you whether you will like a new dish even before you tasted it. It would be easier for him to like a new thing if he didn't witness the cooking process.
*recipe will be uploaded soon.
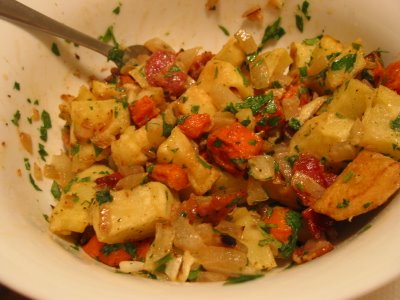
On the same ground, the roasted potato salad with mustard dressing didn't gain his approval too. Although I think this is one of the nice salads I tried lately. I like the combination of caramelised onion and roasted potatoes, eventhough I don't really like mustard. OCT promised to give the salad another chance. I guess I will have to make it when he was not watching next time. Compared to the potato salad I made a while ago, this one is certainly healthier. The amount of mayo used was only a tablespoon. Yet, it was very flavorful. Certainly less sinful to eat than the classic potato salad. Maybe I will make this as side dish for thanksgiving. Ok, I know that's a bit too soon to talk about....
Roasted Potato Salad with Mustard Dressing
(adapted from Cookinglight)
3 pounds small red potatoes, cut into 1-inch pieces
1 tablespoon olive oil
2 teaspoons freshly ground black pepper
1/2 teaspoon kosher salt
2 bacon slices (uncooked), chopped
2 cups diced Vidalia or other sweet onion (about 2 medium)
2 garlic cloves, minced
3 tablespoons Dijon mustard
2 tablespoons reduced-fat mayonnaise
1 1/2 tablespoons honey
1 1/2 tablespoons sherry vinegar
1/4 cup chopped fresh parsley
Preheat oven to 400°.
Combine first 4 ingredients in a large bowl; toss to coat. Arrange potatoes in a single layer on a jelly-roll pan. Bake at 400° for 40 minutes or until potatoes are tender, stirring once. Transfer potatoes to a large bowl.
Cook bacon in a large nonstick skillet over medium heat until crisp. Remove bacon from pan, reserving 1 tablespoon drippings in pan; set bacon aside. Add onion to drippings in pan; cook 15 minutes or until golden brown and caramelized, stirring frequently. Add garlic to pan; cook 30 seconds. Add onion mixture and bacon to potatoes; toss gently. Let stand 15 minutes.
Combine mustard, mayonnaise, honey, and vinegar in a small bowl; stir with a whisk. Add mustard mixture and parsley to potato mixture; toss gently.
Yield: 8 servings (serving size: 1 cup)
Read more...
Home alone Italian Night
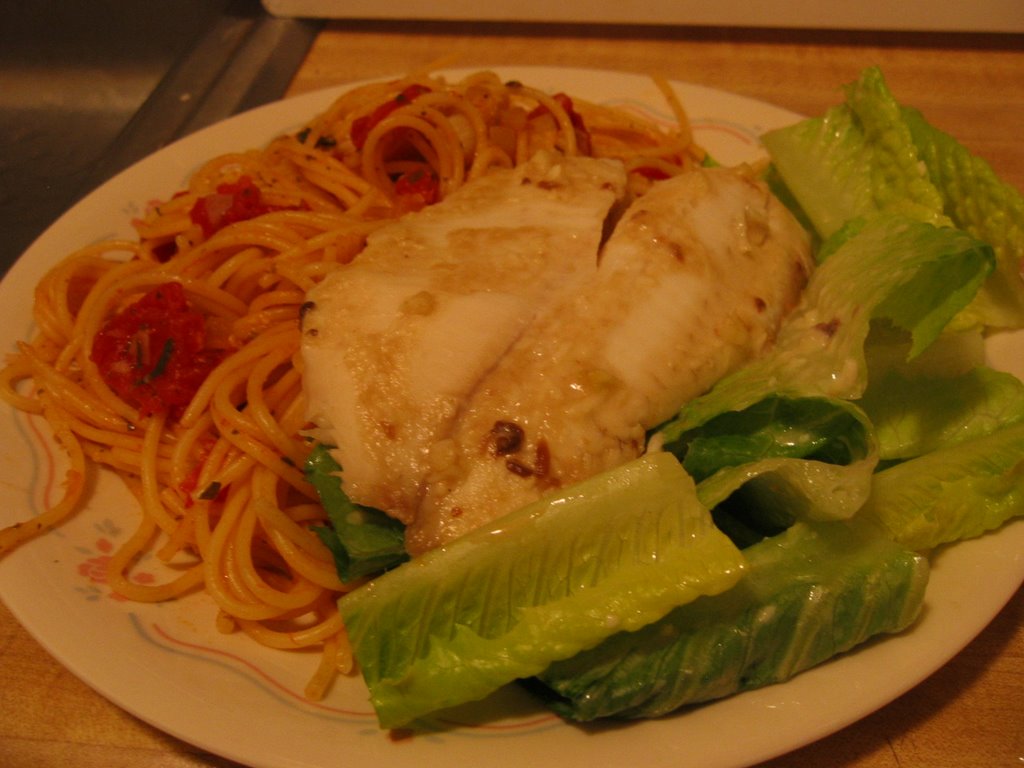
I tried 3 new recipes tonight! The first one: tomato basil pasta nest is from Rachel Ray 365: No Repeat, and a Caesar dressing from Everyday Food, which I used the leftover in baked tilapia.
It was an excellent meal. We thoroughly enjoy it though OCT and I had it at different time. The tomato basil pasta got a booast from a tablespoon of pesto sauce which makes it really outstanding. I am not crazy about pesto, but its subtle taste added some complexity to this otherwise simple dish. A dish worth repeating another day!
The caesar dressing is from the Sept issue of Everyday Food, a magazine I recently subscribed. Though it tasted quite ok, I still prefer Ina's version. After dressing the salad, I still have quite a bit of the dressing left. I guess the tang would go well with tilapia, so I baked them together. And they turned out well too.
The delicious meal made me forget temporarily that I was dining alone. You know people sometime tell you that no matter how delicious the food is, if you were to eat alone; the food will be pretty tasteless. Not for me! Maybe I was too hungry....
*recipes will be uploaded soon.
Tuesday, August 29, 2006
Malaysian Pizza
I want to laugh when I see this recipe on Cookinglight.com. What? Malaysian Pizza? We eat roti canai at mamak stall and not pizza! So this must be a fusion dish. With a few tub of pizza dough on hand, I decided to make one Malaysian Pizza to investigate the authenticity of this dish.
I suddenly remembered the funny incident happened past few weeks when I was helping to main the Chinese booth in Festival of Nation. A few people dropped by and asked if we had chicken. One specifically asked for Orange chicken. When I told them that we didn't have any chicken that day, they were obviously disappointed. And looked pretty bewildered. They must be thinking: " huh? no chicken? and you dare say this is a chinese stall?" OK people, in case you don't know; chinese dish is not equavalent to chicken. In fact, I think chinese eat more pork that chinese. But no, authentic chinese dish doesn't equavalent to pork dish either. So stop looking bewildered when the chinese stall doesn't sell chicken in the next festival!
Coming back to this Malaysian Pizza from a westerner perspective. It was actually pretty good! The filling for the pizza resembled satay! So it's a satay pizza! This is the kind of dish that you can bring to a gathering (proudly) and have people raving at it all night long. Of course the credits goes to the genius who created this pizza. I must write to Cookinglight one day to tell them how well they have represented my country!
Because I was on the caution side and only made half the recipe for the filling, I filled up the other half of the pizza simply with tomato slices and cheese. Both sides were well received by OCT. And I have no doubt that the Malaysian pizza will come back on our menu soon.
Malaysian Pizza
(adapted from Cookinglight)
3/4 cup rice vinegar
1/4 cup firmly packed brown sugar
1/4 cup low-sodium soy sauce
3 tablespoons water
1 tablespoon minced peeled fresh ginger
2 tablespoons chunky peanut butter
1/2 to 3/4 teaspoon crushed red pepper
4 garlic cloves, minced
Cooking spray
1/2 pound skinless, boneless chicken breasts, cut into bite-sized pieces
1/2 cup (2 ounces) shredded reduced-fat, reduced-sodium Swiss cheese (such as Alpine Lace)
1/4 cup (1 ounce) shredded part-skim mozzarella cheese
1 tub pizza dough (such as Pilsbury)
1/4 cup chopped green onions
Preheat oven to 500°.
Combine first 8 ingredients in a bowl; stir well with a whisk.
Heat a nonstick skillet coated with cooking spray over medium heat. Add chicken, and sauté 2 minutes. Remove chicken from pan.
Pour rice vinegar mixture into pan, and bring to a boil over medium-high heat. Cook mixture 6 minutes or until slightly thickened. Return chicken to pan; cook 1 minute or until chicken is done. (Mixture will be consistency of thick syrup.)
Sprinkle cheeses over prepared crust, leaving a 1/2-inch border, and top with chicken mixture. Bake at 500° for 12 minutes on bottom rack in oven. Sprinkle with green onions. Place pizza on a cutting board; let stand 5 minutes.
Yield: 6 servings
Monday, August 28, 2006
Gianduia Torte
I found a recipe of Gianduia Torte from epicurious.com during my research for birthday cake last week. I wanted to make it because the recipe coincidentally came from Bar Italia, an Italian restaurant below our apartment. Heading a frugal student life, we have yet checked out this restaurant let alone its dessert. I did a search and was excited to find that the Gianduia Torte is still on their menu, with $6.00 per piece.
With the recipe on hand, I decided to make my version of gianduia torte in my little apartment kitchen. Never mind the fact that I don't know how a torte should taste, and I don't have a food processor to grind the hazelnut..... Since I haven't fully recovered from the muscle ache caused by Saturday's house moving, OCT kindly took up the responsibility to smash the hazelnut using the meat mallet.
It was a flourless recipe and I can't help but wonder if torte and brownie were the same thing. Appearance wise, they really resemble one another. And both don't call for baking powder or baking soda. Maybe they are relatives. Because I remember adding flour in the brownie. So in that sense, they are different....
After 15 minutes of pounding, OCT presented the coarsely grind hazelnut to me. Good enough for now. I went ahead with the mixing, folding and baking. The torte was ready after 40 minutes.
The humble Gianduia Torte made her appearance on the subsequent night dinner with the company of Starbuck Coffee ice cream. She was too nervous to come out on her own because of her plain look, she said. It turned out that the torte and coffee ice cream were a great combination, and they received positive reviews from many. Bittersweet chocolate and hazelnut, the parents of gianduia torte and Mandy's Biscottis were relieved that both their creations were well received. They are contemplating another baby, namely chocolate hazelnut cookies for their dessert family.
I think they will do well. But I won't know for sure. The EBT (estimated baking time) is on 31 Aug 06. We will know in a few days time. Meanwhile, well done Gianduia Torte!
Note: Because Gianduia was too nervous of her first apperance, she refused to take photo. After the great review, she was promptly devoured by the greedy OCT on the subsequent morning....
Gianduia Torte
(adapted from Bon Appétit Dec 1997)
1 1/2 cups hazelnuts, toasted, husked
8 ounces semisweet chocolate, chopped
10 tablespoons (1 1/4 sticks) unsalted butter
7 large egg yolks
3/4 cup sugar
Preheat oven to 350°F. Butter 8-inch-diameter springform pan with 2 3/4-inch-high sides. Line bottom of pan with parchment paper. Butter parchment. Wrap outside of pan with foil. Finely grind hazelnuts in processor. Stir chocolate and butter in heavy medium saucepan over low heat until smooth. Cool chocolate mixture to room temperature.
Using electric mixer, beat yolks and sugar in large bowl until thick and pale yellow, about 5 minutes. Fold in cooled chocolate mixture, then hazelnuts. Transfer batter to prepared pan. Smooth top.
Bake until cake is set and appears dry but tester comes out with very moist crumbs attached, about 45 minutes. Transfer to rack. Lightly press down any raised edges of cake. Cool completely. Run small knife around sides of pan to loosen cake. Remove pan sides. Invert cake onto platter. Remove pan bottom. Peel off parchment. Slide waxed paper strips under cake to protect platter.
Serves 12.
Saturday, August 26, 2006
An uninspired week
I think I am a bit slack this week. OCT has worked late most of the days, so I wasn't inspire to cook up a storm while knowing most of the dishes will need to be reheated later. At time like this, I like to go back to the reliable and comforting recipes, like beef stew and eggplant. I think I have cooked these so often that I can prepare them with both eyes closed.
However slack I am, I still baked something for OCT and his labmates. For the very first time OCT asked me to bake something one morning when we walked to school together. OCT requested something not too sweet for his breakfast since we have run out of bread. I looked up some websites, and found one that fulfilled his criterias. I baked him a banana bread, that used only half a stick of butter, and lots of banana. I never expect it to taste nice, (at least not as nice as Rose's version) but it turned out pretty good. The kind of bread that you feel healthy enough to eat on a daily basis, but not decadent enough for indulgence.
I also baked another batch of the dark chocolate pistachio cookies after one of his colleagues told me that they were awesome. That was what OCT brought to his Friday lab meeting. On Friday night, I made my first batch of brownie (from scratch) for his colleague's house moving. We are helping them today and I thought it would be nice to have something to nibble on after the "workout". The recipe is from Nancy Baggett. She described the brownie as "The One", which is light and dense at the same time. I know it doesn't sound logical. Things can't be light and dense at the same time. But after a bite into the brownie, I must admit that I share her exact sentiment!
To me, brownie is a quintessential American food. And I don't know how a nice brownie should taste. I have eaten brownies before, but will it pass the American standard? You know it's like the Chinese food you eat here compared to those back home.It suddenly striked me that I probably shouldn't have brought my first batch of brownie to an American gathering, where everyone knows their brownies as much as I know my rice. What was I thinking? Luckily, they assured me that mine tasted like what a brownie should taste.
Another colleague asked for the recipe. I hope she didn't just say it to make me feel better. Anyway, I am glad that they finished the whole tray that I brought.
After typing this out, I realised that eventhough my week has passed pretty uninspired, I still managed to bake a bread, a batch of cookies and some brownies. That's not too bad!
Hope I can bake more new stuff next week.And remember to take pictures of them before they are gone.
Classic Banana Bread
(adapted from Cookinglight)
2 cups all-purpose flour
3/4 teaspoon baking soda
1/2 teaspoon salt
1 cup sugar
1/4 cup butter, softened
2 large eggs
1 1/2 cups mashed ripe banana (about 3 bananas)
1/3 cup plain low-fat yogurt
1 teaspoon vanilla extract
Cooking spray
Preheat oven to 350°.
Lightly spoon flour into dry measuring cups; level with a knife. Combine the flour, baking soda, and salt, stirring with a whisk.
Place sugar and butter in a large bowl, and beat with a mixer at medium speed until well blended (about 1 minute). Add the eggs, 1 at a time, beating well after each addition. Add banana, yogurt, and vanilla; beat until blended. Add flour mixture; beat at low speed just until moist. Spoon batter into an 8 1/2 x 4 1/2-inch loaf pan coated with cooking spray. Bake at 350° for 1 hour or until a wooden pick inserted in center comes out clean. Cool 10 minutes in pan on a wire rack; remove from pan. Cool completely on wire rack.
Note: I used non fat vanilla yoghurt in place of the vanilla extract and plain yoghurt.
Fudge Brownies Supreme
(Adapted from Nancy Baggett's The All Amarican Cookie Book)
10 tablespoons unsalted butter
6 ounces bittersweet (not unsweetened) or semisweet chocolate, broken up or coarsely chopped
1/3 cup all-purpose white flour
2 tablespoon unsweetened American-style cocoa powder
1/4 teaspoon salt
1 cup sugar
1/3 cup packed brown sugar
3 large eggs
2 1/2 teaspoon vanilla extract
Preheat the oven to 350 degrees. Lightly grease an 8-inch square baking pan or coat with nonstick spray. Line the pan with aluminum foil, letting the foil overhang two opposing sides of the pan by about 2 inches. Grease the foil or coat with nonstick spray.
In a large microwave-safe bowl, microwave the butter and chocolate on 100 percent power for 1 minute. Stir well. Continue microwaving on 50 percent power, stirring at 30-second intervals. Stop microwaving before the chocolate completely melts and let the residual heat finish the job. (Alternately, in a large, heavy saucepan, melt the chocolate and butter over lowest heat, stirring frequently; be very careful not to burn. Immediately remove from the heat.)
Let cool to warm. In a small bowl, thoroughly stir together the flour, cocoa powder and salt; set aside. Stir the sugar and brown sugar into the chocolate-butter mixture until well combined. Add the eggs and vanilla and stir until the sugar dissolves and the mixture is well blended and smooth. Stir in the flour mixture just until evenly incorporated.
Turn out the batter into the baking pan, spreading to the edges. Bake in the middle of the oven for 28 minutes, or until the center is almost firm when tapped and a toothpick inserted in the center comes out clean except for the bottom 1/4 inch, which should still look moist.
Transfer the pan to a wire rack and let stand until the brownie is completely cooled. Refrigerate until well chilled.
Using the overhanging foil as handles, transfer the brownie to a cutting board. Carefully peel off and discard the foil. If desired, cut away and discard any overbaked edges. Using a large sharp knife, cut the brownie into 12 bars; wipe the knife clean between cuts.
Store in an airtight container for up to 3 days or freeze for up to 1 month. If freezing, leave the brownie slab whole, then cut into bars when partially thawed.
Serves 12
Note: I used a 9 inch square baking dish, and cut the brownies into smaller bites.
Monday, August 21, 2006
Glutinous rice

I picked up a bag of glutinous rice from the Chinese grocery store yesterday, and can't wait to make my favorite glutinous rice for dinner tonight!
This is my first attempt and it was merely a passable one. OCT likes the Taiwanese sausage that I used. He said it tasted like the BBQ pork. I think the recipe needs some adjustment. I will probably post the recipe when I achieve the right flavor and consistency.
Sunday, August 20, 2006
Weekend pancake frenzy
Ever since I tried Ina Garten's sour cream pancakes, I was hooked and craved for pancakes for weekend breakfast. I have a few pancakes recipes on my to try list, so I decided to try out 2 recipes on Saturday.
The first recipe is a Blueberry Banana Pancake,from Shape magazine. It used mostly whole wheat flour, which I figured should be pretty healthy. Maybe a bit too healthy for my palate. And I also substituted the nonfat milk with buttermilk. Maybe that had somehow changed the structure or taste of the pancakes. Anyway, I doubt if I will give this recipe another chance.
The second recipe was from the September issue of Everyday Food. The pancake was featured prominently on its cover, so I thought they must have been very proud with it. In other word, it can only be good. My instinct was right! The buttermilk pancakes were really tasty. I added in some ripe banana slices, which added to the sweetness of the pancakes. OCT thought they were a bit too fluffy, he preferred the tougher version. Other than that, it was a perfect breakfast!
Too bad I didn't have a chance to take the pancakes photos, but they looked just like any other pancakes. Not very spectacular in term of appearance. But big in flavor!
Thursday, August 17, 2006
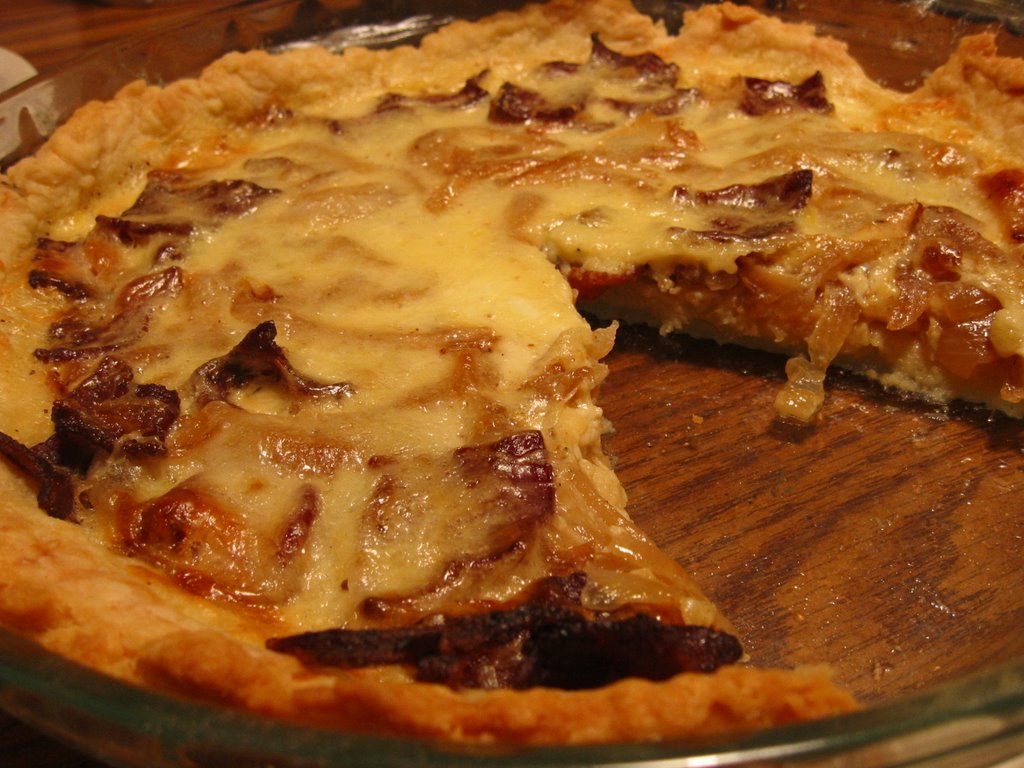
Onion Cheese and Bacon tart
If there's a word to sum up my cooking style, it will undoubtedly be Timid. Or some called it unadventurous. I normally will not try a recipe unless:
a) it has been tried by many with positive reviews
b) I can imagine how it is going to taste
c) it comes with a picture
So I actually surprised myself by baking a bacon and onion tart from scratch. By this, I mean I made my own tart pastry. An apparently daunting task for many cooks and bakers. Of course there are many celebrities chefs who trumpet the ease of making the perfect crust with food processor. I think I would join the food processor clan and mocked at those who couldn't make the crust. Too bad I don't have a processor.
I do have a loyal and dependable pastry blender. And some extra flesh on my arms that needed exercise. So I made the crust in the old fashioned way. You know what? It turns out that making the crust is not that difficult! Mine was quite presentable actually. This suddenly reminds me of the saying " The greatest fear is fear itself". How true!
Speaking of the crust, I think the key point is keeping everything cool. The butter and shortening especially. you want to cut the fat into the flour in the shortest possible time without melting them. Thanks to the countless scones making process, I am quite familiar and competent in this aspect. After the fat was cut into peas sizes, a few tablespoons of icy cold water was added to the flour mixture. Just a few tablespoons of water, until the mixture can be formed into a dough. That's about the most challenging part of the recipe for me.
To cut down on fat, I replaced the cream with nonfat milk. It still tasted very rich actually. I can see myself making this tart again soon.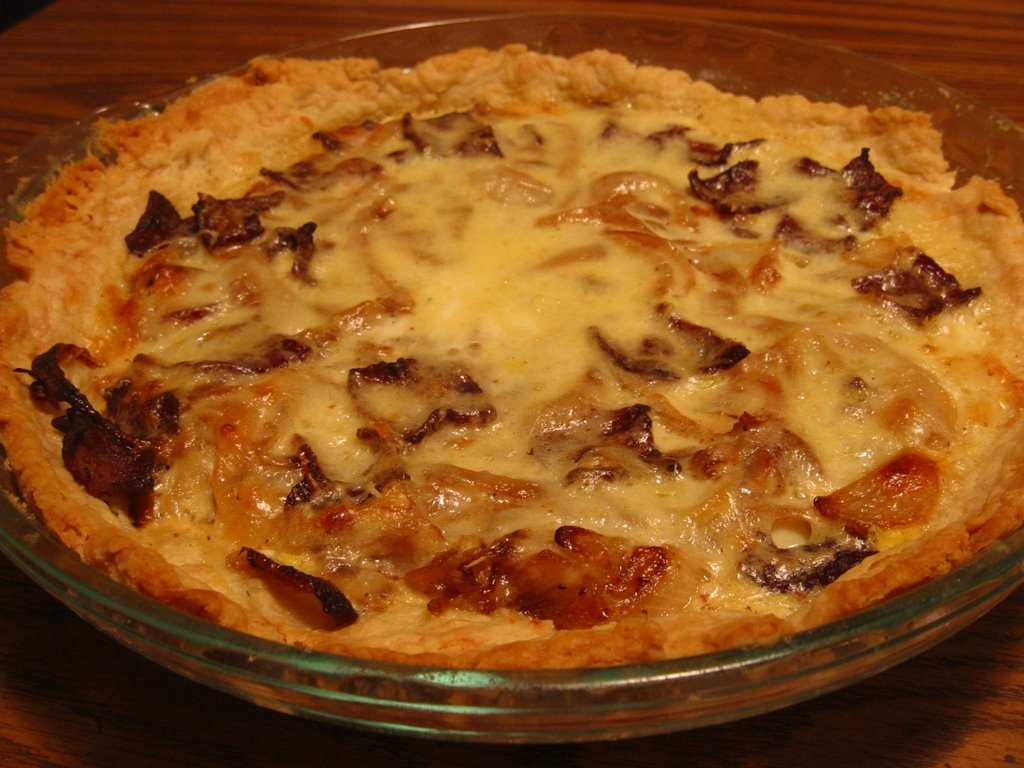
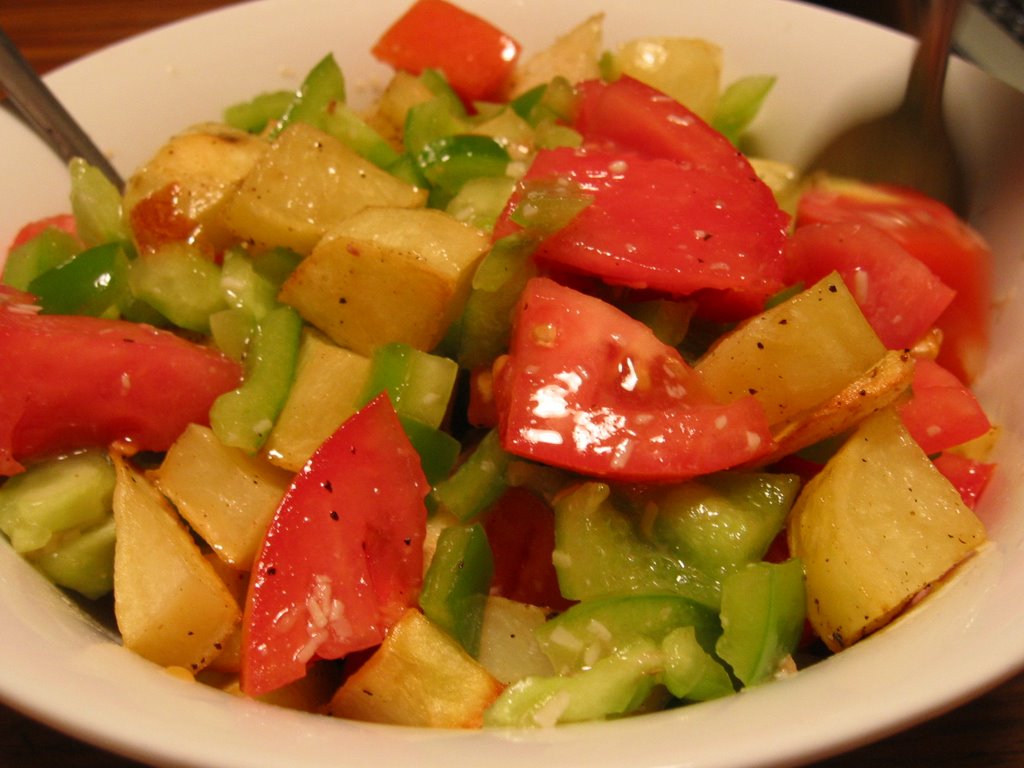
On the same night, we had a yummy roasted potato salad with the leftover Caesar dressing from yesterday.
Catching up on new recipes: Eggplant Parmesan, Salmon and Caesar Salad
I was feeling ambitious on Tuesday night,and tried 3 new recipes!
Eggplant parmesan is another recipe from The Best Light Recipe, which is supposed to be lighter than the regular stuff. Eventhough it's a lighter recipe, I think it tastes equally good, if not better.This is definitely another way to use up my extra eggplants other than the sambal style I used to cook. OCT being the conservative eater likes the dish too. And he ended up eating most of it.
Lime and honey glazed salmon is a recipe from Rachel Ray's 365 recipes no repeat. Quite a healthy and tasty way to cook salmon. We like its sweet and tangy taste.
Last but not least, the Caesar Salad, recipe from Ina Garten! I know it's an easy recipe, or you can actually buy a bottle of the vinaigrette, but the freshly made one taste very refreshing! Thanks to the freshly squeeze lemon juice.
It was a very satisfying meal. And for once, I was glad that OCT was home late. I didn't read the recipe carefully, and hence didn't realise that the eggplant parmesan was quite a time consuming dish. By the time he was back at 9:00p.m, it was the perfect time.I pulled out the piping old eggplant parmesan and icy cold salad for a great night meal.

Eggplant Parmesan
(adapted from The Best Light Recipe)
Serves 6
2 medium globe eggplants (1 pound each), ends trimmed, cut crosswise into 1/3inch thick rounds
kosher salt
1.5 cup panko
1 tbsp olive oil
1 ounce parmesan cheese, grated, about 1/2 cup, plus extra for serving
1/2 cup unbleached all purpose flour
1.5 tsp garlic powder
ground black pepper
3 large egg whites
1 tbsp water
vegetable oil spray
5 cups tomato sauce
8 ounces reduced fat mozarella cheese, shredded (about 2 cups)
2 tbsps minced fresh basil leaves
1. Toss half of the eggplants with 1 teaspoon kosher salt, then place in a large colander set over a bowl. Repeat with the remaining eggplant and 1 more teaspoon kosher salt, and transfer to the colander with the first batch. Let sit until the eggplant releases about 2 tablespoons liquid, 30 to 40 minutes. spread the eggplant slices on a triple thickness of paper towels and cover with another triple thickness of paper towels. Press firmly on each slice to remove as much liquid as possible, and wipe off the excess salt.
2. Adjust the oven racks to the lower-middle and upper-middle positions and heat the oven to 475F. Combine the bread crumbs and oil in a 12 inch nonstick skillet and toast over medium heat, stirring often, until golden, about 10 minutes. Spread the breadcrumbs into a shallow dish and let cool slightly; when cool, stir in the 1/2 cup parmesan. Combine the flour, garlic powder, and 1/2 teaspoon pepper together into a second shallow dish. In a third shallow dish, whisk the eggwhites and water together.
3.Line 2 rimmed baking sheets with foil and coat with vegetable oil spray. Season the eggplant with pepper. Lightly dredge one side of each eggplant slice in the seasoned flour, shaking off the excess. Dip the floured side of the eggplant into the egg whites, and then coat the same side with the bread crumbs. Press on the crumbs to make sure they adhere. lay the eggplant, breaded side up, on the baking sheets in a single layer.
4. Lightly spray the top of the eggplant slices with vegetable oil spray. Bake until the top of the eggplant slices are crisp and golden, about 30 minutes, rotating and switching the baking sheets halfway through baking.
5. Spread one cup of the tomato sauce in the bottom of a 13x9 inch baking dish. Layer in half of the eggplant slices, breaded side up, overlapping the slices to fit. Distribute 1/2 cup of the sauce over the eggplants; sprinkle with half of the mozzarella. Later in the remaining eggplant, breaded side up and dot with one cup of the sauce, leaving the majority of the eggplant exposed so it will remain crisp; sprinkle with the remaining mozzarella. Bake until bubbling and the cheese is browned, about 10 minutes. Cool for 5 minutes, then sprinkle with the basil and serve, passing the remaining sauce and extra parmesan separately.
Note:
The original recipe called for homemade tomato sauce, but I used the store bought sauce. It tasted fine to me. And I halved the recipe, as usual.
Caesar Salad
(adapted from Barefoot Contessa Parties!)
serves 6-8
3/4 pound pancetta, sliced 1/2-inch thick (omitted)
2 pints cherry tomatoes
olive oil
salt and freshly ground pepper
2 large heads Romaine lettuce
1 cup freshly grated parmesan cheese
For the dressing:
1 extra large egg york at room temperature (or 2 tablespoons mayonaise)
2 teaspoons dijon mustard
2 large garlic cloves, chopped
8 to 10 anchovy fillets (optional)
1/2 cup freshly squeezed lemon juice (3 lemons)
2 teaspoons kosher salt
1/2 teaspoon freshly ground black pepper
1 1/2 cups good mild olive oil
1/2 cup freshly grated parmesan cheese
Preheat the oven to 400F
Cut the pancetta into 1/2-inch cubes and cook it in a skillet over medium low heat for 10-15 minutes, until browned and crisp. Remove to paper towel and drain.
Place the tomatoes on a baking sheet and coat with olive oil. Sprinke with salt and pepper. Roast for 15-20 minutes, until soft. Wash the lettuce leaves carefully and spin dry in a salad spinner. Stack the leaves on a cutting board and cut them crosswise into 1 1/2-inch slices. Place them in a large mixing bowl.
For the dressing, place the egg yolk (or mayo), mustard, garlic, anchovies, lemon juice, salt, and pepper into a bowl of food processor fitted with a steel blade. Process until smooth. With the food processor running, slowly pour the olive oil through the feed tube and process until thick. Add 1/2 cup grated parmesan cheese and pulse 3 times.
Toss the lettuce with enough dressing to moisten well. Add 1 cup grated parmesan and toss. Divde the lettuce among 6 to 8 plates and sprinkle with pancetta and roasted tomatoes.
Note: I halved the recipe. Even when the dressing was halved, it was sufficient to make 3 night's salad. Read more...
Wednesday, August 16, 2006
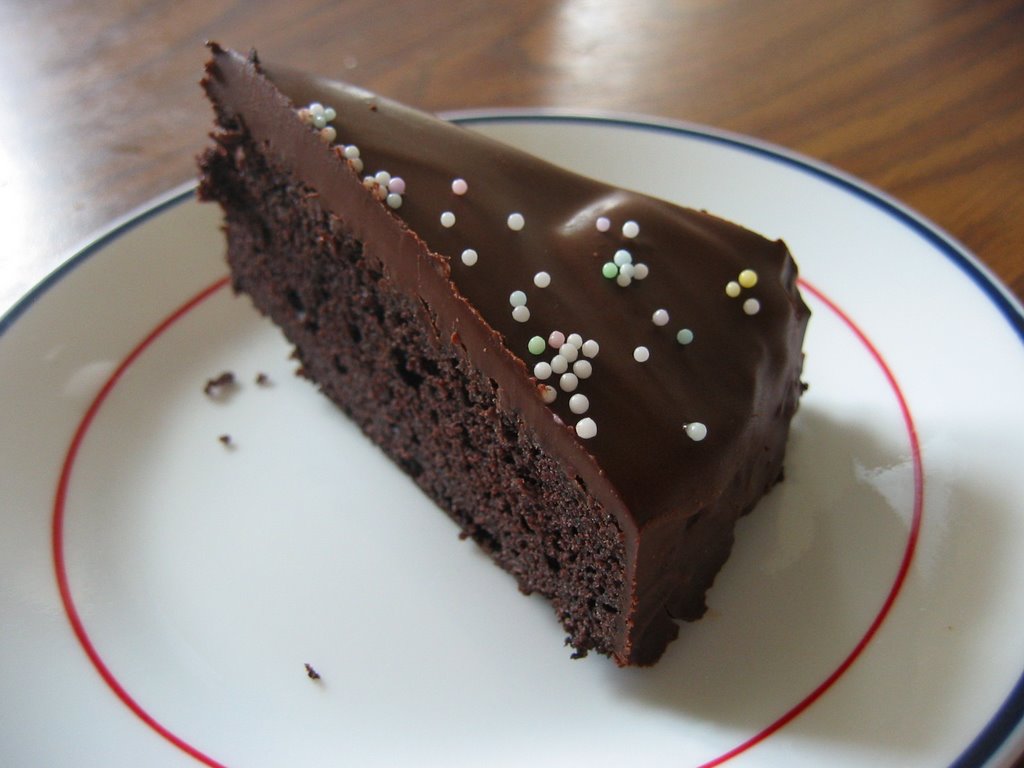
My birthday cake: Devil Chocolate Cake with Dark Chocolate Ganache
Actually I wanted to make a torte for my birthday....but changed my mind last minute to make this supposedly more festive cake. The recipe is taken from Martha Stewart Baking Handbook and I actually saw her making it on TV once. I was quite worry that it would be too sweet to our liking, but was pleased with the final product. Maybe because I used the 72% chocolate in the ganache, it somehow counteract the sweetness from the cake.
OCT said he wanted to make me a cake initially. But I decided to let him help with the brainless work, like sifting the flour; in case his endeavor failed, I would end up having no cake for my birthday. Not good for a woman suffering from PMS on her birthday. So, I took things on my hands, and make myself a birthday cake.
It was supposed to be a layer cake, but I figured that 2 layers will be too big for the two of us. Hence I decided to use only one cake instead of two to make a single layer chocolate cake. But destiny has it that I accidentally made too much ganache, which was enough to frost 2 cakes....so we ended up having 2 chocolate cakes. I let OCT frosted one and I frosted another one.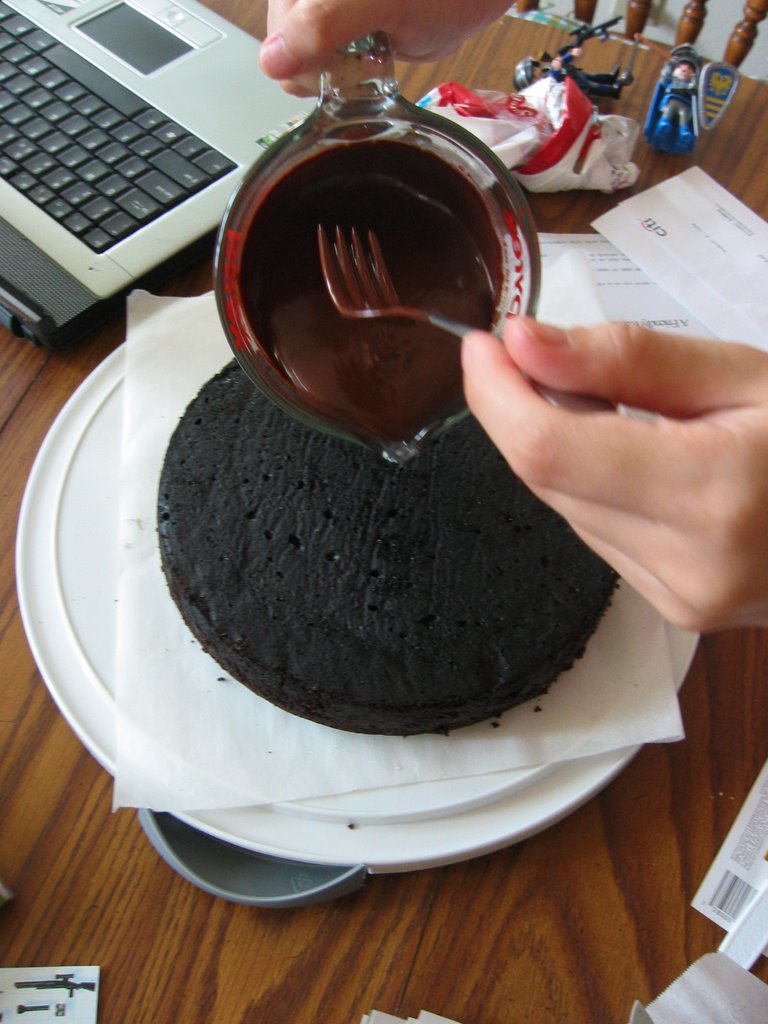
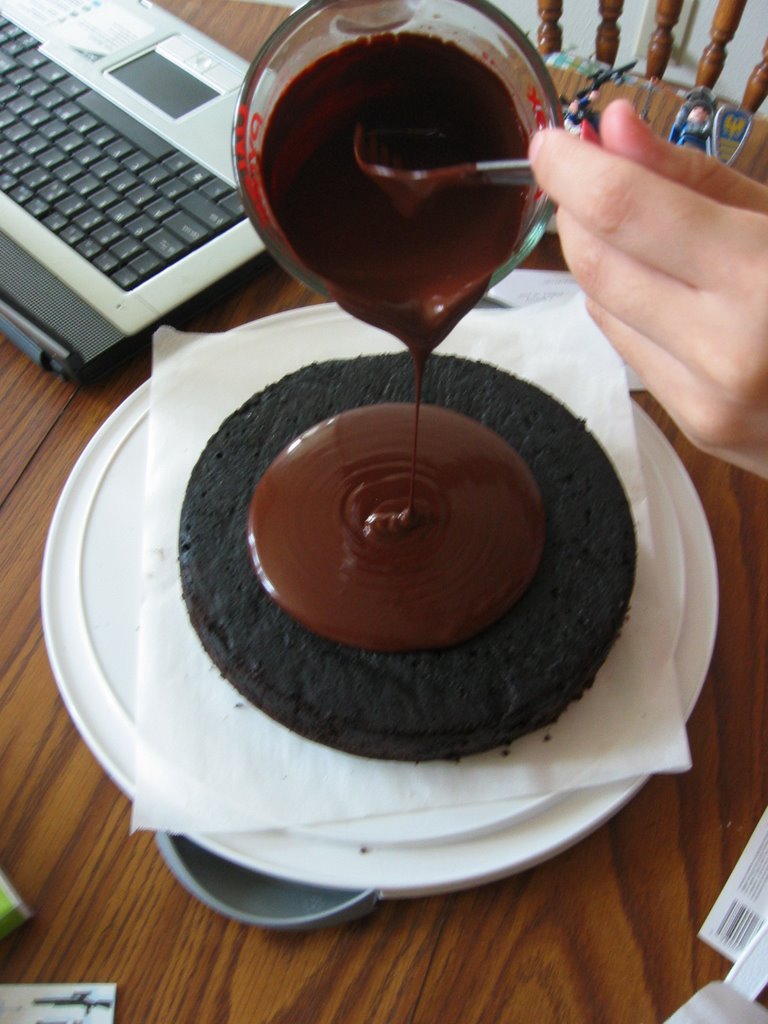
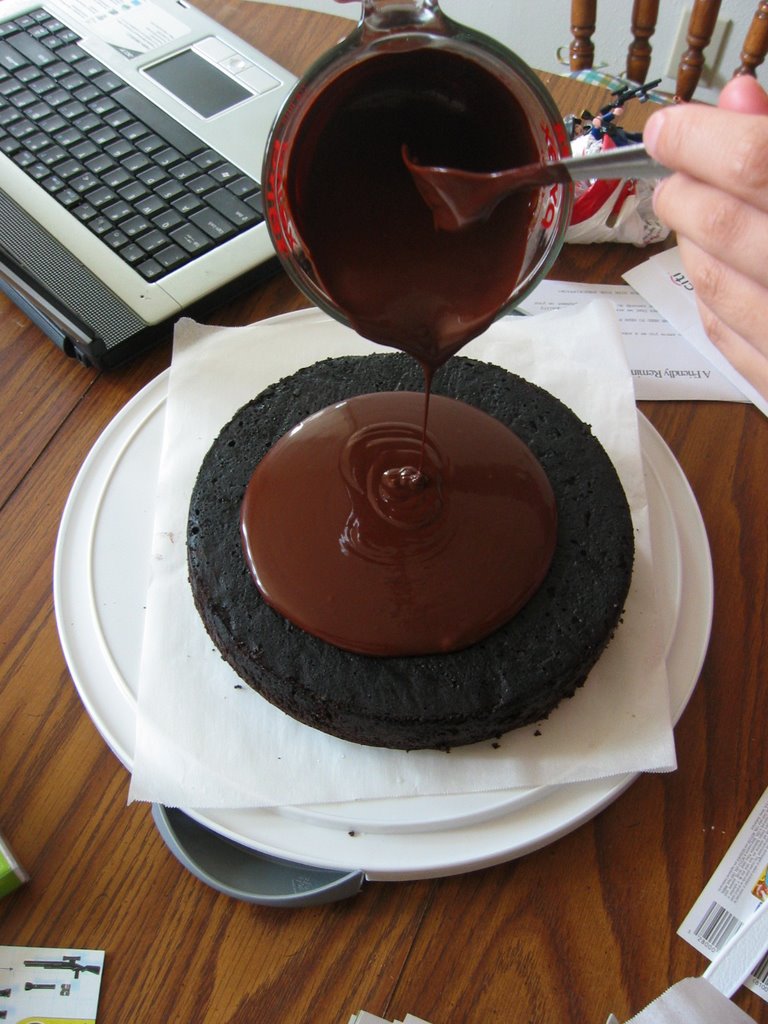
Frosting one-two-three: Pour ganache onto the middle of the cake with steady hands and slowly spread out to the sides.

Colourful candles to dress-up the classic looking cake.
A bittersweet cake to remind me of the nature of life.
Friday, August 11, 2006
A hit!
OCT tried my cookies yesterday despite his dislike of pistachio. And he likes it.
He brought a box of them to lab this morning, and was promptly finished by his colleagues.
I was a bit worried at first, because my cookies had never gained any praises from them. They preferred my cake, which were all generously frosted. Just now while talking to OCT over the phone, he told me of the positive reviews! Needless to say, I was in cloud nine.
Now, who say my cookies are not nice? I am going to try a batch with hazelnut when I get hold of them tomorrow.
Thursday, August 10, 2006
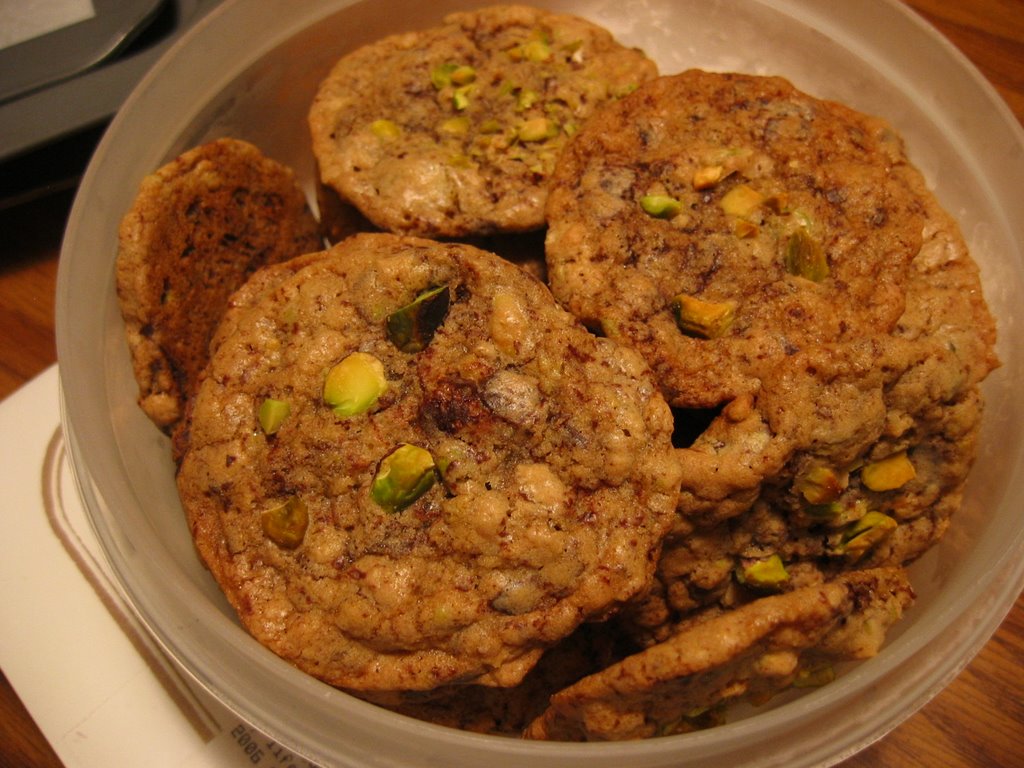
Dark Chocolate Pistachio Cookies
This is the answer to that bag of pistachio that has been sitting in the cabinet for more than a month.As usual, I wasn't sure why I bought it in the first place. Maybe it's for the trail mix that I intended to conjure, or something.
This afternoon, while browsing for a potential birthday cake to make for myself, I came across a white chocolate pistachio cookies recipe. Since tomorrow is OCT's lab meeting, I decided to whip up a batch for his labmates.
Before the cookies are presented to others, it's imperative for them to pass the baker's quality control. I took one bite of the cookie that was still warm, and couldn't help to reach out for second.There isn't many chocolate pistachio cookies recipe around, and I am not too sure if it's interchageable with walnuts or hazelnut. But I definitely like the texture of these cookies. They are soft and chewy.
OCT doesn't like pistachio, so I am not sure if he would enjoy these cookies as much as I do. Anyway, I don't think the pistachio has any distinctive or unpleasant taste here. I shall wait for his review when he is back....
Pistachio Dark Chocolate Chunk Cookies
(adapted from California Pistachio Commission)
1 1/4 cups unsalted butter, at room temperature
1 cup granulated sugar
1 cup dark brown sugar, packed
2 eggs
2 tablespoons milk (omitted)
2 tablespoons vanilla
2 1/2 cups flour (used 2 cups)
1 teaspoon each baking soda, baking powder and salt
1 cup rolled oats
1 1/2 cups natural California pistachios, coarsely chopped, divided
1 package (10 ounces) dark chocolate chunk
Instructions:
Preheat oven to 350 degrees F. Cream butter and sugars together. Beat in eggs, milk and vanilla. Combine flour, baking soda, baking powder and salt. Process oats in blender or food processor, leaving some texture. Gradually add flour mixture and chopped oats to butter mixture, mixing well. Stir in 1 cup pistachios and dark chocolate chips. Drop mixture by heaping teaspoons onto greased baking sheets, allowing for spreading. Press remaining pistachios on top of cookie dough. Bake 8 to 10 minutes or until golden brown. Let cool slightly on sheet to set up.
Makes 3 to 4 dozen.
Turkey meatballs with homemade marinara sauce
Time flies and it's already Thursday today. I have been following the korean series that my friends sent me since Monday. Because of this, the quality of dinners suffered a bit. We had fried beehoon as dinner on Monday,and burned chicken with white wine and onion sauce on Tuesday. Fried beehoon is the kind of dish I like to cook when I miss home. The chicken with white wine and onion sauce should have tasted better if I didn't overcook the chicken and charred the onion.Minus the burnt taste, it is a dish worth revisit someday.
Yesterday, I was guilt-driven and wanted to cook something nicer to make up for the past nights. I settled on a turkey meatballs recipe with homemade marinara sauce from Giada De Laurentiis's Everyday Italian. Unlike most of the recipes I tried on the book, this one is a winner. A taste of the marinara sauce quickly resume my confidence in this book that many have raved. I am going to buy many more cans of crushed tomatoes to make my own marinara sauce from now on. Although there isn't a lack of choices for tomato sauces,neither are they expensive; I just think that it's healthier to make my own's. In Giada De Laurentiis's recipe, she used only a teaspoon of salt, and make up the flavor by using other wholesome ingredients like onion,carrots, celery, and herbs. I didn't add sugar, but the sauce was sweet, and flavorful. I will not be surprised that other commercial brands will need to add other flavor enhancing ingredients to make it taste as nice.
In short, I am going to make a lot of marinara sauce to freeze. or perhaps I can give some away....
The turkey meatballs are also flavorful. They reminds me of the minced pork meatballs we have in porridge.The Asian version is healthier, being boiled insteads of fried like its western counterpart. I wish I could get hold of some minced pork here, but I never recall seeing it in the grocery stores. It also seems to have lesser choices of cuts for pork here, compared to beef or chicken.Not that I am a big pork fan. Quite the contrary, it is one of the things I can leave without.
Unlike the pork meatballs where chinese condiments are used for seasoning; the turkey meatballs used 2 types of cheese, ketchup, parsley, breadcrumbs, salt and pepper. I love both versions. And I am glad that the ground turkey doesn't turn out bland and dry. Though the whole cooking process took almost one and a half hour, I don't mind coming back to this recipe when ground turkey are on sale again.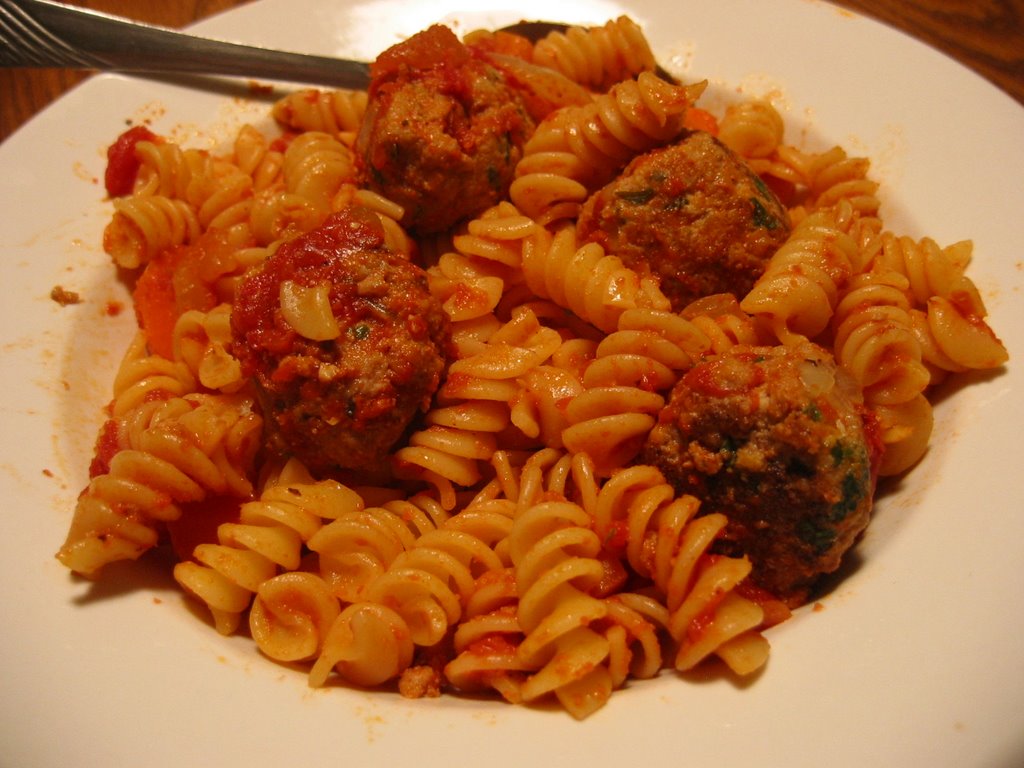
Turkey Meatballs with homemade Marinara Sauce
1 small onion, grated
3 garlic cloves, minced
1 large egg
1/4 cup dried bread crumbs
3 tablespoons ketchup
1/4 cup chopped fresh Italian parsley leaves
1/4 cup grated Parmesan
1/4 cup grated Pecorino Romano
1 teaspoon salt
1/4 teaspoon ground black pepper
1 pound ground dark turkey meat
3 tablespoons olive oil
26 ounces Simple Tomato Sauce, recipe follows, or store-bought marinara sauce
Add the onion, garlic, egg, bread crumbs, ketchup, parsley, Parmesan, Pecorino, salt and pepper to a large bowl and blend. Mix in the turkey. Shape the turkey mixture into 1 1/4-inch-diameter meatballs. Place on a large plate or baking sheet.
Heat the oil in a heavy large frying pan over medium-high heat. Add the meatballs and saute until browned on all sides, about 5 minutes. Turn off heat. Transfer the meatballs to a plate. Pour off any excess oil. Add the marinara sauce, about 3 cups. Return all the meatballs to the pan. Turn the heat to medium-low and simmer until the sauce thickens slightly and the flavors blend, 15 to 20 minutes. Season the sauce, to taste, with salt and pepper.
Marinara Sauce
1/2 cup extra-virgin olive oil
2 small onions, finely chopped
2 garlic cloves, finely chopped
2 stalks celery, finely chopped
2 carrots, peeled and finely chopped
1/2 teaspoon sea salt
1/2 teaspoon freshly ground black pepper
2 (32-ounce) cans crushed tomatoes
2 dried bay leaves
In a large casserole pot, heat the oil over a medium-high flame. Add the onions and garlic and saute until the onions are translucent, about 10 minutes. Add the celery, carrots, and 1/2 teaspoon of each salt and pepper. Saute until all the vegetables are soft, about 10 minutes. Add the tomatoes and bay leaves, and simmer uncovered over low heat until the sauce thickens, about 1 hour. Remove and discard the bay leaf. Season the sauce with more salt and pepper, to taste. (The sauce can be made 1 day ahead. Cool, then cover and refrigerate. Rewarm over medium heat before using.)
Monday, August 07, 2006
Thank you gals!

I received a huge parcel from Singapore this afternoon that's packed with lots of goodies! Thanks gals for your thoughtfulness. What have I done to deserve friends like you?
Sunday mixed reviews
Sunday morning, I suddenly craved for pancake and decided to whip up some banana sour cream pancakes from Barefoot Contessa Family Style. Interestingly the taste is a cross of fried banana back home and Rose Levy Beranbaum's banana bread. Probably because Ina used lemon zest in her pancake batter.
I also noticed that the pancake rose higher than the buttermilk pancake I made before, and this tasted so much better. The texture is a bit like mini sponge cake with banana filling. I think I am going to make some next weekend for breakfast :) One downside though, the pancakes only taste good when served warm. And I certainly need to work on the presentation....

Banana Sour Cream Pancakes
makes 12 pancakes
1.5 cups all purpose flour
3 tablespoons sugar
2 teaspoons baking powder
1.5 teaspoons kosher salt
1/2 cup sour cream
3/4 cup plus 1 tablespoon milk
2 extra large eggs
1 teaspoon pure vanilla extract
1 teaspoon grated lemon zest
unsalted butter
2 ripe bananas, diced plus extra for serving
pure maple syrup
In a medium bowl, sift together the flour, sugar, baking powder, and salt. Whisk together the sour cream, milk, eggs, vanilla and lemon zest. Add the wet ingredients to the dry ones, mixing only until combined.
Melt 1 tablespoon of butter in a large skillet over medium low heat until it bubbles. Ladle the pancake batter into the pan. Distribute a rounded tablespoon of bananas on each pancake. Cook for 2 to 3 minutes, until bubbles appear on top and the underside is nicely browned. Flip the pancakes and then cook for another minutes, until browned. Wip out the pan with a paper towel, add more butter to the pan, and continue cooking pancakes until all the batter is used. Serve with sliced bananas, butter and maple syrup.
Tips:
- Use the 1/4 cup measure to drop the batter into the pan.
-Make sure the diced bananas are covered by batter, or it will stick to the pan.
- I used canola oil instead of butter, to reduce fat.
For dinner, I cooked Spinach Fettucine, which is a staff favorite in July issue of Cookinglight magazine. I substituted a few items; like 2%milk for half & half and Gruyere for 1/3 cream cheese. The result was a mess to say the least. I am going to try this recipe again when I gather all the ingredients. Poor OCT has to finish the leftover as today's lunch.
Weekend lunch


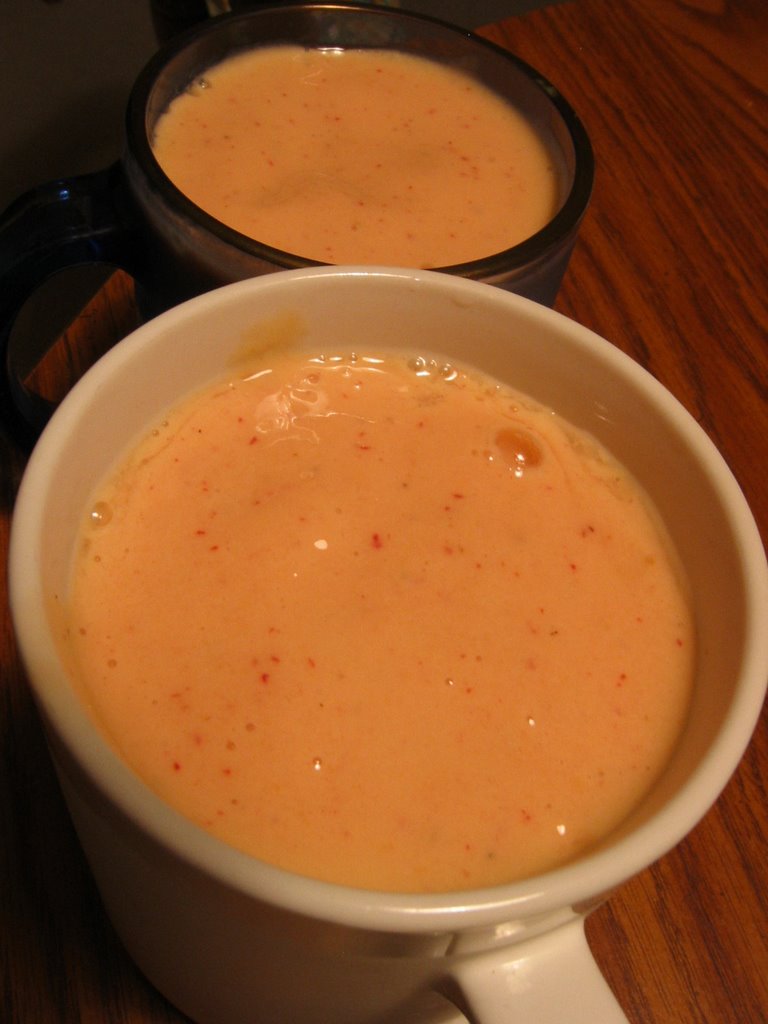
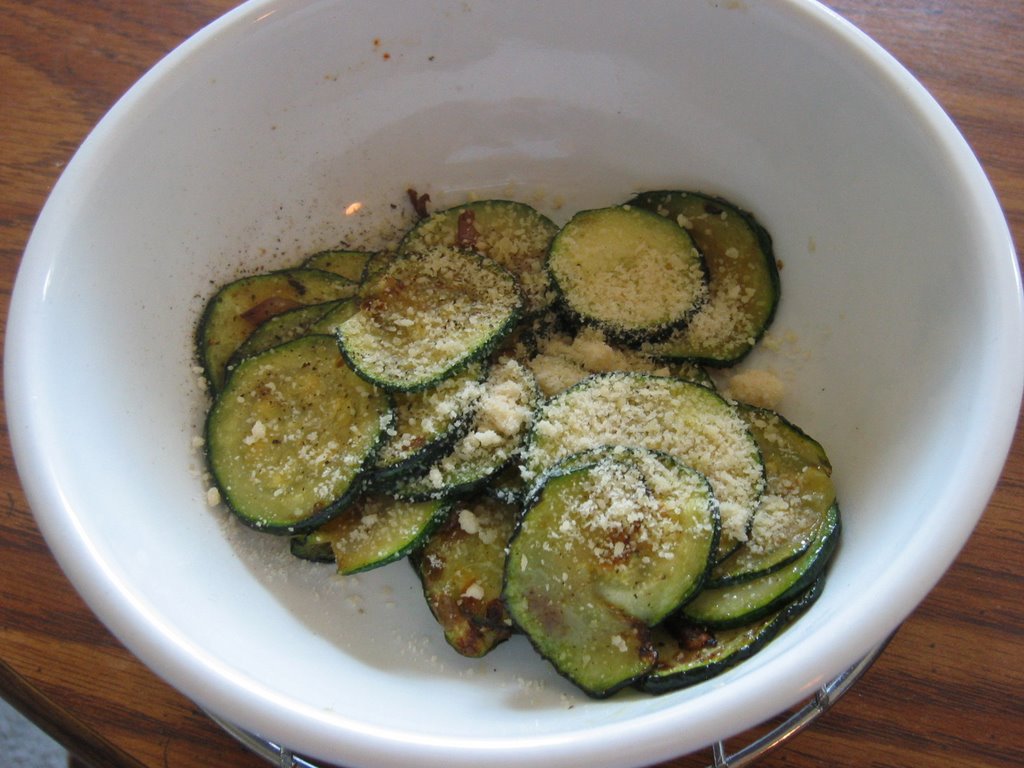
Top: Cheesy Zucchini and red onion flatbread; hash brown
Bottom: Mixed fruit smoothies, parmesan zucchini
Although I knew there was going to be a big feast at night, I couldn't help to make something for lunch on an idle Saturday. Since I have assembled all the ingredients for cheesy zucchini and red onion flatbread, I decided to just do it! With the leftover zucchini and red onion, I came up with another 2 side dishes : parmesan zucchini and hash brown with caramelised red onion. To round up the meal, we had mixed fruit smoothies. Pretty substantial meal before the feast..
The flatbread was nice. I liked it a lot, but OCT thought it was too cheesy for him. Eventhough I used less cheese than what the recipe called for. This is definitely a great dish to serve your vegetarian friends.
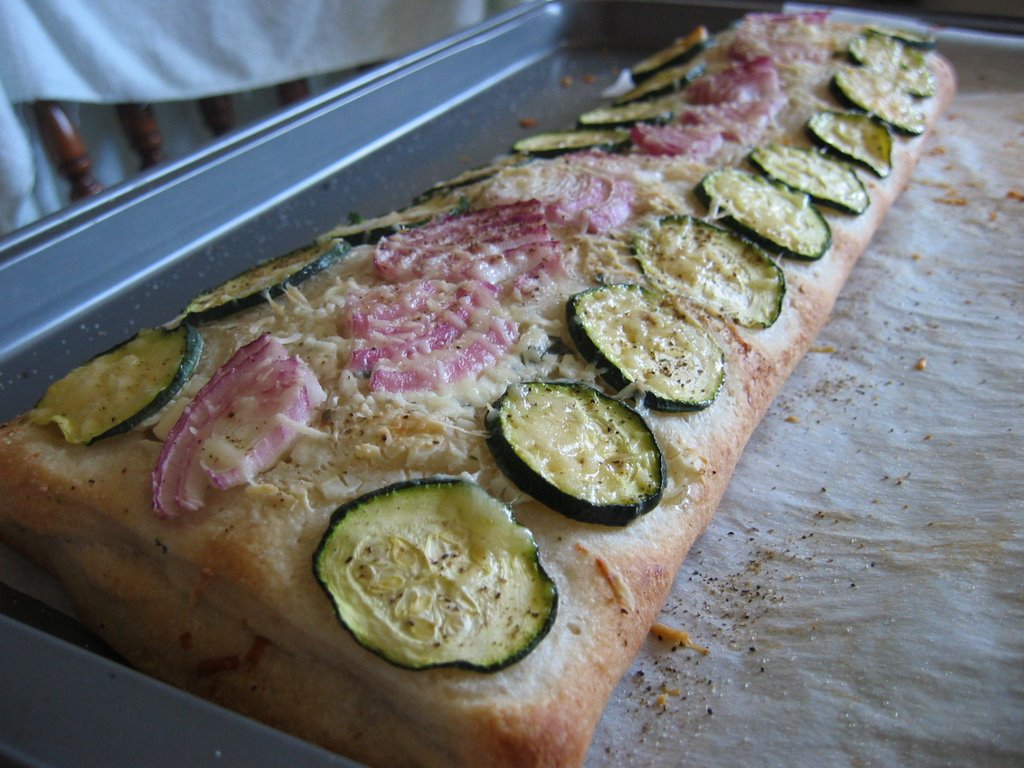
Cheesy Zucchini and Red Onion Flatbread
(adapted from Bon Appetit August 2006)
13 oz tube refrigerated pizza dough
3/4 cup garlic and herb cheese spread (such as Alouette), divided
3/4 cup finely grated parmesan cheese, divided (I substituted half with Gruyere cheese)
3 tbsp chopped fresh Italian parsley
1 small red onion, cut into 1/8-inch rounds
1 7- to 8-inch long zucchini, cut crosswise into 1/8-inch thick rounds
olive oil
salt
Preheat oven to 400. Line baking sheet with parchment. Unroll dough onto parchment. Spread half of herb cheese over one long half of dough, leaving 1/2 inch plain border. Sprinkle with half of parmesan and 2 tbsp parsley. Arrange one row of zucchini down one long side of dough on top of the herb cheese. Arrange onion rounds in row alongside zucchini. Arrange one more row of zucchini alongside onion.Using parchment as an aid, fold plain half of dough over filled half (don't seal edges).
Spread remaining herb cheese over top; sprinkle with remaining parmesan.Arrange one row of zucchini down one long side of dough.Arrange onion rounds in row alongside zucchini. Arrange one more row of zucchini alongside onion. Brush vegetables with olive oil and sprinkle with salt and pepper.
Bake until puffed and deep brown at edges, about 24 minutes. Sprinkle with remaining parsley.
Read more...
Sunday, August 06, 2006
A very yummy Weekend
August is the month of this baker's birthday; and more importantly, the birthday of Singapore! Through the connection of my significant half, I got to know a few Singaporeans who have now turned into great friends during my short stay in St Louis. Since 9 Aug falls on Wednesday, they decided to hold the National Day party on an earlier date, i.e Saturday; for the convenience of everyone.
It was really a feast!
We had:
-2 types of curry chicken
-Singapore economy rice style potato and luncheon meat
-Lasagna
-Bak Kut Teh
-Spanakopita
-Beef Stew
-Tomyam tuna rolls
-Mixed Veggies Stirfry
-Stirfry Tofu with prawn and mushroom *
-Belachan Egg plant*
-Strawberry Country Cake*
-Almond jelly with mixed fruit
-Watermelon
-Almond jelly with mixed fruits
* are my contributions.


Some of the dishes captured by M.
The Stawberry Country Cake was the same one I made last week. I made this because red and white are the colour of Singapore Flag.
The varieties and quantities of the food could beat the buffets here in St Louis. Ok, maybe I exaggerated a bit. But there really isn't any place that serves authentic Singapore food here. And all of the dishes are tasty! Being the inquisitive baker, I took the opportunity to ask the rest for their recipes (roughly).
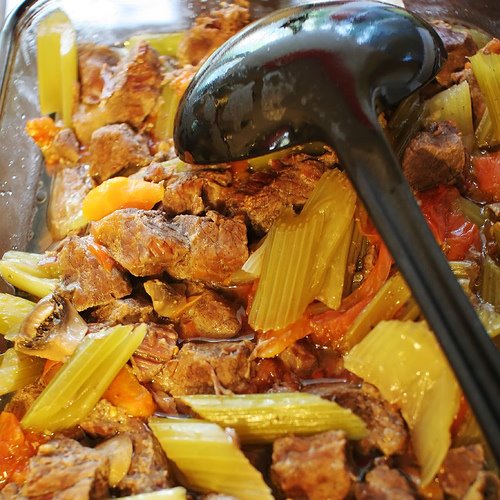
For instant, the juicy and tender beef stew from the host BP. She told me the secret was her pressure cooker and the LONGER cooking time;
"I use the pressure cooker, and cook longer than usual. " Said BP
"Oh, how long did you cook?" I asked
"Usually, I cook for 15- 20 minutes. Today, it's 30 minutes"
"......"
That's merely a quarter of the time I used with my dutch oven, to achieve the same kind of tenderness.
Next, I asked SK, who brought the lasagna. Honestly, his version is really the best I have ever tasted. Better than the Pizza Hut's, which I once liked. This was his reply:
" I followed the recipe from the Barilla's box, and substituted ground turkey for the ground beef, and added extra red bell peppers"
"Really? That's it?" I asked in a bit of bewilderment. I have made lasagna twice. First time was inedible, second time was merely mediocre. Yet,he made making lasagna sounds so effortless.
"Yeah, just follow the instruction from the box" answered the talented SK. ( I wish I could introduce him to my friend ST since both of them are singles. And a guy who can cook so well is hard to come by)
Last but not least, I asked M, who was also the photographer of the night, for the recipe of his Singapore economy rice style potato and lucheon meat. According to him, it's a recipe from his grandmother. I was impressed, and secretly wished that my grandma had left me any recipe at all.. Anyway, he told me that the sauce was a mixture of tomato sauce, fish sauce and sugar. Brilliant! I never thought of adding fish sauce to the tomato sauce before.
I have once again seized the opportunity to learn and had a great time yesterday!

To the rest of the Singaporeans who read this blog : "Happy National Day"! Read more...
Thursday, August 03, 2006
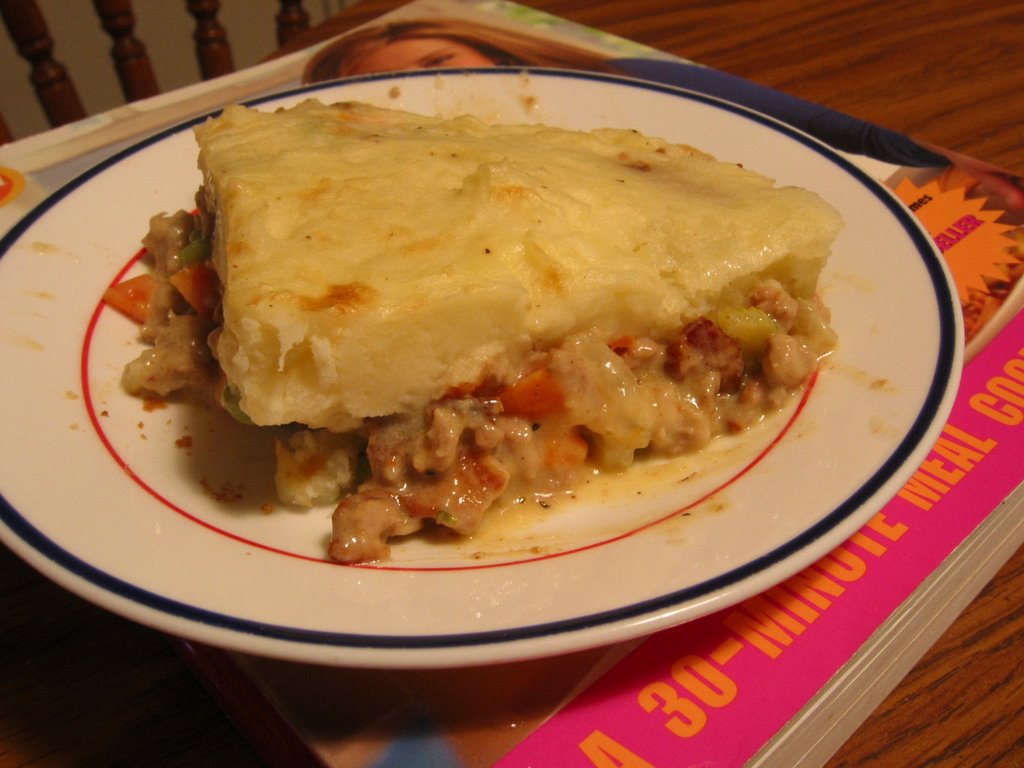
The definitely not 30 minutes Shepherd's Pie
I just got Rachel Ray 365: No Repeat from the library a few day ago. After browsing through some of the recipes, I was quite excited about some of the combinations, which I have never thought of. The idea of having 365 dishes, no repeat for a whole year is quite liberating. No more dull days having to eat the same thing ever again! Not to mention all these recipes require only 30 minutes to prepare.
Before this book, I actually tried some of Rachel Ray's recipes. They were all pretty easy and tasty. That's the reason why I am so looking forward to try the recipes in this book.
Today, I started off with her 30 minutes Smoky Turkey Shepherd's Pie. One thing for sure, it takes longer than 30 minutes for me. It took me almost an hour in fact. I am sure it will take 30 minutes if all ingredients were prep beforehand, and all I need to do is just cooking. Too bad, that's not the case here. I have to scrub, peel, cut and boil my potatoes. I am not complaining since I also take more of less the same amount of time to cook my daily meal.
Rachel Ray's Shepherd's pie appeals to me because it uses ground turkey, which is generally healthier than other meat. Also it sneaks in many veggies in its filling. But I will make it with other meat next time just for comparison sake. Instead of baking the pie in the oven for 30-40 minutes, Rachel's recipe cooks the filling on stove, and broil the mashed potato covered filling for only a few minutes. With the mercury rising, it certainly help to minimise the use of the oven.
OCT likes the pie and asked me repeatedly if the top is made of mashed potatoes. I wonder if he would ever remember it when I ask him again next week.
Smoky Turkey Shepherd's Pie
serves 4-5
3 large Idaho potatoes, peeled and cubed
Coarse salt
2 tablespoons EVOO - extra-virgin olive oil - 2 turns of the pan
1/4 pound smoky bacon or turkey bacon, chopped
1 1/3 pound ground turkey breast
1 tablespoon smoked paprika, available in small cans on spice aisle of market
(You may substitute 1 1/2 teaspoons each sweet paprika and cumin combined)
Coarse black pepper
2 tablespoons, 5 or 6 sprigs, fresh thyme leaves
1 medium onion, chopped
2 carrots, peeled and diced
3 ribs celery from the heart, chopped
1 small red bell pepper, seeded and chopped
2 cups frozen peas
2 tablespoons all-purpose flour
2 cups chicken broth
1 cup sour cream, divided
3 tablespoons butter
1 large egg, beaten
10 to 12 blades fresh chives, chopped or snipped
Bring a medium pot of water to a boil, salt it, and cook the potatoes until tender, 12 to 15 minutes.
Heat a deep, large skillet over medium-high heat. Add EVOO, 2 turns of the pan, to the skillet. Add bacon and brown it up, then add ground turkey to the pan and break it up. Season the turkey with smoked paprika, salt and peppe,r and thyme. When turkey browns up, add: onions, carrots, celery. Season the veggies with salt and pepper. Cook 5 minutes, then add red pepper and peas cook another 2 minutes. Stir in flour and cook flour 2 minutes. Whisk in broth and combine. Add 1/2 cup of sour cream and combine. Simmer mixture over low heat.
Preheat your broiler to high.
When potatoes are tender, add a ladle of cooking water to the egg. Drain potatoes and return to the warm pot to dry them out a little. Add remaining 1/2 cup sour cream, butter, half of the chives, and salt and pepper. Smash and mash the potatoes, mashing in the beaten, tempered egg. If the potatoes are too tight, mix in a splash of milk.
Pour turkey mixture into a medium casserole dish. Top turkey with an even layer of smashed potatoes and place casserole 5 inches from hot broiler. Broil the potatoes until golden at edges and remove the casserole from the oven. Garnish the casserole with the remaining chives and a sprinkle of smoked paprika.
A few new recipes
For some reasons, I never get round to buy zucchini until now. Maybe it is its close resemblance to cucumber, which I normally won't use, except for making sandwiches. After reading a few Italian cookbooks however, I decided to incorporate this cucumber-look-alike into our diet.
 The recipe I used is from Martha Stewart's Everyday Food. A Zucchini fritter recipe. Guess everything just tastes better after frying ... Though it's not necessarily better for the body.I think I will use zucchini in some healthy recipes next time. But the first introduction to zucchini in the form of frtter does help to break the ice. I am now more ready to make recipes using zucchini. In which one of them, is a flatbread from the latest Bon Appetit- Cheesy Zucchini with red onion flatbread. But that will be another entry.
Speaking of new veggie, we also tried sauteed swiss chard this week. But OCT didn't like the "very fiberous" green. And hence asked me not to buy it again. Well, at least we tried.
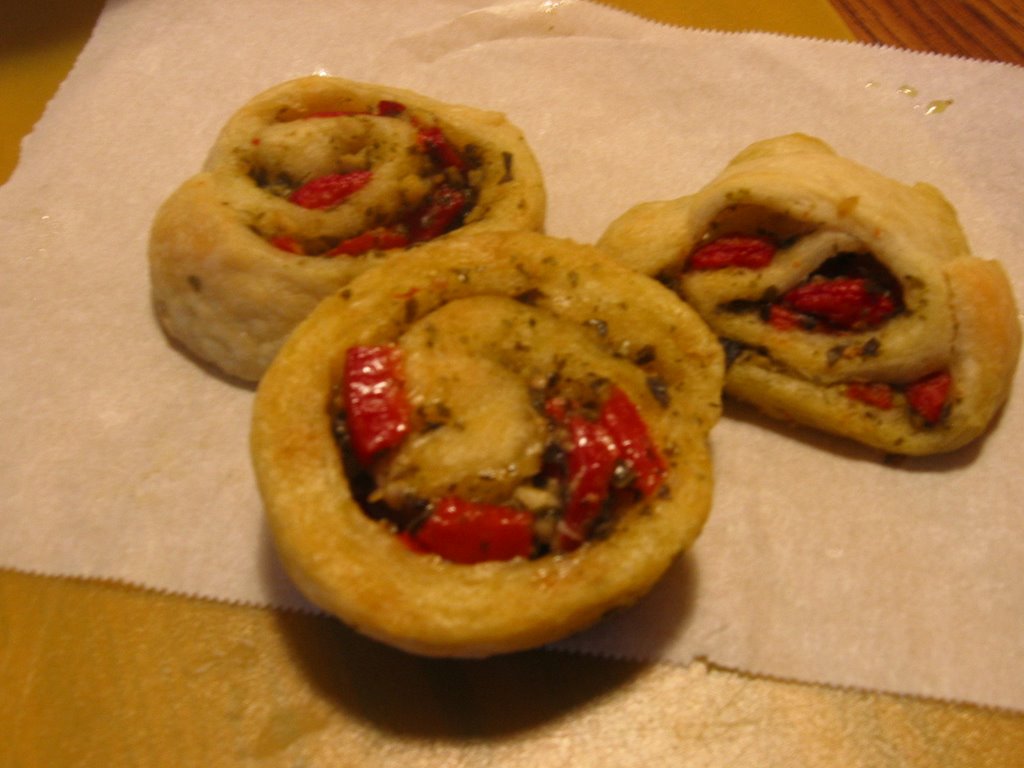 Yesterday, I made some pesto pinwheels using Pilsbury crescent rolls. The making process is quite a mess, but I am glad that OCT likes it. More than I do. Now I have introduced 3 new food to OCT : zucchini, swisschard and pesto within a week. That is not too bad for a guy who once resisted to try anything new. He used to eat only broccoli and carrot as his side dishes..
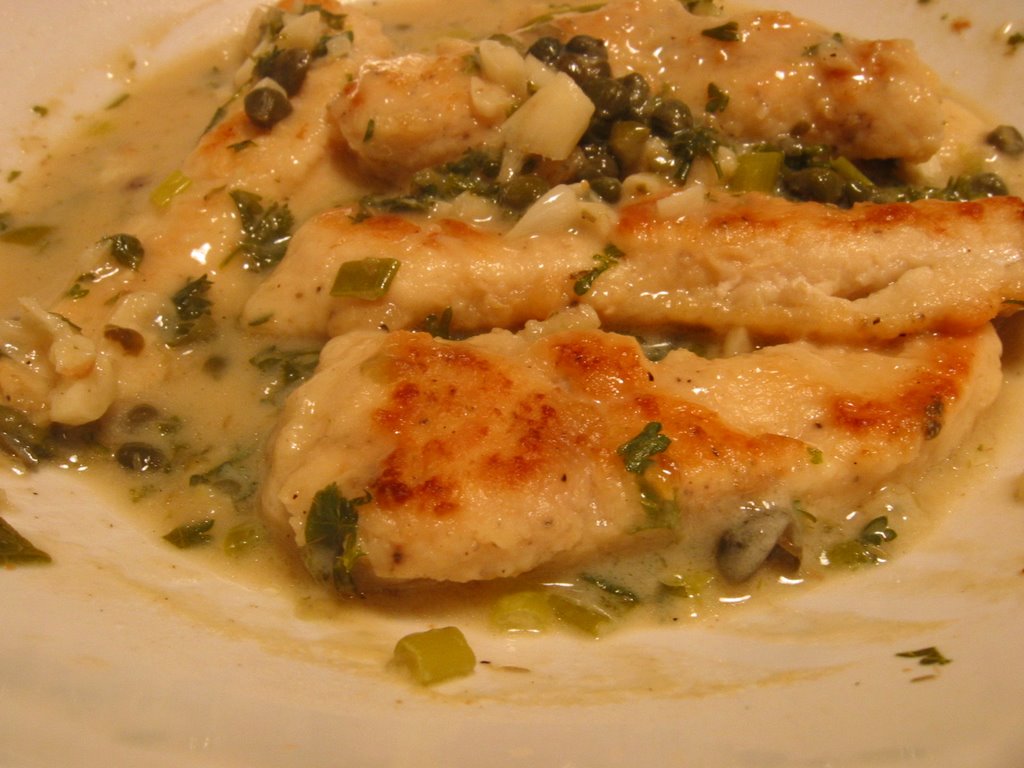
Last but not least, I revisited chicken piccata. And this time it was a success! I must thank The Best Light Recipe for its yummy and considerably lighter recipe. Speaking of which, I should get hold of a copy of this soon.
Read more...Wednesday, August 02, 2006
Baking with peach (part 2): Peach Cheesecake

Second recipe I made with peaches was a cheesecake! This cheesecake was brought to my attention by someone from the Cookinglight bulletin board (thanks funnybone!), a forum I frequent.
After looking at the recipe, which is pretty high fat, I decided to twist the recipe a bit. This is what I usually do to any cheesecake recipes. First, I will reduce the amount of cream cheese, which contributed to most of the fat. Next, I like to substitute 1/3 cream cheese for normal cream cheese. So far, I have pretty good result with this formula. And I always use 3 blocks of cheese instead of 4 blocks, the standard amount of cream cheese in most cheesecake recipe.
I have also substituted the gingersnap cookies with the honey graham crackers that I have on hand. Instead of using all 1/3 cream cheese, I used 2 blocks of cream cheese plus one block of 1/3 cream cheese this time. The improvement on texture is drastic. The heesecake I made with 1/3 cream cheese sometime came out slightly dry and not as creamy as the full fat version. But then again, I often made the mistake of overbaking my cheesecakes. So maybe I shall not blame the low-fat cheese for my dry cake..
Although this recipe is a bit more work compared to the rest of the cheesecakes I made, it is well worth the effort. It's so creamy and smooth that it simply glides through my tongue. This is so good! And the texture is better than the rest of the cheesecake I made. Seriously. I am going to try this with other fruits next time. Maybe straberries.
The recipe actually called for a glaze, but I think it is really unnecessary. The cheesecake with peach compote itself is delicious enough. On a second thought, maybe I should glaze half of the cake and compare the result?
To glaze or not to glaze, that is the question.
Peach Cheesecake
(Adapted from Bon Appétit June 2002)
*click here for the original recipe*
Crust
2 cups of crushed graham cracker crumb
1/4 cup (1/2 stick) unsalted butter, melted
Filling
4 small peaches (about 1 1/4 pounds), peeled, pitted, sliced 1/4 inch thick
2 tablespoons plus 1 cup sugar
1/2 teaspoon fresh lemon juice
2 8-ounce packages cream cheese, room temperature
1 8-ounce package 1/3 cream cheese, room temperature
3 large eggs, room temperature
1/3 cup sour cream
1 teaspoons vanilla extract
Glaze (omitted)
1/2 cup peach preserves
1 1/2 teaspoons fresh lemon juice
1/2 large peach, peeled, pitted, very thinly sliced
For crust:
Preheat oven to 350°F. Add melted butter to graham cracker crumb until evenly moistened. Press crumbs over bottom and 1 inch up sides of 9-inch-diameter springform pan with 2 3/4-inch-high sides. Bake crust until beginning to brown, about 8 minutes. Cool on rack. Reduce oven temperature to 325°F.
For filling:
Combine peaches, 2 tablespoons sugar, and lemon juice in heavy large saucepan. Cover and cook over medium-high heat until sugar dissolves and peaches are juicy, stirring occasionally, about 5 minutes. Uncover and cook until peaches are tender and juices thicken, about 5 minutes. Cool compote.
Using electric mixer, beat cream cheese in large bowl until fluffy. Gradually add 1 cup sugar and beat until smooth. Beat in eggs 1 at a time. Mix in sour cream and vanilla. Spoon half of cheese mixture into crust. Spoon peach compote over by tablespoonfuls, spacing apart. Top with remaining cheese mixture.
Place large piece of foil on oven rack. Place pan with cheesecake on foil. Bake until puffed, slightly jiggly in the center, about 1 hour. Then the oven off and let the cake continue to cook with the remaining heat in the oven for 30 minutes or until set. Place hot cheesecake on rack; cool 5 minutes. Run small sharp knife around pan sides to loosen. Place cheesecake, uncovered, on rack in refrigerator and chill overnight. (Can be made 2 days ahead. Cover; keep chilled.)
For glaze:
Combine preserves and lemon juice in heavy small saucepan. Stir over medium heat until glaze comes to simmer. Strain into small bowl. Release pan sides; place cheesecake on platter. Spread glaze over top of cheesecake to within 1/4 inch of edge. Chill cheesecake until glaze sets, at least 30 minutes and up to 8 hours. Arrange peach slices in center of cake and serve.
Makes 12 servings.
Tuesday, August 01, 2006
Baking with peach (part one) : Peach Cobbler
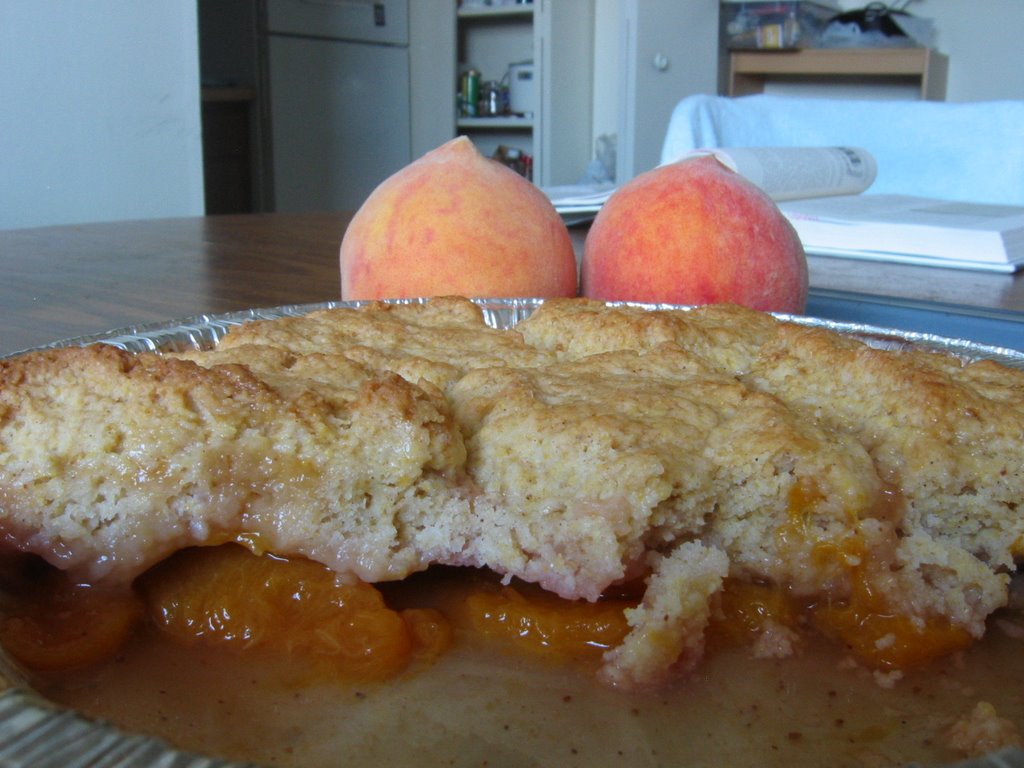
I am never a big fan of fruit dessert. So it shouldn't come as a surprise that I have never tasted any cobbler before, let alone a peach cobbler.
After doing some research on recipes, I decided to use the one from The Best Light Recipe. It is supposed to be a light recipe, which is good. Because I never tried any cobbler before, it is hard to tell if I have attained the right texture of a nice cobbler. All I know, is that I like the biscuit topping of this cobbler. OCT thinks it's pretty nice too. Except for the strong nutmeg taste, which I added to replace cloves.... What a silly mistake.
Next, I am going to make a peach cheesecake. I hope I will have some success this time.
Peach Cobbler
(adapted from The Best Light Recipe)
Filling
1 3/4 pounds peaches (3 to 4), pitted, peeled, and sliced
1/4 - 1/3 cup sugar (depends on how sweet the peaches are)
2 teaspoon cornstarch
pinch of cloves
1 tablespoon brandy
1 teaspoon vanilla extract
Biscuit Topping
1 cup (5 ounces) unbleached all purpose flour
3 tablespoon yellow cornmeal
1/4 cup plus 2 teaspoons sugar
1 teaspoon baking powder
1/4 teaspoon baking soda
1/4 teaspoon salt
1/3 cup buttermilk
3 tablespoon unsalted butter, melted
1/2 teaspoon vanilla extract
1/8 teaspoon ground cinnamon
1. For the filling: Adjust an oven rack to the middle position and heat the oven to 400 degrees. Toss the fruit filling ingedients together in a 9-inch deep dish pie plate. Place the pie plate on a rimmed baking sheet and bake until the fruit releases its liquid and is hot and bubbling around the edges, 20 to 30 minutes.
2. For the Biscuit Topping: Meanwhile, whisk the flour, cornmeal, 1/4 cup of sugar, the baking powder, baking soda and salt together in a large bowl; set aside. In a separate bowl, whisk the buttermilk, butter, and vanilla together; set aside. In a third small bowl, mix the remaining 2 teaspoons sugar with the cinnamon; set aside.
3. When the filling is ready, stir the buttermilk mixture into the flour mixture with a rubber spatula until just combined and no pockets of flour remain. Remove the cobbler filling from the oven and stir. Pinch off 8 equal pieces of biscuit dough and arrange them on top of the hot filling, spaces 1/2 inch apart. Sprinkle the tops of the biscuits with the cinnamon sugar.
4. Continue to bake the cobbler until the biscuits are golden brown on top and cooked through and the filling is again hot and bubbling, 15 to 20 minutes. Cool the cobbler on a wire rack for 15 minutes before serving.
Subscribe to:
Posts (Atom)