Sunday, June 29, 2008

June Daring Bakers Challenge: Danish Braid

danish bread

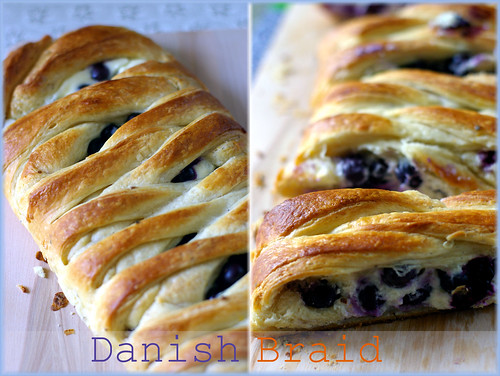
It's that time of the month again when Daring Bakers strike! I must admit that I am constantly amazed by the choices of challenges month after month. Never once did the hosts choose something that I attempted before! The same can be said about the June Challenge : Danish Braid, which Kelly of "Sass and Veracity" and Ben of "What's Cookin" have picked. In fact, it is one of the pastry items I keep dragging my feet about.

Making a Danish Braid requires two things that I dread. One being making a laminated dough, the most temperamental dough in my opinion, that doesn't work well in warm temperature.

Secondly, the dough needs to be braided....Unless you are adept at bread making,(which I am not), otherwise the instructions of the recipe may seems daunting to the occasional bakers, such as myself.

Under such circumstances, watching someone demonstrates the process in video help to alleviate some of the trepidation. Thanks Kelly and Ben for the thoughtful attachments, they help tons!

So, I watched the videos diligently, and proceeded to make the danish braid. Surprisely, it wasn't as hard as I had imagined. And with a stroke of luck, my dough turned out really easy to work with. The only complaint I have, is the length of time involved. In between each rolling, the dough needs to be chilled for half an hour. Making the danish braid was a 2 day event for me.

danish bread2

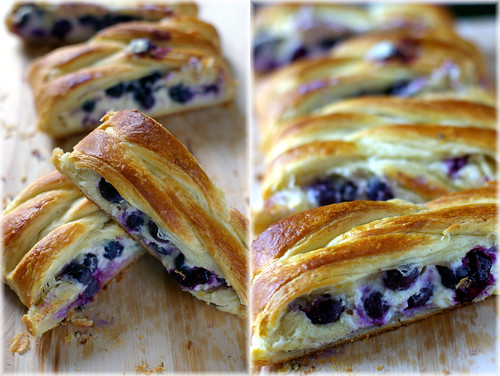
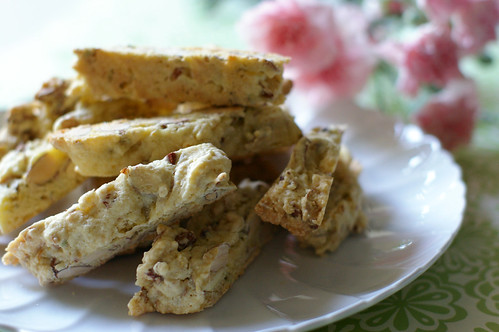
I made a simple cream cheese filling to go with fresh blueberries, which are abundant at the moment. Other than the long down time, the whole process went on quite smoothly,and I am happy with the end result. The braid is flavorful, benefitted from the addition of vanilla beans, fresh orange juice and ground cardamom in the dough. I think I will probably leave the cardamom out next time, as I think the taste is a bit overwhelming.

danish breads

Half of the dough has been tranformed into small invidual danish breads. I think I was a bit too generous with the filling, because almost all of them overflew! I jokingly told my friends that they were alien breads.

Will I make it again? Absolutely! I will even try adding Nutella as filling next.

By the time you read this, I will be in Boulder, visiting my lovely sister in law. I will only be able to read about other Daring Bakers experiences when I get back. Who knows, maybe after reading all the inspiring braids, I may start making another batch of danish pastries. To read more about other Daring Bakers takes on the Danish Braid challenge, click here.

Read more...

Friday, June 27, 2008

Cherry Clafoutis

cherry clafoutis

Ever since I have my first taste of Cherry Clafoutis last year, I have been waiting impatiently for the next cherry season to come. Although I enjoy eating them out of hand, the pleasure of biting into one in the form of clafoutis is incomparable.

cherry rhubarb clafoutis

As soon as I grabbed a bag of the early season cherries, I saved most of them for clafoutis. Insteads of using my "regular recipe", I adapted one from the dessert queen- Ms Tartelette. I replaced the fruits in her recipe with cherries, and added vanilla beans in the batter. The clafoutis is delicious! I love her version so much that I make the clafoutis twice. The first batch, in individual ramekins, with a touch of Chambord; was brought to a gathering at my friend Grace's place. And the second batch, with the addition of rhubarb, was baked on a whim while I was home alone.

The pictures here are from the second batch. Made with cherries and rhubarb in an attempt to clear my fridge before an upcoming trip to Boulder. Sprinkled with chopped pistachios because I like the color and bite.

cherry clafoutis

Since OCT is away attending conference, I decide to take a break from cooking. This cherry and rhubarb clafoutis has become my breakfast, lunch and dinner. Sometime when I am alone, I can eat the same thing for the whole day. Or if I am feeling up to it, I'll try food with weird combinations, such as fried egg on strawberries and mangoes, drizzled with balsamic vinegar. Please tell me that this is perfectly normal! :)

As much as I love the addition of rhubarb in the second batch, it turned out to be too wet.I should have macerated the rhubarb longer (maybe an hour?)to make sure that some of the juice get released.

Cherry Clafoutis/ Cherry Rhubarb Clafoutis
adapted from here

14 oz of cherries (or 2 handfuls or more to your liking)
3 ounces flour
1 ounce cornstarch
2 large eggs
1 1/2 cups 2% milk
1 ounce butter,(2 tablespoons) melted
4 ounces sugar
Pulps from half a vanilla bean, (or 1 teaspoon vanilla extract)
2 teaspoons Chanbord (optional)
chopped pistachio (optional)
*substitute 7 oz of rhubarb with cherries if using, macerate the rhubarb with 2 tablespoons of sugar, and left at room temperature for 1 hour, to release some of the juice*

Preheat the oven to 350F.

Arrange the cherries (and rhubarb) on a buttered glass or earthenware baking dish, cake pan (9 or 10 inches in diameter) or skillet.

Mix the all purpose flour, corstarch, sugar and vanilla beans together in a large bowl.

In another mixing bowl, combine the eggs, milk, melted butter and Chambord, if using.

Slowly pour the liquid mixture into the dry ingredients, whisking well to make sure there is as little lumps as possible.

Pour the batter into the prepared pan and bake for 30 minutes or until the clafoutis turns golden brown and set. Let cool to room temperature. Sprinkle with chopped pistachio or confectioners' sugar.

Read more...

Monday, June 23, 2008

Char Kway Teow at home

Char Kway Teow

Char Kway Teow is a popular dish in Malaysia and Singapore.For the uninitiated, it's a humble stirfry flat rice noodle dish one can find from the roadside hawker stall, to the posh 5-star restaurant that serve local food. There is a constant debate between the two neighboring countries on who makes the better Char Kway Teow. Maybe I exxagerate, there isn't a debate on the national level, but hey, at least such is the case in my household.

OCT prefers the Singaporean version naturally, made with a sweeter sauce. Will it surprise you that, I on the other hand, prefer the version I grown up with, which uses soy sauce and dark soy sauce? Both versions use lard, chinese sausage, mung beans, fish cakes, cockles, prawn and homemade chilli paste, rendering it the bad reputation as cholesterol bomb.

Char Kway Teow

Some weeks ago we spotted the fresh rice noodle at a local Asian grocery store. So we decided to try cooking Char Kway Teow at home. I will be lying if I tell you our version is as good as the one from Singapore/Malaysia. Lacking a powerful hot stove for quick fire stirfrying, it's impossible to replicate the same flavor. Our health conscious also prevented us from using lard or lots of oil in the cooking process.

char kway teow

The end result was a passable version of our beloved Char Kway Teow. Paired with the chilli sauce we brought back from Singapore, at least it satisfied our cravings for the time being. I am not attaching my recipe here because I simply didn't remember to note down the amount of different ingredients used! If anyone has a good recipe for Char Kway Teow, please share. :)

Read more...

Friday, June 20, 2008

Summer Mango Tart

mango tart

Summer is the happiest time for fruits lovers. There are so many berries, stone fruits and cherries in the market now that sometime I have difficulty deciding what to buy. Naturally, I am tempted to buy all of them! Under such circumstance, my better half would pull me back to reality by asking:
"Are you sure you can finish all these fruits?"
"Remember we still have some strawberries/raspberries/kiwi/blueberries...in the fridge?" and more importantly -
"Are you sure it's the peak season for cherries now? Will the price goes down next week?"

However, everytime we spot mangoes on sale, both our logics fly out of the window. And we load dozen of them into our shopping cart. You probably can tell from my posts on mango cheesecake,mango cream cake,mango clafoutis, mango mascarpone cake that we have a penchant for mango.

mango tarts

Our favorite way to eat mango, is simply eating it out of hand. I feel guilty burying the sweet and juicy mango under layers of cream and other stuff in cake and other baked goods.

IMGP9530

However when you have 12 mangoes in the fridge, ripening and begging to be eaten at the same time, it's ok to get creative and use some in a gorgeous tart like this. I use some of the dough leftover from the strawberry rhubarb tart to make the base, and Pierre Herme's vanilla pastry cream to fill it, before piling it up with lots of sweet mango cubes. Kiwi is optional, but I find that the green fruit adds contrast and color to the mango tart.

OCT brings it to the lab, and everyone seems to enjoy it, according to him. So much so that there isn't enough to go around, and the poor guy doesn't manage to eat a slice. I make a small one for myself and promptly devored it after taking a picture.

Unless you absolutely loathe mango, otherwise, how could anyone resist this?

IMGP9570


I am submitting this mango tart to Meeta's Monthly Mingle, in which the theme for the month is "Mango Mania"! Woohoo, I can't wait to see many more mango related posts popping up in the blogsphere in the coming month. :)

Mango Tart
1/3 recipe of sweet tart dough, baked and cooled
2-3 ripe mangoes, peeled and cubed
1 kiwi, peeled and cubed
for pastry cream:
(adapted from "Desserts by Pierre Herme")
1 cup 2% milk
1 plump, moist vanilla vean, split lengthwise and scraped
3 egg yolks
1/4 cup sugar
1/6 cup cornstarch, sifted. (1/2 of a 1/3 cup.Eyeball it using the 1/3 cup)
1.5 tablespoons unsalted butter, softened

To make the pastry cream:
Bring milk and vanilla bean( pulp and pod) to a boil in a small saucepan. Cover the pan, remove from heat and let the liquid be infused with scent of vanilla, for 10 minutes.

Fill a large bowl with ice cubes and set aside a small bowl that can hold the finished cream and be placed in this ice bath. Allow set aside a fine-meshed strainer.

Whisk egg yolks, sugar and cornstarch in a medium saucepan. While whisking, slowly drizzle a quarter of the hot milk into the yolks. Continue to add in the rest of the milk into the tempered yolks, whisking all the while. Remove the vanilla pod.

Place the saucepan over high heat and whisking vigorously, without stop, bring the mixture to the boil. Continue to whisk another 1-2 minutes, until you notice that the texture of th cream has thicken, and less liquidy, remove from heat. Press the cream through the sieve into the reserved small bowl. Set the bowl in the ice bath prepared earlier, and stirring frequently so that the mixture remains smooth, cool the cream to 140F, as measured on an instant read thermometer. Stir in the butter in two or three additions. Make sure that you don't add the butter in when the mixture is still hot. Or the cream would separate. Stir the cream occasionally until it is completely cool. It is ready to be used at this point or keep refrigerated, until you are ready to assemble the tart.

Assembling the tart:
Spread the desired amount of pastry cream into the tart shell, place the cubed mango and kiwi on top of the cream. Enjoy!

Read more...

Monday, June 16, 2008

Raspberry Chocolate Chips Muffins

raspberry chocolate chips muffins


Last week, I received my first ever cake order from OCT's colleague who wanted to surprise his wife with a birthday cake. I was excited and feeling really stressed at the same time. He didn't specify on the kind of cake he wanted, except for something fruity and in season. And preferably not something covered in chocolate. (unfortunately, that is the kind of cake I like). So off to the market I went, stocking on all the fruits that looked good to me, without the slightest idea of what cake I would be making.

After pacing up and down the various fruit aisles for no less than 6 times, I bought some strawberries, blueberries, raspberries, kiwis and rhubarbs (yay, they are still there!). I would have bought some mango too, if I didn't already have about half a dozen in the fridge. At one point, I was contemplating of making a mixed berries pavlova in place of the birthday cake. Seriously, I wouldn't mind having pavlova for my birthday, but this cake is not about me, isn't it?

raspberry chocolate chips muffins

I digress. This post is not about the birthday cake either! I will tell you more about it when OCT reports back on the recipient's feedback. I am going to tell you about these simple but awesome muffins I made on Friday night for our weekend breakfast. The inspiration comes from Cook and Eat and the many raspberries that I bought but didn't use in the birthday cake.

I adapted Lara's recipe, and threw in some chocolate chips and meyer lemon zest into the batter. You could use all berries in the recipe, but I craved for chocolate. I couldn't believe that I haven't made any chocolatey dessert ever since we moved to Atlanta! I miss my chocoholic friends S and A in St Louis. And the RK lab that enjoy chocolatey baked goods as much as I do...

IMGP9622

Making these Raspberry Chocolate Chip muffins is a breeze. No mixer is required. All you need, is a big mixing bowl and a spatula/wooden spoon to do the mixing. Fresh berries can be replaced by frozen ones. No thawing required. Which I think is an advantage over the fresh ones, and they don't sink as much. (not to mention, the frozen raspberries are cheaper and available year round too!)

The simple and straight forward instructions that gives you the most moist and flavorful muffins which you will make over and over again, until you run out of berries. I was going to savor one of the raspberry muffins for breakfast this morning, but found that none was left! Learn from my mistake: if you ever make this raspberry chocolate chips muffins, hide some in a safe place before presenting them to friends/families. They don't last long.

IMGP9608


Raspberry Chocolate Chips Muffins
adapted from Cook and Eat

1 (6 oz container) fat free yogurt
1.5 tablespoons soy milk (or 2% milk or skim milk)
3.5 fl oz (100 ml) canola oil
2 large eggs
2 teaspoons vanilla extract
2 1/4 cups (280g) all purpose flour
2 teaspoons baking powder
zest from 1 meyer lemon (optional)
1/2 cup brown sugar
1/4 cup granulated sugar
1 1/2 cups fresh or frozen raspberries (or a mixture of different berries)
1/2 cup bittersweet chocolate chips

Preheat the oven to 350F. Line a muffin tin with paper liners, or grease it and set aside.

Whisk the yogurt, milk, oil and eggs until smooth, then mix in the vanilla.

In a separate, large bowl, sift together the flour and baking powder. Stir in the lemon zest, if using; brown sugar and granulated sugar. Then, get your berries. First, pick out 12 of the larger berries to stick on the top of each muffin, and set those aside. Now, stir the berries and chocolate chips into the flour sugar mixture until they are well coated.

Fold in the yogurt mixture, and stir until there are no significant bits of dry flour. The batter will be quite dry, more like scone mixture.

Spoon the batter into the muffin tin, dividing evenly between each hole. You can fill these all the way to the top… they will rise some, but not excessively. Top each with one of the berries you picked out, and press a few more chocolate chips to the side, if you like.

Bake for 25 to 35 minutes or until the tops are nicely golden and a skewer inserted comes out clean.

Read more...

Tuesday, June 10, 2008

Cooling down with a bowl of Strawberry Rhubarb Sorbet

sorbet

There isn't much to tell friends when they enquire about my new life in Atlanta. Except that it's hot hot hot here! My brain is sizzling and whatever I make in the kitchen turns out disastrous. Like the rhubarb crumb cake on epicurious.com that many raved about and the traditional madeleines which I made several times with great results before. They all turned out wrong. And yes, I blame it on the weather.:p

Maybe all I need to do in summer months is to churn out batch after batch of sorbets and ice creams. And minimise the contact with oven (and stove). Perhaps, for summer months, my blog should be called "Fresh from the Ice Cream Maker" or something more witty.

strawberry

Remember I told you about the strawberries and rhubarbs I bought from the farmer markets weeks ago? I used some of them to make this refreshing strawberry rhubarb sorbet. Unfortunately, I do not have the precise recipe for you. All I can recall, is I use 2 cups of hulled, sliced strawberries, 2 cups of cooked rhubarb, some simple syrup (50% water: 50% sugar) and a splash of Grand Marnier. Blitz everything in the blender, taste, add more syrup till it tastes slightly sweeter than how I like it; then pour the bright pink mixture into the ice cream maker for it to do its job. Easy Peasy.

strawberry rhubarb sorbet

Such is the beauty of homemade sorbet. You don't really need a recipe. You can personalised it with a splash of liquer and add enough sweetness to your taste. No chemicals or preservatives that even a chemist doesn't know what it is.

Read more...

Friday, June 06, 2008

Strawberry Rhubarb Tart - One of the Reason that makes Summer bearable

strawberry rhubarb tart3

Please tell me that I am not the only one who loathe summer. Tell me that you dislike the sultry heat and 100% humidity as much as coming home ravenous to an empty fridge.(or whatever you really dread). If I could, I'd hide inside an air-conditioned room and eat ice cream for the whole summer. Reading books and food blogs pretending that it is any season but summer.

But if I really do that, I'd miss these juicy strawberries and mound of rhubarb stalks piling gloriously high in the farmers' market. The sweetest, ripest strawberries have finally arrived in my neck of the wood, taking over the spotlight from their mediocre predecessors.

strawberry rhubarb tart

I reached for one punnet, then another, and another, and finally decided that I might as well take half a dozen of them. Afterall, it was more "cost effective" that way. As I sauntered towards the vegetables section, a worker was opening a box of rhubarbs and piling them up under the sign that reads " California Rhubarb $1.99/pound".

The next five minutes, I was trying to grab as many stalks as my bag allowed. Which came up to be slightly less than 4 pounds. I was already thinking of incorporating some in my May Daring Bakers Challenge, and some in the form of tart, cake and sorbet.

Suddenly, summer seems bearable. The heat and humidity is justifiable for the sweetest berries it promises. I need to write down a list of "10 reasons why I love Summer" and stick it on my laptop. The first reason would be this strawberry rhubarb tart.

strawberry rhubarb tart1

Made with my favorite buttery sweet tart dough, and a topping of macerated strawberry and rhubarb that baked to a jam consistency. The peak of season fruits really doesn't need much adornment. Even OCT who isn't a strawberry fan polishes one up when I insist that he tries a bite.


Strawberry Rhubarb Tart

This recipe is inspired by Anita's strawberry rhubarb tart, which she made for her birthday. I added vanilla sugar to macerate the fruits, and cornstarch to thicken up the juice. Sprinkle with chopped pistachio adds color and crunch to the tart.


1/3 batch Sweet tart dough (make a full batch and save the rest in freezer for other use)
2 cups of sliced strawberries
2 cups of sliced rhubarbs
3/4 cup of vanilla sugar/ granulated sugar(more or less, to taste)
1.5 tbsp cornstarch
splash of lemon juice (optional)
chopped pistachio and strawberries when serve (optional)

Follow the instruction on the sweet tart dough recipe to bake the tart shells using your tart rings or tart molds with removable bottom. Remove from oven when the tart shells are dry and lightly colored.

Combine the sliced strawberries, rhubarbs, sugar and cornstarch in a big bowl. Add a splash of lemon juice if you wish. Let rest for 5 minuts. Taste the fruit, add sugar to taste.

Brush the eggwash on the bottom of tart shells. Spoon the macerated fruits into the shells. Becareful not to pack too much filling into each shells. Add spoonful of juice collected at the bottom of bowl into each shells and bake for 35-40 minutes at preheated 350F oven.

The filling will bubbling when it's almost ready. The fruit and juice should looked set when it's ready. The finished tart will have a filling of jam consistency and not runny.

Remove the cooked tarts from oven and let cool. Sprinkle with chopped pistachio and fresh strawberries for color. Serve with a scoop of ice cream or as it is to fully enjoy the flavors of the tart.

Makes 5 3.5-inches individual tarts.

Read more...

Monday, June 02, 2008

Bake Sale and a recipe for Almond, Fennel Seeds & Orange Biscotti

biscottis for bake sale

Two weeks ago, my friend Grace asked if I'd be interested to participate in a bake sale she organized to raise fund for the 5.12 China Earthquake. According to the official toll, this is the worst earthquake that struck China since the Tangshan earthquake in 1976. It has claimed 69,000 lifes, with more than 19,000 people still on the missing list. As for those who escaped, at least 5 millions in the region are left homeless after the quake and many more tremors that followed.

bakesale

Photo on the right was taken by Grace

Wanting to help even when none of us have any bake sale experience, we did what we could. Being the only Malaysian who worked alongside the rest of the oversea Chinese volunteers, I am deeply moved by the passion they showed. And the tales that some told, had allowed this stranger to have a glimpse into their lives that were shook and affected by the earthquake back home. There were bakers of all experience levels who contributed cookies, cakes, muffins, madeleines, brownies and other treats. One of the volunteers-Sheri, who is in her eight months pregnancy, baked more than 80 muffins for the event and had her husband brought them to the event.

IMGP9166

When the booth was first set up outside Kroger, I was apprehensive about the turn-out. "What if nobody wants to buy our stuff?" I asked Grace. My worry proved to be unfounded when many kind people dropped by to lend us their supports.Many of the patrons donated outright without taking anything so that we could raise more fund. Some bought our goodies, asking for no change. The generosity that the Atlanta residents showed is incredible, and I am touched in ways that I have never experienced before.

IMGP9160

Most of us remember the young boy who came by with his mother, wanting to buy something to show his support. He insisted that he must pay with his money. Everyone looked on with interest when he digged deep into his waist pouch but couldn't find enough change. Sweets, gadgets tumbled out as he poured them out at the curb side under the noon sultry sun. We watched him took out the coins one by one, meticulously calculated to make up for 2 dollars. It may not be a lot of money, but the young boy had taught us an important lesson about giving. And kindness.

children

Photo by Grace

That afternoon, we also have four cute little helpers who help distributed the awareness fliers to the patrons. Having them around certainly helped draw in the crowd.

IMGP9172

It's amazing seeing people from all walks of life came through to help people whom they do not know, but suffered in a zillion miles away. In the end, we raised well over a thousand dollar. And Kroger has kindly agreed to match a certain percentage (to be determined after their internal meeting) of what we raised. I am thankful to Grace who offered me the opportunity to help, and a chance to know the wonderful people whom I wouldn't have otherwise met. More of the photos can be found on my flickr and Grace's.

bake sale

Photo by Grace

Now onto the baked goods I brought to the bake sale. I made 3 batches of the Nutella Cupcakes, which people seems to enjoy, a batch of my favorite chocolate biscottis and a new recipe- Almond, Fennel Seeds & Orange Biscotti from Dolce Italiano: Desserts from the Babbo Kitchen. One thing I learned from the bake sale- brownies and rice crispies are more popular than biscottis. ;p

Personally, I think this recipe is a keeper. The original recipe uses anise seed, but fennel seeds is an acceptable substitute which I have on hand, so that is what I used. Although I generally favor biscotti with chocolate, this recipe won my heart with the subtle but delicate flavor of fennel seeds and orange zest. With a generous 4 cups of almond used, the biscotti has an outrageous amount of nuts to dough ratio in every bite. I think I would use 2.5 cups to 3 cups of almonds when I make this again, it would still be a generous amount of almonds in the cookies. And as the rest of the biscotti recipes I favor, this one has no oil or butter in it. Perfect companion for the cup of coffee in the afternoon. Or anytime of the day, for that matter.

Almond, Fennel Seeds & Orange Zest Biscottis


Almond, Fennel Seeds & Orange Biscotti
adapted from Dolce Italiano: Desserts from the Babbo Kitchen

3.5 cups unbleached all purpose flour
1 teaspoon baking powder
1 teaspoon kosher salt
4 cups whole blanched almonds
4 large eggs
2 large egg yolks, plus 1 egg white for glaze
2 cups granulated sugar, plus 1.5 tablespoons for glaze
2 teaspoons pure vanilla extract
1 tablespoon fennel seeds
freshly grated zest of 1 large orange

Combine flour, baking powder and salt in a medium mixing bowl with a whisk. Using a sharp knife, coarsely chop the almonds and set them aside.

In a bowl of an electric mixer, fitted with the paddle attachment, beat together eggs, egg yolks and sugar on medium speed until light, about 2 minutes. Beat in vanilla extract, fennel seeds and orange zest. Beat in the dry ingredients until the mixture is well combined. Remove the mixing bowl and stir in chopped nuts by hands. The dough will be very runny and soft at this point.

Cover the bowl with plastic wrap and chill the dough for 2 hours, or until it's firm enough to handle.

Preheat oven to 325F. Lightly grease two baking sheets with non-stick cooking spray or butter or line them with parchment paper.

Divide dough into 5 equal portions. Using a spoon to scoop out the dough onto the baking sheet, shape dough into a log about 1.5 inches in diameter and 10 inches long.

Place 2 of the logs on one baking sheet, 3 inches apart, and 3 of the logs on the second baking sheet, also 3 inches apart. In a small bowl, beat the eggwhite woth a fork until frothy. With a pastry brush, glaze each log with the beaten egg white and sprinkle with 1 teaspoon sugar.

Bake the logs until they are lightly golden brown, firm to the touch and just beginning to crack slightly, 20-25 minutes. Rotate the sheet 180 degrees halfway through the baking time to ensure even browning. Allow the log to cool on baking sheets on a wire rack until they are cool to the touch, about 40 minutes. Reduce oven temperature to 200F.

With a sharp, serrated knife, slice the cooled biscotti slightly on the bias into 1/4 inch wide slices. Lay the slices on the baking sheets in a single layer. Return them to the oven and bake for 20 minutes more, or until they are toasted, dry and crisp. Cool the biscotti completely on a wire rack. Store them in an airtight container, kept in a cool, dry place for up to 2 weeks.

I like to keep some in the freezer to prolong their lifespan.

Other biscotti recipes on Fresh from The Oven:
Mosaic Biscotti
Cherry,Chocolate and Pistachio Biscotti

Read more...
Related Posts with Thumbnails