Monday, November 26, 2007

My first DB Challenge: Tender Potato Bread!

tender potato bread


Yes, with the christening of this potato bread, I am now a proud member of Daring Bakers! The fabulous online baking community that doesn't require further introduction, in my opinion. If for any reason you haven't heard of them, click here.

pink_sil


I am just happy that I finally get my act together and join these amazing bunch of bakers in the DB family. As for my first challenge, I completed it in record time. Not that I completed it the first week when I learn of the challenge, but it was actually the third week when I dug my hands deep into the sticky potato bread dough. Not exactly prompt compared to lots of DBers, but hey, for those who know me personally (like OCT and my previous sales managers), they know what a procastinator I am! I almost always complete whatever assignments at the very last minute. So, completing this first challenge a week ahead of the deadline is a major improvement for me. :)

On top of becoming a better baker, I think I have become a better person, which is a double bonus for joining Daring Bakers.


tender potato bread


Now let's get on to the Potato Bread, shall we? Instead of a sweet recipe, Tanna of My Kitchen in Half Cups has chosen a savory bread recipe as the November challenge. Honestly, it is a relief to me. Knowing that I will certainly be baking a few sweet recipes in November, I can definitely use a break from all the butter and sugar.

When I told OCT about this month's challenge and asked if he had eaten a potato bread before, he surprised me by saying yes! So has mum, who told me that it was one of grandma's favorite bread. I can't help but wonder if I was the last person alive who have never eaten a potato bread before. Even thoughI have read about potato bread from other's blogs, I keep missing the opportunity to attempt one myself. In fact, I have to confess that I am somewhat intimidated by yeast. And as such, would usually hide behind layers of cakes and tarts when the suggestion of baking bread arises.

But being a Daring Baker to me, is about confronting and conquering my fear. It also helps that they are lots of experienced and helpful bakers, who shared their experiences on the daring bakers blog. All these make the process less intimidating and so much more fun. I enjoy the "sneak previews" everyone posted after their breads were out from the oven.


potato roll


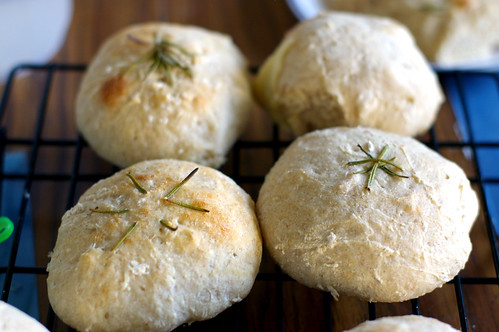
After seeing the many excellent "previews", I tackled my challenge on an early Monday morning. The dough as the rest have warned, was a sticky one. And one shall resist the temptation to add more flour to it. I think I managed pretty well with the help of a bench scraper. Instead of quick to dig my fingers into the sticky dough, I used the scraper to mix and knead the first few turns. I used about 5.5cups of flours, from the 8 cups of flour allowed.


Potato foccacia


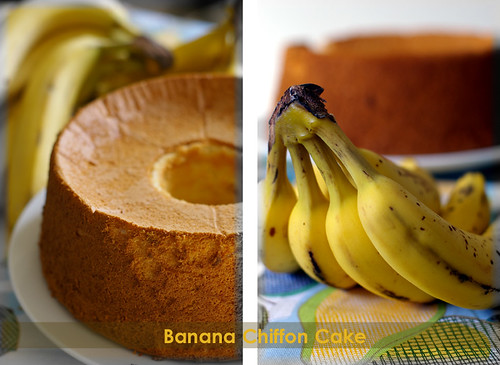
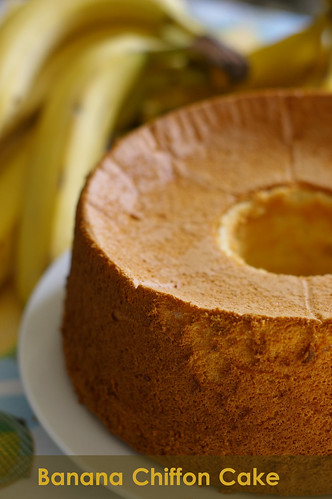
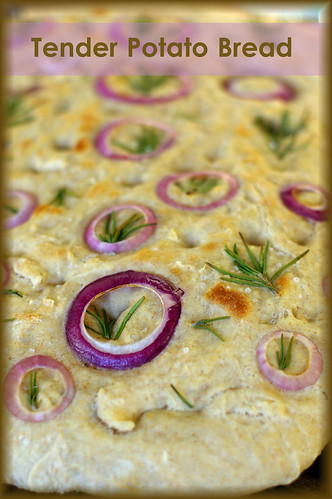
As you can see, I shaped my dough into some dinner rolls and a large focaccia with red onion, rosemary and sea salt. The end products were tender, with a bit of chew and flavorful. I am quite surprised that there isn't a faintest hint of potato in the potato bread! I used 10 oz of potato in my batch from the 8-16 oz potato suggested. I believe the inclusion of potato played an important role in keeping the tender texture of the breadrather than exerting its flavor. With the abundance of sweet potatoes at the farmer's market this time of year, I wonder if that would work as an substitute? I shall undertake it as the next potato bread project. It will be interesting to see how the sweet potatoes manifest in potato bread.

foccacia


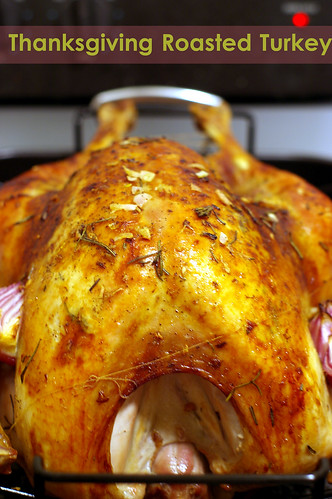
This recipe yields quite a large batch of bread for a small family like ours. We ate 1/3 of the focaccia with some Tom Yum tuna filling as dinner on the first night, and I nibbled a few pieces after slicing some for photo shoot. The dinner rolls which I sneaked in some muenster cheese in them were saved as our breakfast and lunch on the subsequent days. OCT brought half of the foccacia as lunch the next day and we still have some in the fridge now, waiting to be transformed into a yummy sandwich. I think I will top it with slices of tomatoes, avocados and the leftover turkey from Thanksgiving.

pink_db


To read more about the other Daring Bakers' take on this month challenge, please visit The Daring Bakers Blogroll. I can't wait to see what the rest have come up with!


For the recipe of this month's Tender Potato Bread challenge, check out Tanna's post

Read more...

Sunday, November 25, 2007

My third Thanksgiving in St Louis

turkey

Time flies and last Thursday marked my third Thanksgiving in St Louis. It seems only like yesterday when I confronted my first turkey breast. Although it was only 7 pounds, it was nonetheless the biggest piece of meat I have ever handled.

resting turkey

I remembered back then I was hesitant to invite anybody over as I wasn't sure my first turkey would be edible at all. When we finally decided to extend the invitations to friends, we didn't have a particular menu in mind. Needless to say, our first Thanksgiving meal wasn't a conventional one. Turkey breast with ready-made gravy and stuffing, uneven chunks of "mashed" potato, steamed vegetables and two quiches. I cannot recall what was dessert although I suspect it must be something made of chocolate.

Asparagus


That was how it began. That Thanksgiving dinner marked the beginning of many parties at our little one bedroom apartment, and the revelation of my pleasure from caring and serving others with home-cooked meals.

Thanksgiving is also a time I reflect on the kindness others have showered me, and their acceptance of me into their lives. I count my blessings and thank God for friends and family in my life. With that, I cooked and baked for the people I care. It has always been my way to say "Thank you" and "I love you".

normandy apple tart

These feelings were epitomized with the Normandy Apple Tart. The apple sauce was made painstalking by sieving over my only strainer, which was unfortunately too fine for such a task. The resulting apple sauce used for the filling of the tart was very smooth, making me feel that all the time and effort spent were worthwhile. I first saw the Normandy Apple Tart in Dorie Greenspan'sBaking: From My Home to Yours, and subsequently saw it made by Anita and Christine. Their beautiful tarts and the abundance of apples at the farmer's market inspired me to overcome my inertia to finally making it.

Normandy Apple Tart

Although mine didn't turn out as stunning as theirs, I gave myself a pat on the shoulder when our friends commented that the tart was delicious. The credit was all Greenspan's, who came up with the recipe; and of course the farmer who grew the apples.

Normandy Apple Tart

This Normandy Tart is not a difficult recipe, I believe anybody can make it with some prior planning and lots of patience. Although one can use the store-bought apple sauce, I agree with Greenspan that homemade apple sauce, (especially in this time of year) made a difference in the Normandy Tart. I don't have a mandoline, so I used a very sharp knife to finely slice the apples for topping.

Normandy Apple Tart

I baked the tart on the Thanksgiving morning, and believe that it would taste even better if I have the time to bake and serve it straight from the oven. The filling was a bit loose, but can easily be disguised with some fine ice cream (which I did!)

Normandy Apple Tart

Seeing that the topless tart has been selected as the theme for this month's "Waiter there's something in my ..." by Cooksister, I am submitting the Normandy Tart as my entry.

In case you want to know, these are what we had on Thanksgiving. The mostly Gourmet inspired recipes:
Stuffed Turkey with Lemon, Oregano and Red Onion (I used rosemary in place of oregano, and added in some white wine in the basting liquid)
Make Ahead Mashed Potato
Quick Stovetop Gravy
Roasted Japanese Sweet Potato with Scallion Butter
Italian Sausage and Bread Stuffing
Roasted Asparagus
Normandy Apple Tart
Alice Medrich Fastest Fudge Cake (as a backup in case the Normandy Apple tart was inedible ;p)

Asparagus


No photos on the meal, as I was a little behind the schedule, and I couldn't bring myself to let the guests wait on hungry stomachs!

Normandy Apple Tart
Adapted from Dorie Greenspan'sBaking: From My Home to Yours and as seen in Dessert First and Hot.Sour.Salty.Sweet and Umami

Pâte Sablée

1 1/2 cups flour
1/2 cup confectioner's sugar
1/2 teaspoon salt
9 tablespoon butter, very cold, cut into small pieces
1 egg yolk

Applesauce
2 pounds baking apples,(about 6 medium) such as Empire, Cortland, McIntosh, or Pippin
1/4 cup water, or more
1 tablespoon (packed) light brown sugar
1-4 tablespoons sugar (optional)
1/2 teaspoon pure Vanilla extract (optional)

Topping
2 medium-sized, firm apples,(preferably firm Golden Delicious or Granny Smith, not the mealy type you used for applesauce)
1 egg, beaten with 1/2 teaspoon water, for egg wash
1/3 cup apple jelly for glaze (I used apricot jelly)

To make the applesauce:
Peel and core the apples, and cut into chunks. Toss them into a 2-3 quart, heavy-bottomed saucepan. (or leave the skin on for a rosier color) . Add in the water and brown sugar, and stir to combine.

Cover the saucepan and cook the apples over the medium-low heat.Don't go far from the stove and stir the apples from time to time to keep them from scorching.

If the water is boiling away too quickly, add more by driblets. When the apples are soft enough to be mashed with a spoon, about 20-25 minutes, remove the pan from heat and pass the apples through a food mill or press them through a sturdy strainer into a bowl.

If the applesauce seems thin (if liquid accumulates around the edges), return the sauce to the pan and cook, stirring constantly, for a few minutes, until the sauce is just thick enough to sit up on a spoon. Taste the sauce , adding granulated sugar if you think it needs it (bearing in mind that the applesauce for this tart was not very sweet)and vanilla, if you want it.

Pour the applesauce into a container, press a piece of plastic wrap to the surface, and refrigerate until it is no longer warm before using. (The applesauce can be kept in the refrigerator for up to 4 days.)

For the tart shell:
Combine the flour, confectioner's sugar, and salt in a food processor and pulse a few times to combine. Add the pieces of cold butter and pulse until the butter is cut into pea-sized pieces. Add the egg yolk and combine in several pulses until the dough starts to become clumpy. Taking care not to overwork the dough. Turn the dough out onto a work surface, knead dough lightly to incorporate any dry ingredients that escaped mixing.

If you are using a pastry cutter, combine all dry ingredients and cut butter into the sizes of peas. Add in eggyolk and mix until all ingredients come together into a ball. Add in one or two tablespoons of cold water if the ingredients is too dry.

Butter a 9-in fluted tart pan with removable bottom.Lightly press the dough evenly over the bottom and up the sides of the pan, using all but one little piece of dough, which you should save in the fridge to patch any cracks after the crust is baked.

Freeze the tart shell for at least 30 minutes, preferably longer. Bake it in a 375 degrees.

To partially bake the tart shell:
Butter the shiny side of a piece of aluminium foil and fit the foil, buttered side down, tightly against the crust. Place the tart shell on a baking sheet and bake for about 25 minutes, until the shell is dry and lightly colored. If any places have cracked, repair with the extra dough. Let cool on a rack until room temperature.

For the tart:
When ready to finish baking the tart, preheat the oven to 400 degrees F.

Fill the tart shell almost to the top of the rim with the applesauce and smooth the top. Place the tart on a baking sheet lined with parchment or a silpat.

For the topping:
Peel,core and quarter two apples. Cut each apple quarter into about 7 slices.

Arrange the apple slices over the top of the applesauce in any pattern that strike your fancy, overlapping slices slightly as they will shrink a little after baking.
Make a egg wash by beating the egg with a teaspoon of water. Using a pastry brush,paint the egg wash over the sliced apples.

Bake the tart in the oven for about 50 minutes- it will look as though the applesauce and apples have risne a bit. The apple should be golden, a little burnt around the edges and soft enough to be pierced easily with the tip of a knife. If you'd like to enhance the color around the edges of the apples, run the tart under the broiler just unitl you get the color you're after. Transfer the pan to a cooling rack.

To make the optional glaze:
Bring the jelly and water to a boil. When the jelly is liquefied, brush a thin layer over the topof the tart with a pastry brush. Return the pan to the rack and cool the tart until it is just warm or at room temperature.

The tart can be served when it is only just warm or when it reaches room temperature. Try to eat it as soon as it is baked,to prevent it from getting soggy.

Read more...

Tuesday, November 20, 2007

How to decorate Chocolate Cake for dinner party

chocolate cake


Actually there are a few recipes that I wanted to share. But I am willing to let this entry jumps the queue, seeing that it's Thanksgiving this Thursday, and you may want some dessert ideas, other than pumpkin pie.

This is the chocolate cake I made for a dinner party last Friday. The cake and frosting is a combination I have made in the past. I feel more comfortable bringing a tried and true dessert to any party, as oppose to something new and potentially exciting. Call me inadventurous, I certainly don't want to use it as an opportunity to experiment with new recipes. Hey, it is my reputation at stake. Although I am not sure if I have one at the moment. Having said that, I am pretty sure the nice people in OCT's lab wouldn't mind being my guinea pigs. Which in a way,they already are, eating whatever I conjure most of the Fridays.

chocolate cake


As much as I enjoy baking, cake decorating is something I dread. I can't pipe anything without being mistaken as a child's work. Cake decorating is undoubtedly one aspect that I need to work on. For the time being, my idea of decorating consists of microwave melted chocolate in a ziploc bag, and snipped off a tiny hole at one corner to trace a simple pattern.

Chocolate Cake


As you can see, my drawing is pretty untidy. There's even a puddle of white chocolate in the center of the cake, where the circles intersect. I had no choice but to cover it with some hazelnuts. Luckily, I always keep a selection of nuts on hand.

As for the lady fingers on the sides, they were there for a reason. Their mission was to cover the somewhat bare sides I left behind, after realizing I didn't make enough frosting to cover the whole cake. The pack of lady fingers is the hero that saved my day. :)

A ribbon tied around the cake make the recipient feel special, and hold all lady fingers in place.

chocolate cake


This is just my 2 cents on how to decorate a cake without resorting to the piping bag and tips. So, what are you making for Thanksgiving?

Chocolate Lovers' Chocolate Cake
cake base and filling adapted from this recipe

cake
1 3/4 cups all-purpose flour, plus more for dusting
2 cups sugar
3/4 cup unsweetened cocoa powder
2 teaspoons baking soda
1 teaspoon baking powder
1 teaspoon kosher salt
1 cup buttermilk
1/2 cup vegetable oil
2 large eggs
1 teaspoon pure vanilla extract
1 cup freshly brewed hot coffee

Filling:(enough to fill one layer)
Whipped Dark Chocolate Ganache
(adapted from Alice Medrich's Bittersweet)
1 cup heavy cream
3 ounces 72% chocolate
2 teaspoons granulated sugar

For the ganache: (used as topping)
1/3 cup (3 oz) heavy cream
4 ounces best-quality bittersweet/dark chocolate

Decoration:
lady fingers, soaked briefly in syrup (heat some raspberry preserve and water in a saucepan, sugar to taste)
melted white chocolate

Make the cake:
Preheat the oven to 350°. Butter two 8-inch round cake pans and line them with parchment paper; butter the paper. Dust the pans with flour, tapping out any excess.

In the bowl of an electric mixer fitted with a paddle, mix the flour with the sugar, cocoa powder, baking soda, baking powder and salt at low speed. In a medium bowl, whisk the buttermilk with the oil, eggs and vanilla. Slowly beat the buttermilk mixture into the dry ingredients until just incorporated, then slowly beat in the hot coffee until fully incorporated.

Pour the batter into the prepared pans. Bake for 35 minutes, or until a toothpick inserted in the center of each cake comes out clean. Let the cakes cool in the pans for 30 minutes, then invert the cakes onto a rack to cool completely. Peel off the parchment paper.

Make the whipped gananche:
Heat the heavy cream and sugar in a small saucepan until it bubbles on the edges and immediately pour it over the chocolate. Allows the heat from the cream to melt the chocolate.Let stand for 10-15 minutes. Slowly stir to make sure that the chocolate has completely melted. Chill for at least 6 hours or overnight, and whip the ganache only when ready to use.

Make the gananche :
Bring 1/3 cup of heavy cream to a near boil in a small saucepan.When it is steaming well, remove it from heat and pour over the chopped chocolate. Stir or whisk until the chocolate is melted. The mixture should be smooth. Let stand until the ganache is warm enough to be poured over the cake.

Assemble the cake:
Set a cake layer on a plate with the flat side facing up. Evenly spread the whipped ganache over the cake. Top with the second cake layer, rounded side up. Spread a thin layer of the whipped gananche over the top and side of the cake. Arrange lady fingers immediately around the cake.

Pour the gananche to cover the top of the cake.Unleash your imagination and use the melted chocolate to sketch whatever pattern that strike your fancy. Refrigerate for at least 1 hour before slicing.

Read more...

Monday, November 19, 2007

Enjoying Fall

What have you done last weekend?

fall


I grabbed my camera and the reluctant OCT out for a stroll in the neighborhood.

fall2


Walking down the streets we have had so many memories in the past two and a half year. And very soon, we will have to bid this place good bye.

fall flickr


As if knowing this will be our last Fall here, the nature treated us with what must be the most spectacular fall hue in this part of the midwest.

Like two little kids, we derived life simple joy from walking into the stash of crisp, fallen leaves, and competed to find the prettiest leaves on the ground.

fal3


IMGP5507


And admire the neighbor's garden, which is always meticulously kept.

fall3

Not a bad way to spend a Saturday afternoon. Food recipe and photos coming up soon.

Read more...

Thursday, November 15, 2007

Lemon Lavender Cake

lemon lavender cake


Do you know that November 15 is National Bundt Day? Perfect time to blog about the messy bundt cake I made two weeks ago.

If you know me well, you know my affinity to anything with coffee+ chocolate in it. "Lemon + lavender" on the other hand, is another flavor combination that I can't resist. I have had sables with this combination but haven't had a success with cake yet. After trying the lemon lavender cake from the Macrina Bakery in Seattle, I can't stop thinking about it ever since we came back. The generous serving of their light but flavorful cake is the best lemon lavender cake I have ever had. The balance between two of my favorite flavors is simply spot on.

I have tried making a lemon lavender cake in the past using my favorite lemon cake recipe as a base. Although it was moist and flavorful, upon comparison, I found mine to be too dense. And it shouldn't be so. I need to make one as poetic (and light) as the Macrina's.

In order to achieve the desired cake, I need a lemon cake with light texture as base. The next step maybe a little tricky.It is to determine the amount of lavender required. It has to be just enough to complement the citrus flavor, without making the eaters feel poisoned eating a lavender soap bar. I decided to go with 1 tablespoon of dried lavender. In order to extract the maximum flavor, I steep it in the buttermilk. Easily done when the buttermilk was lefted on the bench to come to room temperature.

Lemon Lavender Cake

Having had good result with this recipe in the past, I decided to use it as the base here. Once the cake was out of the oven, I impatiently waited for 30 minutes before cutting out a thin slice to taste. It was nice, but not as lemony as I would have loved. I knew I had to add a thin layer of glaze to boast up the flavor. And I did just that. But maybe the glaze is a little too thin. It is quite unsightly as you can see from the various shots here. The flavor had improved with the added glaze but I know something is amiss. I really should have bought their recipe book which was prominently displayed on the shelf. Or at least took a peek and tried to remember the recipe! By the way, I also couldn't resist to buy a piece of their chocolate grand marnier cake. Heavenly! Now I need to find that recipe. If ANY of you know the recipe, please drop me an email. My stomach and tastebuds will thank you.

Lemon Lavender Cake

Coming back to the lemon lavender cake, I think this version is not too bad, but I would tweak it again the next time I try. Maybe a little more lemon zest in the batter, and a thicker, prettier glaze.

Lemon Lavender Cake

If however, lemon lavender is not your cup of tea, head over to Nordic Ware's website. There are a series of drool-worthy winning recipes from the "Bundts Across America" recipe contest. One of the judges, is none other than Anita, the talented blogger behind the sweet blog -Dessert First! Her account on the contest judging is here. I am jealous of all the yummy bundts she had tasted......

Lemon Lavender Cake
Modified from this recipe


Cooking spray
3 cups plus 2 tablespoons all-purpose flour (about 13 2/3 ounces)
2 teaspoons baking powder
1/2 teaspoon baking soda
1/2 teaspoon salt
2 cups granulated sugar
3/4 cup butter, softened
2 large eggs
1 tablespoon grated fresh lemon rind
3 tablespoons fresh lemon juice
1 tablespoon of dried lavender, steep in 1 cup of low fat buttermilk

For the glaze:
2 cups confectioners' sugar (I used 1.5 cups, it turned out too thin)
3 1/2 tablespoons freshly squeezed lemon juice
1 teaspoon dried lavender


Preheat oven to 350°.
To prepare the cake, coat a 10-inch tube pan with cooking spray; dust with 2 tablespoons flour.

Lightly spoon remaining 3 cups flour into dry measuring cups; level with a knife. Combine 3 cups flour, baking powder, baking soda, and salt in a bowl, stirring well with a whisk. Combine 2 cups granulated sugar and butter in a large bowl; beat with a mixer at medium speed until light and fluffy. Add eggs, 1 at a time, beating well after each addition. Add flour mixture to sugar mixture alternately with buttermilk, beating at low speed, beginning and ending with the flour mixture. Add rind and juice; beat just until blended.

Spoon batter into prepared pan; sharply tap the pan once on counter to remove air bubbles. Bake at 350° for 45 minutes or until a wooden pick inserted in the center comes out clean. Cool in pan 10 minutes on a wire rack; remove from pan. Cool completely on a wire rack.

For the glaze, combine the confectioners' sugar,lemon juice and dried lavender in a bowl, mixing with a wire whisk until smooth. Pour over the top of the cakes and allow the glaze to drizzle down the sides.

Read more...

Tuesday, November 13, 2007

By the power of Nutella

nutella

I was pleasantly surprised when Jennifer dropped me a congratulatory email last Sunday.And told me that I was one of the winners for the October 2007 DMBLGIT!

I can't tell you how excited I am, not exactly holding any hope for this simple homey picture to win me any award. I simply submitted the picture for fun. When I went to bed on Sunday night, I tried to figure what the judges see "enticing" in this picture.

Nutella Tart

Then I came up with a hypothesis. It must be the power of Nutella that lured them to cast a vote for me. Seriously, who can resist Nutella, right? The deliciously satisfying chocolate hazelnut paste that conjure up many happy memories must be the reason! I also deduce that a mouth watering name is important in food photography competition. For instance, one that starts with "Nutella".

nutella and bread


Anyway, I am thankful to the judges who selected my photo to be the overall third place winner among so many beautiful photos. On Monday night, I thought I would bake another batch of Nutella tart to commemorate the happy occasion. Instead of a 9-inch tart, I baked it into some 4-inch tart rings. It is the convenient size to give away. Not to mention it surely make the recipient feels special to have a delicious tart all by himself.

nutella tart

I wish I could give everyone who like this photo a piece of the tart. Since that is not possible, may I encourage you to give this Pierre Herme recipe a try.

For the complete roundup of October DMBLGIT, please visit Jennifer's blog-Bake or Break. Thanks Jennifer for being a great host. I can't wait to put up my badge on the sidebar! Oh yes, I am so vain. :D

Read more...

Saturday, November 10, 2007

Bananas, two ways.

bananas, two ways


I love it when bananas are on sale. The slightly spotted bananas which the grocery store knows will ripen exponentially overnight. They have to get rid of them and I am one happy customer who don't mind buying them.

In the grocery store here, this kind of bananas comes in the 5lb bag. OCT being a banana lover, would try to eat as many as he could.While the rest would be left to ripe at room temperature. After which I would either use some to make a cake or freeze them for later use. I find freezing banana extremely convenient and satisfying. I feel empowered knowing that I can make banana cake whenever the craving hits, without making a trip to the grocery store.

Inspired by the bag of ripen bananas we bought not long ago, I am going to share two banana recipes with you.

The first one is a simple coconut banana bread with lime glaze. After trying a few banana bread recipes and found one that I really love, there isn't much incentive or urgency for me to try a new one. As the old adage says "if it isn't broken, don't fix it". However, I was tempted the positive reviews it received from other reviewers. This recipe, which comes from my favorite magazine- Cooking light, also garnered the test kitchen's highest rating. I just have to make it myself and see what the hype's about.

banana cake with lime glaze

Instead of making it in a loaf pan, as instructed in the recipe, I make it in the muffin pan. It's more convenient for sharing with friends and took half the time to cook.

The coconut banana bread which incorporated low fat yogurt and a few tablespoons of dark rum was full of flavor. I especially love the lime glaze that provided a hint of tang that cut through the sweetness of the banana bread. If you are going to make this recipe, remember not to omit the lime glaze. Since I am not a fan of shredded coconut, I would probably omit it the next time.

Banana Chiffon Cake

The second recipe, is a banana chiffon cake. Recently,I am addicted to the pillowy texture of chiffon cake, and have to make it whenever a good recipe presents itself!Oh how happy we were, biting into the first slice of this cottony soft chiffon cake. The lightness of the cake almost deceived us into finishing half of it in one sitting! Although I like to eat it as it is, I would not consider a thin glaze of chocolate ganache on top to be gilding the lily. Especially when one is considering of bringing this to a party.I am content however, with an unadorned slice of banana chiffon cake to go with my cup of coffee in the morning, or afternoon or even after dinner!

banana chiffon cake

I was initially sceptical of the usage of only one banana in the batter. I mean, it's such a huge cake! But I was pleasantly surprised with the banana flavor in each slice of the chiffon cake. It was the right sweetness and spot on flavor. The secret, as some of you may already know, is to use a very ripe banana.


Coconut Banana Bread with Lime Glaze
adapted from Cookinglight.com

2 cups all-purpose flour (about 9 ounces)
3/4 teaspoon baking soda
1/2 teaspoon salt
1 cup granulated sugar
1/4 cup butter, softened
2 large eggs
1 1/2 cups mashed ripe banana (about 3 bananas)
1/4 cup plain low-fat yogurt
3 tablespoons dark rum
1/2 teaspoon vanilla extract
1/2 cup flaked sweetened coconut
Cooking spray
1 tablespoon flaked sweetened coconut
1/2 cup powdered sugar
1 1/2 tablespoons fresh lime or lemon juice

Preheat oven to 350°.
Lightly spoon flour into dry measuring cups; level with a knife. Combine flour, baking soda, and salt, stirring with a whisk.

Place granulated sugar and butter in a large bowl; beat with a mixer at medium speed until well blended. Add eggs, 1 at a time, beating well after each addition. Add banana, yogurt, rum, and vanilla; beat until blended. Add flour mixture; beat at low speed just until moist. Stir in 1/2 cup coconut. Spoon batter into a 9 x 5-inch loaf pan coated with cooking spray; sprinkle with 1 tablespoon coconut. Bake at 350° for 1 hour or until a wooden pick inserted in center comes out clean. Cool in pan 10 minutes on a wire rack; remove from pan. Combine powdered sugar and juice, stirring with a whisk; drizzle over warm bread. Cool completely on wire rack.

Banana Chiffon Cake
Modified from Everyday Food Jan/Feb 2007 and Carol Bloom's Essential Baker

1 large, ripe banana
3/4 cup water
1/2 cup unflavored vegetable oil
1 teaspoon pure vanilla extract
2 cups all purpose flour (spooned and leveled)
1 tablespoon baking powder
1 teaspoon salt
1 1/2 cups granulated sugar, separated ( I used 1 1/4 cup of sugar)
7 large eggs, at room temperature, separated (I used 6 extra large eggs)
1/2 teaspoon cream of tartar
confectioner sugar, for dusting

For Bittersweet Chocolate Ganache (optional):
6 ounces bittersweet chocolate (I used 72% chocolate), finely chopped
3/4 cup heavy cream
1 to 2 tablespoons rum
1 tablespoon granulated sugar

Center a rack in the oven and preheat it to 325F.

Cut a round of parchment paper to fit the bottom of the pan and cut out a hole in the middle to fit the center tube of the pan. This cake is baked in an ungreased pan because greasing the pan would keep the batter from rising and gripping the sides of the pan as the cake bakes.

In a large measuring cup or medium bowl, mash the banana. Add water,oil,vanilla and eggyolks. Whisk until well combined.

Over a large piece of parchment paper or bowl sift together the flour and baking powder. Add 3/4 cup of sugar and salt and stir together.

Make a well in the center of the mixture by pushing the dry ingredients towards the side of the bowl. Add the banana mixture. Using a rubber spatula, stir together until thoroughly combined.

Place the egg whites in the grease free bowl of an electric mixer or in a large grease free bowl. Using the wire whip attachment or a hand held mixer, whip the egg whites on medium speed until they are frothy. Add the cream of tartar. Slowly sprinkle the remaining 1/2 cup of sugar and continue whipping until the egg whites hold glossy and firm but not stiff, peaks, about 5 minutes.

Fold the egg whites into the cake batter in 3 to 4 stages, blending thoroughly after each addition. Transfer the batter to the tube pan. Use the rubber spatula to smooth and even the top.

Bake for 1 hour, or until the cake tester inserted in the center of the cake comes out clean.(Mine took 45-50 minutes).

Remove the pan from the oven and invert it over a cooling rack onto its feet or over a funnel or a thin necked bottle. Let the cake hanf to cook completely. Don't set the pan on a cooling rack on its base. This will cause the cake to collapse onto itself.

Don't shake the cake out of the pan before it is cool. Once the cake is cool. use a thin blade knife or flexible blade spatula to run across the outer edge and the inside tube to help release the cake from the pan. Invert the cake onto a rack, then reinvert onto a serving plate.

Place the cake on a rack over a lined baking sheet. Sprinkle with confectioner's sugar if using.

*optional*
Making Chocolate Ganache Glaze:
Heat cream, sugar, rum in a saucepan over medium heat until it simmers and bubbles forming on the sides of saucepan. Remove from heat and pour cream over chopped chocolate. Using a rubber spatula, stir to melt chocolate with hot cream until the mixture turns glossy and smooth. Let the chocolate ganache cool to pouring consistency. Pour over the chiffon cake.

Read more...

Sunday, November 04, 2007

Favorite Chocolate Biscotti Recipe

chocolate biscotti


Despite the many baking failures I had over the past, I am extremely blessed in the biscotti department. In fact I find my favorite biscotti recipe the first time I attempted it. Although I blogged about these biscottis a couple of times in the past, I failed to include the recipe. Firstly because I am lazy. Secondly, the recipe is lengthy.I have the book and even copied it by hand in my notebook, so that I could bake it during my last trip home. So I find no rush to put it up here.
Until not long ago, my friend A asked me for the recipe. Her friend who tried the biscottis and has since moved to New York is thinking of attempting the recipe herself. So I thought I might type it here for her, and others who may be interested too.

After my first sweet success, I have since tried many biscotti recipes but none (ok, except those mosaic biscottis) measured up to this one. This recipe, which comes from the Martha Stewart's Baking Handbook is my reliable source for chocolate biscottis. I have also tweaked it a few times with different flour components, amount of sugar, varieties of nuts and even used different brands of chocolate, just to see if that makes a different. Come to think of it, I must have made it more than ten times.

chocolate biscotti

For research purpose, I bought biscotti from Starbucks one day and did a blind test. In my humble opinion, they tasted equally great. So I would safely say that I wouldn't be getting my biscottis from Starbucks again. I figure that the money saved could be used to buy other quality ingredients!

I strongly encourage bakers who have not tried baking biscottis before to give this incredibly easy recipe a go. And for the novice bakers out there, making this will guarantee an instant confidence boost. I certainly felt invinsible the day I made my first batch. There is no way you can mess up this easy cookie.

To make the process even easier,I have one tips for you. Just one. Instead of shaping the dough by hand, simply drop spoonfuls directly onto the parchment paper to form logs.

chocolate biscotti


Chocolate Hazelnut Biscotti
adapted and modified from Martha Stewart's Baking Handbook

2 1/4 cups unbleached all-purpose flour (I like to replace 1/4 cup to 1/2 cup whole wheat flour for the all purpose)
1/4 cup dutch-processed cocoa powder
1 tsp baking soda
1 1/2 cups granulated sugar, 1 tsp granulated sugar for glaze (I used 1 cup and it's the right sweetness for me)
1 tsp kosher salt
1 1/2 cups(about 8 ounces) blanched hazelnuts (sometime I use almond, but I prefer hazelnuts)
12 oz semisweet or bittersweet chocolate chunk(I like to use one pack of 3.5oz 72% Lindt and make up the rest with 60% Ghiradelli Chocolate chips)
4 large eggs, at room temperature
1 eggwhite for glaze (optional), at room temperature
Sanding sugar (or granulated)for sprinkling (optional)

Preheat oven to 350F.Line two large baking sheet with parchment paper. Set aside.

In a food processor, pulse the flour, cocoa,baking soda,salt, 1 cup of chocolate chunks and hazelnut, until chocolate chunks and hazelnuts are the size of peas. *if you don't have a food processor (like me), coarsely chop the nuts and chocolate and sieve the flour.

In a bowl of electric mixer fitted with whisk attachment, beat the whole eggs, and granulated sugar until the mixture holds a ribbon-like trail on the surface for a few seconds when you raise the whisk.

Switch to the paddle attachment. With mixer on low speed, add the flour mixture. When it's well combined, add in the nuts and chocolate and stir by hand, using a large spatula.

Martha Stewart's proper way:
Turn out dough onto a lightly floured work surface, and divide into 3 equal pieces. Shape each pieces into an 18 inch log. Transfer to prepared baking sheet. With the palm of your hand, gently press the logs to flatten slighlt. Brush egg wash over logs. Sprinkle with sanding sugar if using.

OR

Mandy's lazy not messy way:
Using the spatula as a guide, drop the dough by spoonful into a 2.5-inches wide and 18-inches long log directly onto the parchment paper. Slightly flatten it to 1/2-inch thick. Leave 2 inches space between logs.*** Brush eggwash over logs. Sprinkle with granulated sugar, if using.

Bake, rotating pan halfway through, until logs are just firm to the touch, 20-24 minutes. Transfer baking sheets to a wire rack to cool completely, about 20 minutes.

When the logs are cool enough to handle, use a serrated knife to cut biscotti log on the diagonal, into 1/4-inch thick, or if you like, 3/4-inch thick (which is more durable to be send off as care package.

Place a wire rack on a large rimmed baking sheet. Arrange slices, cut sides down on the rack.Bake until biscottis are firm to the touch and completely dry. 10 to 12 minutes.

Remove pans from the oven;Let biscottis cool completely on the rack. They can be kept in an airtight container at room temperature for up to 2 weeks. I keep them in the freezer when I don't feel like sharing with others. They can be kept there for months.

note: chocolate drizzle is not necessary, but I used it for aesthetic purpose.

Read more...

Friday, November 02, 2007

Crunchy Vietnamese Chicken Salad

vietnamese chicken salad


I have never had Vietnamese food before I came to St Louis. It sounded a bit funny considering how close Vietnam is to Singapore and Malaysia. We are neighbors who have never met one another before.

I blame it on the scarcity of Vietnamese restaurants in Singapore. And the polite Vietnamese colleague whom I worked with for not trumpeting the delicious-ness of her country cuisine. Only after I travelled a zillion miles to United State have I been exposured to the amazing cuisine. Still, better late than never right?

Being an absolutely unadventurous eater, I usually steer myself to the safe side when comes to ordering. "A beef pho for me please" is what I order. Oh and a cup of Vietnamese coffee of course. How could I not get a cup of this addictive stuff. It's almost therapeutic to see the coffee slowly dripping down onto the condense milk. Until the incessant nag and complaint comes from OCT. "Yike, this is too sweet!You shouldn't order this next time,it's not good for your health....." All I could think of, is where can I buy the coffee press. So that I can have it everyday. If you know, please drop me a line.

Oh, I really shouldn't be telling this boring and unrelated story. Because this entry is about a Vietnamese recipe I made a couple of nights ago. It's a crunchy Vietnamese Chicken Salad. I like recipe with name like this. It preps you for what you are expecting.

vietnamese chicken salad2

Except, it's better than I envisaged. The dressing was flavorful and distinctly Asian. What with the fish sauce, rice vinegar, lime juice and thai basil, I almost felt like sitting in a shaded table somewhere along a burstling street; Eating and sweating at the same time at a roadside hawker stall.

Because I don't normally keep chile, cilatro and mint at home, I omitted them and replaced with some thai basil. It worked for me and I am delighted to find a new recipe to bring to the next dinner party.

Curiously the dressing reminds me of the green mango/papaya salad I had in Thailand. I guess as far as Southeast Asia cuisine is concerned, we are influenced a lot by our neighboring countries. I would try this dressing with green mango if lady luck handed some green mango on my lap.(which is fat chance) But I am equally happy to use green cabbages, which are abundant and cheap here.


IMGP5145


Crunchy Vietnamese Chicken Salad
adapted and modified from Eric and Sophie Banhs via Foodandwine.com

Chef Way- The Banhs like to poach the chicken for this vibrant dish, then toss the salad with a homemade scallion oil.

Easy Way- To save time, use store-bought rotisserie chicken and skip the scallion oil; the salad already gets plenty of flavor from the spicy, vinegary dressing and abundance of fresh herbs.

ingredients
2 tablespoons sugar
2 tablespoons plus 1 teaspoon Asian fish sauce
1 1/2 tablespoons fresh lime juice, plus lime wedges for serving
1 1/2 tablespoons distilled white vinegar (I used 2 tablespoons of rice wine vinegar)
1 tablespoon water
1 serrano chile with seeds, minced (omitted)
1 small garlic clove, minced
1 cup vegetable oil, for frying (I used just enough oil to shalow fry the shallot, maybe three/four tablespoons)
2 large shallots, thinly sliced
Salt
4 cups finely shredded green cabbage (from 1/2 small head)
2 carrots, finely shredded
1/2 small red onion, thinly sliced
1/4 cup coarsely chopped cilantro (omitted, and replaced with a palmful of shredded Thai Basil)
1/4 cup coarsely chopped mint (omitted)
3 cups shredded rotisserie chicken (from 1/2 chicken)(I roasted 6 drumsticks in a 400F oven until cooked to make the shredded chicken)
2 tablespoons extra-virgin olive oil
3 tablespoons coarsely chopped unsalted roasted peanuts

In a small bowl, combine the sugar, fish sauce, lime juice, vinegar, water, chile and garlic and stir until the sugar is dissolved. Let the dressing stand for 5 minutes.

Meanwhile, in a small saucepan, heat the vegetable oil until shimmering. Add the shallots and cook over high heat, stirring constantly, until golden, 3 to 4 minutes. Drain the shallots on paper towels; reserve the oil for another use. Sprinkle the shallots with salt and let cool.

In a large bowl, toss the cabbage, carrots, red onion, cilantro, mint (if using) and shredded chicken. Add the olive oil and the dressing and toss. Sprinkle with the peanuts and fried shallots and serve the chicken salad with lime wedges.

Serves 4 -6 people.

Read more...
Related Posts with Thumbnails