Saturday, September 22, 2007

Thai Basil: A great herb to try

We don't go to the Asian grocery stores very often. But whenever we go, I make sure that a pack of fresh Thai Basil lands in our shopping cart. Ever since I got back from a Bangkok trip 5 years ago, I have been mesmerised by Thai cuisine. There's something intriguing in Thai cuisine. No doubt it's almost always spicy, rich-because of the coconut milk used. But on top of that there's something else. Something uniquely Thai. Maybe it's the spice and herb they use.

Ironically, the mystery is only solved after 5 years and a move to another continent later. I finally learn that part of the mystery flavor is imparted by Thai Basil. Ever since my first encounter with Thai Basil, I use it in every single Thai recipes. And it never fails to offer the flavor I love and miss from Thailand. Unlike the sweet basil which we use in Italian cooking, Thai Basil has a more assertive flavor. OCT think it's pungent. However, I find it hard to express in words its complexity. For some reason, it reminds me of fennel bulb. Other than that, Thai Basil is a highly compatible herb with Asian cuisine. I like to add it towards the end when cooking red/green curry. Sometime even in sweet and sour dish, which one could associate with Chinese/Thai cuisine.

Spicy Sesame Noodle with chopped nuts and Thai BasilRecently I find another use of this beloved herb in a recipe from July issue of Bon Appetit. A glance at the ingredient list, I know it would be perfect for our weekly vegetarian meal. The original recipe used egg noodle, but I swapped it with angel hair with no problem. Despite its simplicity, this dish is one which packs with lots of Oriental flavors. The use of three types of fragrant oil with ginger, garlic and vinegar is certainly a clever way to infuse lots of flavors without loading on fat. I further reduced the amount of oil by 1.5 tablespoons and increased 2 more cloves of garlic without missing much flavor. It was a perfect light Oriental meal for summer.

Thai basil may seems unassuming, but adding it to any stirfry, or in this case pasta; would instantly enhance the flavor. If you haven't already tried cooking with Thai basil, I strongly urge to do so. It would certainly surprises you how simple it is to add a "Thai touch" to the standard stirfry.

I am submitting this dish which features Thai Basil as my first entry to Weekend Herb Blogging hosted by Myriam of Once upon a Tart this round, and be sure to check out more about Weekend Herb Blogging at Kalyn's Kitchen.

Spicy Sesame Noodle with chopped nuts and Thai Basil


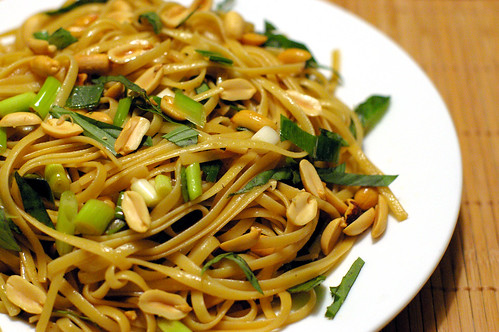
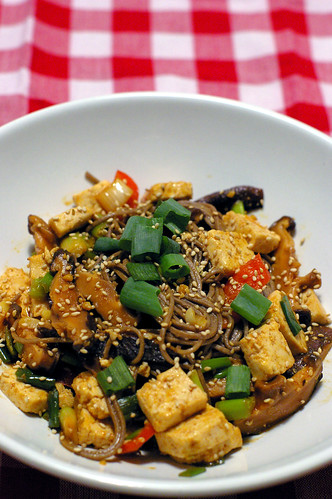
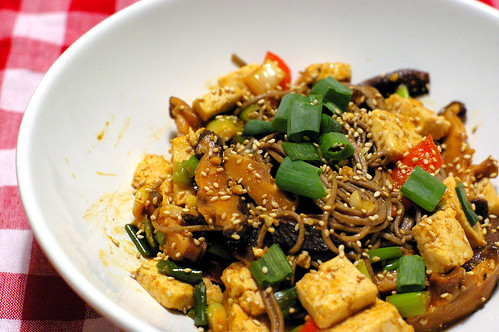
Spicy Sesame Noodle with Chopped Nuts and Thai Basil
adapted from July 2007 Bon Appetit

1 tablespoon peanut oil
2 tablespoons minced peeled fresh ginger
2 garlic cloves, minced ( I used 4 gloves,because I love garlic!)
3 tablespoons Asian sesame oil (I used 1.5 Tbps)
2 tablespoons soy sauce
2 tablespoons balsamic vinegar
11/2 tablespoons sugar
1 tablespoon (or more) hot chili oil*
11/2 teaspoons salt
1 pound fresh Chinese egg noodles (about 1/16 inch in diameter) or fresh angel hair pasta ( I used dried angel hair)
12 green onions (white and pale green parts only), thinly sliced
1/2 cup coarsely chopped roasted peanuts
1/4 cup thinly sliced fresh Thai basil leaves

*Available in the Asian foods section of many supermarkets and at Asian markets.

Heat peanut oil in small skillet over medium heat. Add ginger and garlic; sauté 1 minute. Transfer to large bowl. Add next 6 ingredients; whisk to blend.

Place noodles in sieve over sink. Separate noodles with fingers and shake to remove excess starch. Cook in large pot of boiling salted water until just tender, stirring occasionally. Drain and rinse under cold water until cool. Drain thoroughly and transfer to bowl with sauce. Add sliced green onions and toss to coat noodles. Let stand at room temperature until noodles have absorbed dressing, tossing occasionally, about 1 hour. Stir in peanuts and Thai basil; toss again. Season to taste with salt and pepper. Serve at room temperature.

Makes 4 to 6 servings.

Read more...

Friday, September 21, 2007

One chiffon cake, Two ways

Espresso Chiffon Cake with Caramel Glaze

As much as I love my trustworthy chocolate cake recipes, I decided it's time to try my hands at making chiffon cake last week.But which recipe should I entrust my first chiffon cake experiment? In the end, I decided to go with Espresso Chiffon Cake with Caramel Glaze from Carole Broom's Essential Baker. Surely I can't resist a recipe with name like this! And what would be a better breakfast item to bring on OCT's weekly lab meeting?


Espresso Chiffon Cake with Caramel GlazeThe final result was light and flavorful. But not too sweet. I like how the espresso aroma filled the room when the cake was out from the oven. The soft and airy texture was reminiscent of my childhood. This is the kind of cakes which I liked to buy from the Asian bakeries. Often filled with chocolate buttercream. I was instantly transformed back to my childhood.


Needless to say, I am ecstatic that I could replicate this familiar comfort food memory in my apartment kitchen. Never mind that I am zillion miles away from home. I cut a huge piece for myself after the cake was frosted with caramel glaze, and paired it with a cup of coffee. It was a great afternoon tea. The rest was packed and sent for the next day's breakfast meeting.Now that I have a taste of my childhood chiffon cake, I can't stop thinking about it. I decided to do something unprecedented in my short baking life. I baked the same chiffon cake again! This time, frosted with a bittersweet chocolate ganache for a dinner party.

The effect is not unlike a woman who takes off her serious working clothes and put on an elegant evening gown. The version of Espresso Chiffon Cake adorned with Bittersweet Ganache albeit simple, was sophisticated and elegant. Not to mention, delicious; with the accompaniment of ice cream.


Espresso Chiffon Cake with Bittersweet glaze


I have to admit, I much prefer the second version. But I maybe bias, as I like anything with coffee and chocolate together.

Espresso Chiffon Cake with Caramel Glaze
adapted from Carol Bloom's Essential Baker

Ingredients for Espresso Chiffon Cake:
2 tablespoons instant espresso powder
2/3 cup water
1/2 cup unflavored vegetable oil (canola or safflower)
2 teaspoon pure vanilla extract or vanilla paste
2 1/4 cups cake flour (I used all purpose flour with no problem)
1 tablespoon baking powder
1/4 teaspoon salt
1 1/2 cups superfine sugar, separated
6 extra large eggs, at room temperature, separated
1/2 teaspoon cream of tartar


For Caramel Glaze:
2/3 cup firmly packed light brown sugar
2 ounces (4 tablespoons, 1/2 stick) unsalted butter, cut into small pieces
3 tablespoons heavy cream
1/4 cup confectioners' sugar, sifted

For Bittersweet Chocolate Ganache:
6 ounces bittersweet chocolate (I used 72% chocolate), finely chopped
3/4 cup heavy cream
1 to 2 tablespoons rum
1 tablespoon granulated sugar
Center a rack in the oven and preheat it to 325F.

Cut a round of parchment paper to fit the bottom of the pan and cut out a hole in the middle to fit the center tube of the pan. This cake is baked in an ungreased pan because greasing the pan would keep the batter from rising and gripping the sides of the pan as the cake bakes.

In a large measuring cup or medium bowl, dissolve the espresso powder in the water, Add the oil,vanilla and eggyolks. Whisk until well combined.

Over a large piece of parchment paper or bowl sift together the flour and baking powder. Add 1 cup of sugar and salt and stir together.

Make a well in the center of the mixture by pushing the dry ingredients towards the side of the bowl. Add the espresso mixture. Using a rubber spatula, stir together until thoroughly combined.

Place the egg whites in the grease free bowl of an electric mixer or in a large grease free bowl. Using the wire whip attachment or a hand held mixer, whip the egg whites on medium speed until they are frothy. Add the cream of tartar. Slowly sprinkle the remaining 1/2 cup of sugar and continue whipping until the egg whites hold glossy and firm but not stiff, peaks, about 5 minutes.

Fold the egg whites into the cake batter in 3 to 4 stages, blending thoroughly after each addition. Transfer the batter to the tube pan. Use the rubber spatula to smooth and even the top.

Bake for 1 hour, or until the cake tester inserted in the center of the cake comes out clean.(Mine took 45-50 minutes).

Remove the pan from the oven and invert it over a cooling rack onto its feet or over a funnel or a thin necked bottle. Let the cake hanf to cook completely. Don't set the pan on a cooling rack on its base. This will cause the cake to collapse onto itself.

Don't shake the cake out of the pan before it is cool. Once the cake is cool. use a thin blade knife or flexible blade spatula to run across the outer edge and the inside tube to help release the cake from the pan. Invert the cake onto a rack, then reinvert onto a serving plate.

Making the Caramel Glaze:
Place the sugar, butter and cream in a saucepan over medium heat. Stir until the mixture is very smooth. Remove the pan from the heat and cool slightly. Stir in the confectioners' sugar until very smooth.

Place the cake on a rack over a lined baking sheet. Drizzle the glaze over the top of the cake and let it run down the sides. Let the glaze set for 10 minutes, then cut into serving pieces.

Making Chocolate Ganache Glaze:
Heat cream, sugar, rum in a saucepan over medium heat until it simmers and bubbles forming on the sides of saucepan. Remove from heat and pour cream over chopped chocolate. Using a rubber spatula, stir to melt chocolate with hot cream until the mixture turns glossy and smooth. Let the chocolate ganache cool to pouring consistency. Pour over the chiffon cake. The leftover is delicious to eat with a spoon or as spread on bread.

Serves 12 to 14.

Note on keeping:
The unglazed cake can be kept in room temperature for 3 days and up to 4 month in freezer, when tightly wrapped in plastic. If frozen, defrost overnight in the refrigerator and bring to room temperature before serving.

Once the cake is glazed, it can be kept, lightly covered with waxed paper and then tightly covered with plastic wrap, at room temperature for 1 day. (Mine was kept in refrigerator for 3 days with no problem)

Read more...

Thursday, September 20, 2007

Yay, I won!

Lychee Cheesecake


On top of its contribution as our dinner party dessert, this cake also won me the "Best in Edibility" category in DMBLGIT August 2007! It's my first time participating in this event, and I am honored that the judges selected mine out of so many drool-worthy pictures.Honestly, I think everybody did extremely well this round, and I am a bit embarassed to tell you I won.... (shhh....so we will keep it low-key, ok?)

Maybe this is what they call "beginner's luck"? Anyway, thanks to the kind people who like this pic and my friends (yes, YOU!) who frequent my blog and leave me encouraging comments. I won't have cared to style my food and decorate my baked goods if it wasn't for you.

I am a happy girl now. I wish I could share a piece of Lychee Cheesecake with you now. Oh, and you can see the roundup of DMBLGIT August 2007 here. Hmmm, I wonder which photo should I choose to participate in the September DMBLGIT? Would you tell me which one is your favorite!

Read more...

Tuesday, September 18, 2007

When life hands you tomatoes.....

We love tomatoes in our pasta and sandwiches. So it was a delight to see all the juicy ripe tomatoes at the farmer's market last week,indicating a good harvest. As much as we tried to restraint from buying too many tomatoes, OCT and I still bought far too many for our weekly consumption. Sure tomatoes aren't expensive, but my heart still aches remembering throwing out lots of those that went bad. A consequence of overbought what we could consume.

IMGP4361Anyway, I was thinking of trying out a new recipe I had bookmarked from the september issue of Cookinglight. The recipe that garnered the test kitchen's highest rating is a sure way to catch my attention.

Chicken Breasts with Gorgonzola-Tomato Salsa is a simple dish that packs in lots of flavors. And I love its bright color.It instantly transformed the dull chicken breasts into a photo-worthy kind of dish. Since there's just two of us here, I cut down the amount of chicken used and paired it with way too much salsa. But nobody is complaining. Eating the juicy ripe tomatoes at their peaks is a real treat! Not to mention its many beneficial properties, of which "rich in antioxidant" is one of them.Because I didn't have red onion on hand, I simply omitted it and substituted with shallot. It still tasted pretty good. I think the recipe is fairly forgiving and one can certainly use more or less of the ingredients listed, to taste. Just remember to use the ripest tomatoes you can find!

I am submitting this anti-oxidant packed recipe to Sweetnick's weekly ARF 5-A-Day. Be sure to check out the roundup at her blog later tonight!

IMGP4356


Chicken Breasts with Gorgonzola-Tomato Salsa
adapted from Cookinglight Sept 2007

Combine the ingredients for the salsa--except the cheese--up to a few hours before dinner, and store at room temperature; pound the chicken ahead of time, and keep chilled.

Ingredients
2 cups chopped tomato
1/3 cup minced red onion
1/3 cup finely chopped fresh basil
2 teaspoons extravirgin olive oil
1 teaspoon kosher salt, divided
6 (6-ounce) skinless, boneless chicken breast halves
1/4 teaspoon freshly ground black pepper
Cooking spray
3 tablespoons crumbled Gorgonzola cheese


Preparation
Combine tomato, onion, basil, oil, and 1/2 teaspoon salt in a medium bowl. Let stand at room temperature.
Place each chicken breast half between 2 sheets of heavy-duty plastic wrap; pound each piece to 1-inch thickness using a meat mallet or small heavy skillet. Sprinkle both sides of chicken with remaining 1/2 teaspoon salt and pepper.

Heat a large nonstick skillet over medium-high heat. Coat pan with cooking spray. Add 3 chicken breast halves to pan; cook 4 minutes on each side or until chicken is browned and done. Remove from pan; keep warm. Repeat procedure with remaining 3 chicken breast halves.

Stir cheese into tomato mixture. Place 1 chicken breast half on each of 6 plates; top each serving with about 1/3 cup salsa.

Yield
6 servings

Read more...

Thursday, September 13, 2007

Soba's what for dinner!

When you spend a lot of time reading the delicious food blogs out, many things can happen to you. Do you know that by simply staring at the food on the computer screen can make one gain weights? Ok, this may not sound scientific, and I don't have any concrete research work done on this yet. But that is certainly the case for me. Sadly, as of the last time I weighed, I have gained some more pounds from looking at food that I didn't eat! I am serious. Really.

Soba with tofu, shiitake mushroom and red pepperAnother thing, that may or may not happen to you, is an impulsive change of menu for dinner. Yes, this happens a lot of time around here... You know, the menu I planned sounds great, and the necessary ingredient has been taken out to thaw. But thing changes in a matter of one click. Like the time when I see the entry about soba here and here.

"Isn't it great?" I told myself. "I have soba in the pantry which I bought for a recipe I read somewhere. But couldn't find it anymore after soba comes on board." A change of menu is inevitable, lest I forget where I see the recipe again. So much on food blogs overloaded.

Speaking of soba, I wish I could tell you more than it's noodle made of buckwheat flour and I have seen it made fresh from the Japanese restaurant display window. Other than that, I know very little about soba. If you are interested to know more, check out here.If you are only interested in eating (like me), skip the link, and drag the cursor down because I want to tell you about my first soba experience.

You know how sometime you have never tasted a new thing and don't know what to expect? That was my case with soba. Would it taste like the Italian's spaghetti or Asian's instant noodle? The answer is none of the above. In fact, I tasted a mild nutty flavor in Soba. Since I have not tasted anything made with buckwheat before, I wouldn't know if that's the typical "buckwheat taste".

Anyhow, I sort of incorporated these two recipes into one, because I don't have some of the ingredients in the respective recipes.ha! The thing with cooking (at least Asian's cooking) is, it is very forgiving. You can safely incorportate more of certain condiments to suit your taste, or leave it altogether.(With some exceptions of course, but that's not the case here, at least)

While I am sure both recipes taste marvellous, I am happy to report that my modified version was pretty good too. With an auspicious beginning with soba, I have since optimistically bought a few more packs of soba (with different brands)from my local Asian's grocery store. They are now sitting neatly with their Italian and Chinese counterparts!

Does any food blog make you try something new lately?

Soba with tofu, shiitake mushroom and red pepper


Spicy Soba Noodles with Tofu, Shiitake mushroom and Red Pepper

Makes 4 servings

For sauce
1/3 cup water
1/3 cup soy sauce
2 to 3 teaspoons Korean hot-pepper paste (sometimes labeled “gochujang”)
1 tablespoon packed brown sugar

For noodles
3 tablespoons sesame seeds
1/4 cup vegetable oil
2 tablespoons finely chopped peeled ginger
1 tablespoon finely chopped garlic
10 dried shiitake mushrooms, soaked in water to soften, stemmed and thinly sliced
1 block (12oz) of firm tofu, cubed.
6 scallions, thinly sliced
8 to 9 ounces soba
1 red pepper, cored and thinly sliced

Stir together all sauce ingredients until brown sugar is dissolved, then set aside.

Toast sesame seeds in a dry 12-inch heavy skillet (not nonstick) over medium heat, stirring, until pale golden, then transfer to a small bowl.

Heat oil in skillet over medium-high heat until it shimmers,add tofu and cook, stirring occasionally, until all sides are browned. Remove from skillet. In the same skillet,sauté ginger and garlic, stirring, until fragrant, about 30 seconds. Add shiitakes and red bell pepper and sauté, stirring frequently, until tender, about 4 minutes. Reduce heat to medium,return tofu to the skillet and add most of scallions (reserve about a tablespoon for garnish. Add sauce and simmer 2 minutes.

While the tofu mixture is cooking, cook soba in a pasta pot of boiling salted water (2 tablespoons salt for 6 quarts water) until noodles are just tender, about 6 minutes. Drain in a colander and rinse under cool water to stop cooking and remove excess starch, then drain well again. Transfer to a large bowl and toss with sesame seeds and tofu mixture. Serve sprinkled with reserved scallions.

If you aren’t able to find Korean hot-pepper paste, substitute 3/4 teaspoon Chinese chile paste and reduce the amount of soy sauce to 1/4 cup.

Read more...

Tuesday, September 11, 2007

Matcha Again?!

matcha cookies

Hmmm... Yeah. Sorry, I am really obsessed with Matcha lately. I am sure you will see more Matcha related recipes on my blog until I finally finish using my tiny tin of Matcha powder. I will try to spread them out over the weeks, so Green will not be the only color you see in this blog.As you may recall,I have blogged about the Matcha Brownie and mini matcha cheese tarts here not too long ago. But the first recipe I tried after I acquired the Matcha powder was indeed these Matcha Cookies, which Kelli from Lovescool had so kindly shared on her blog.

matcha cookies


Now you probably have seen it on Fanny, Veronica,Mae and some other beautiful blogs before(sorry I am sure I have seen a lot more bloggers' entries on this sweet but I can't remember where!), and I don't have to sound like a broken record telling you just how amazing these cookies are. I simply love its melt in your mouth texture and distinct matcha flavor. Eating the cookie is almost like drinking the matcha tea itself. However, if Matcha is not your cup of tea, then maybe you would find it a bit grassy.OCT for one, finds the cookies too "green/grassy". I nodded to his comment, and secretly happy that I could have the cookies all to myself! Well, I guess we can say:"one man's meat is another man's poison?" Like how I adore chocolate of high cocoa percentage, but OCT finds it too bitter.Just my 2 cents anyway.

But I am urging you, green tea lovers out there to give this a try, and remember: Don't waste it on your tea-hating friends. They may not enjoy it, so save the precious morsels for yourself!Like how I baked a batch, offered OCT a tiny bite and kept the rest all to myself!

Another batch of matcha cookiesIn Kelli's version, she rolls the cookies in sugar. I followed the method in my first batch but decided to play around with the subsequent batch. Since I always have some sweet tart dough in the freezer, I defrosted some, rolled it thin and glued to the Matcha cookie dough.

After the dough firmed up, the dough was sliced and baked in the oven. I think I like the second version better. The outer ring of sweet tart dough added a nice buttery flavor to the cookies and I prefer the cookies without the crunch from granulated sugar.

Thank you Kelli, for your generosity in sharing your award winning Matcha Cookies recipe! Your recipe nudged me to get my first tin of Matcha powder, and ignited my obsession with Matcha ever since.

Have you made these cookies yet?

Another batch of matcha cookies

Read more...

Friday, September 07, 2007

Something sweet for the weekend

Strength of a wine cork

Don't listen to people who tell you,"You are too small to achieve great things". Look at the wine cork, it has the strength to lift up a Nutella Tart which probably is a thousand times heavier than its weight.


Have you made any plans for the weekend? I am not sure about others, but I like to pack my weekends with lots of activities. Most of the time, ambitious plans which I ended up not achieving much.

Nutella TartIdeally, our weekend should begin with a hearthy homemade breakfast with coffee/orange juice. After which, we would take a 45 minutes walk to the park near our apartment and take in some fresh air. Then, we will make a trip to the farmer's market where we will be considered the early birds, and will get to pick the freshest, prettiest produce first without joustling with the rest of the customers.

Lunch will either be a picnic at the park, or a sandwich at our favorite spot in the Italian neighborhood. Then we would stroll around the neighborhood with freshly made cannoli on hand. Maybe we would catch an afternoon movie after that? It would be dinner time after the show.

Then I would leave OCT alone to play computer game, while I bake something in the kitchen.....

This, as I have mentioned, is my over-ambitious weekend plan.

A typical weekend usually begin when we wake up after we have slept to our hearts' content. I won't tell you the time, let's just say it would be too hot for a leisure walk to the park and the farmer's market will already be packed with people.

Then we will debate on whether we should go directly for lunch or make a detour home to put down our loot. On summer, it's generally too hot to do anything, so we normally head straight home and stay in the comfort of indoor air-conditioner.

And stay indoor for the rest of the day.

Boring, I know. This weekend, I make the same ambitious plan, and let's see how much I can accomplish.

Nutella Tart

I am going to leave you with this Nutella Tart I made awhile ago, from Pierre Herme's Chocolate Desserts Book. It's the tart Monsieur Herme developed for his wife who loves Nutella. Oh, how romantic! I wish I could tell him it's my favorite too. Too bad I don't speak French! Even if I could, I must transport myself to Paris first! Anyway, have a great weekend,you all!

Nutella Tart


Nutella Tart
adapted from Pierre Herme's Chocolate Desserts

The crust:
1 fully baked 8 3/4 inch (22cm) tart shell made from Sweet Tart Dough, cooled to room temperature

Keep the cooled crust, with the tart ring still in place, on the parchment-lined baking sheet.( The crust can be made up to 8 hours ahead and kept at room temperature.)

The Filling:
2/3 cup (200g) Nutella
4 3/4 ounces (140g) bittersweet chocolate, preferably Valrhona Noir Gastronomie, finely chopped
7 tbsps (3 1/2 ounces, 200g) unsalted butter
1 large egg, at room temperature, stired with a fork
3 large egg yolks, at room temperature, stirred with a fork
2 tbsp sugar
1 cup (140g) hazelnuts toasted,skinned and cut into large pieces


Center a rack in the ove and preheat the oven to 375F (190C).

Spread Nutella evenly over the bottom of the crust and set it aside while you make the ganache.

Melt the chocolate and butter in separate bowls either over-not touching-simmering water or in a microwave oven. Allow them to cool until they feel only just warm to the touch [104F (40C)], as measured on an instant read thermometer, is perfect).

Using a small whisk or rubber spatula, stir the egg into the chocolate, stirring gently in ever widening circles and taking care not to agitate the mixture- you don't want to beat air into the ganache. Little by little, stir in the egg yolks, then the sugar. Finally, still working gently, stir in the warm melted butter. Pour the ganache over the Nutella in the tart shell. Scatter the toasted hazelnus over the top.

Bake the tart for 11 minutes- that should be just enough time to turn the top of the tart dull, like the top of a cake. The center of the tart will shimmy if jiggled- that's just what it's supposed to do. Remove the tart from the oven and slide it onto a rack. Allow the tart to cool for at least 20 minutes, or until it reaches room temperature- the best temperature at which to serve it.

Makes 6 to 8 servings .

Read more...

Tuesday, September 04, 2007

My first taste of cherry clafoutis

Over the weekend, I was lucky to find some cherries from our farmer's market even though the cherry season has long passed. It finally gave me a reason to try my hand on making cherry clafoutis, a recipe that I have been thinking a lot about, when cherries were abundant, but never got around to making it.

So, I took this as a sign that it's my time to make clafoutis. You see, I have been hesitant for a long time, because I am not really into custardy desserts. But seeing it popped up on lovely Bea's blog a couple of times, it made me suddenly craved for one! And this was how I finally decided to charter into the clafoutis land.

Being a timid and undecisive baker/blogger that I am, I did a bit of blog-hopping before I settled on a fool-proof clafoutis recipe. It's not one from Bea's though, because at 10p.m, I realised I had ran out of heavy cream, an ingredient required in her recipe. So, I settled for another great recipe. One that this blogger said it's a good clafoutis recipe and another blogger made it with stunning result too, that gave me enough assurance to dive right in!

Cherry Clafoutis


Surprisingly the making of clafoutis was pretty easy. I beat everything by hand (without breaking a sweat), and within 30 minutes, they were sent into the oven. I was apphensive about the outcome, so with the little waiting time I had, I went to bake something else. You know, in case the cherry clafoutis turned out "not my cup of tea" I will have something comforting as backup.

I settled for plum galettes. Mainly because I had seen it not long ago on Martha Stewart's website and I had some gorgeous plums. Well, to tell you the truth, I have debated with myself on whether to bake the plum galettes. They are so sweet and perfect to be eaten on its own. What if there isn't anymore plums in the farmer's market when we return the next week? I asked OCT for his opinion, and even told him the pros and cons of baking up a batch of plum galettes. I don't remember whether he gave his seal of approval, but evidently a batch of galettes was made nonetheless.


Plum Galette


Since there's a batch of pate brisee in the fridge, all I had to do was to slice the plums into pieces, mixed them with some sugar and cornstarch, and "tried" to arrange them decoratively on the pate brisee. The galettes were baked in the same temperature as the clafoutis which was great. They could keep one another company and discuss their fates once they were out of the oven. But they didn't stay together for long, as the time for the cherry clafoutis was up.

Cherry ClafoutisIt gave me great joy to see the clafoutis rose to such heights even before I tasted one. They reminded me of souffle (even though I have never made one, but one can imagine right?)I asked OCT to check out the "fake souffles" too. They were quite stunning but I wasn't sure if that's how clafoutis should behave. At least I don't remember seeing them so puffed up on Bea's blog. I could have overwhipped the milk mixture or baked them slightly too long. But my worry was unfounded because the clafoutis collapsed once they cooled down.

Time for verdict! I tentatively took a small bite, and then another, and before I knew it, I almost finished one clafoutis by myself. OCT was summoned in for tasting and it was love at first bite for him too! However he complained about the trouble of having to spit out the cherry pits. "It imparts an almond flavor to the clafoutis!" I pretended to be knowledgable and knew what I was doing, while in fact I obtained the information from other fellow bloggers. Sometime I love to pretend I know more than OCT when it comes to food.ha!

Plum GaletteThe plum galettes however, turned out to be on the sourish side. I tried to sweetened them up with some powdered sugar, but the attempt was futile. After sitting forlornly in front of the sour plum galettes for about half an hour, a light bulb moment came. The idea was to make a sweetened apricot glaze and smothered on top of the galettes! This certainly worked and I was relieved that there won't be any sour plum galettes to haunt me in my dream!

The next morning, I packed a few galettes and a few clafoutis for our friends. The intended recipients however were not at church, so we passed them to another family. Little did I know that such simple act of giving would bring so much joy to that family! Their daughter was so excited when presented the box of clafoutis and asked if they were cookies. (She didn't see the content of the box initially)

I won't forget the smile and excitement on her face, as if it's her Christmas present on Christmas morning. I haven't felt so appreciated in a long time and almost forget how good it feels. It's totally worth the effort to make something for people who would appreciate what you have done, don't you think?

Plum Galettes

1 recipe Pate Brisee (see recipe below)
1 tablespoon turbinado sugar, plus more for sprinkling
1 tablespoon all-purpose flour, plus more for work surface
1 tablespoon granulated sugar
1/4 teaspoon ground cinnamon
1/4 teaspoon freshly grated nutmeg
5 cups pitted plums, sliced 1/4-inch thick (about 5 medium)
1/2 teaspoon lemon zest
1 tablespoon unsalted butter, cut into small pieces
1 large egg
apricot glaze

Line a baking sheet with parchment paper or a nonstick baking mat.

Preheat oven to 375 degrees.

Sprinkle a lightly floured work surface with 1 tablespoon turbinado sugar. Roll out dough into several 5-inch rounds, about 1/4-inch thick.

In a small bowl, mix together 1 tablespoon flour, granulated sugar, cinnamon, and nutmeg. In a large bowl gently toss together plums and zest. Sprinkle the flour mixture over plums; gently toss until evenly coated. carefully place a few pieces of plum on top of dough, leaving a 1-inch border all the way around. Fold border over plum mixture, overlapping where necessary and gently pressing to adhere the folds.Repeat with the rest of the dough rounds.

In a small bowl, beat together egg with 1 teaspoon water. Brush edges of dough with egg mixture, and sprinkle with turbinado sugar. Bake until crusts are golden brown and juices are bubbling, about 30 minutes. Transfer the baking sheet to a wire rack to cool. Serve warm or at room temperature.

Pate Brisee

2 1/2 cups all-purpose flour
1 teaspoon table salt
1 teaspoon sugar
1 cup chilled unsalted butter (2 sticks), cut into small pieces
1/4 to 1/2 cup ice water

Place flour, salt, and sugar in the bowl of a food processor; pulse to combine, about 30 seconds.

Add butter; pulse until mixture resembles coarse meal. While pulsing, slowly pour in 1/4 to 1/2 cup ice water; process until dough begins to come together. Divide dough in half; shape into two disks. Wrap in plastic; chill at least 1 hour before using.

Note: I used a pastry cutter to make the dough with no problem.


Cherry Clafoutis
adapted from Ceres and Bacchus

3 eggs
1/2 cup sugar
1/2 cup butter, melted
1 cup all purpose flour
1 cup milk
1/2 tsp. vanilla
2 cups of cherries
some chopped pistachios (optional)


Preheat the oven to 400 F. With a mixing bowl, beat the sugar and eggs with a wire whisk until they turn lighter in color. Gradually add in the melted butter, beating to incorporate. Add the flour all at once and whisk until the batter is a homogeneous mixture.

Slowly pour in the milk and vanilla,whisking to combine. The batter should be very smooth and shiny.

Distribute the cherries in 7 disposable aluminium dishes,(or you can also use a buttered glass or earthenware baking dish, cake pan (9 or 10 inches in diameter) or skillet, as the original recipe suggests). Pour the batter over the fruit. Bake for approximately 20-30 minutes (longer if you can using a bigger pan), until slightly browned and almost completely set in the middle. Serve warm, at room temperature or cold. (I baked them at night, had one before sleep and another one for breakfast the next morning.)

Top some chopped pistachio on the clafoutis before serving.

Make 7 individual size clafoutis for weekend breakfast.

Read more...
Related Posts with Thumbnails