Friday, August 31, 2007

Happy Birthday M&M!

It's Malaysia's birthday today! 50 years ago, our first Prime Minister Tunku Abdul Rahman declared our independent at the Stadium Merdeka with the resounding : "Merdeka! Merdeka! Merdeka!" (independence!) I can't help but filled with emotion and pride everytime I see the clip as if I was there, 50 years ago.

Coincidentally, my birthday falls in the same month as Malaysia's Independence day. And my name starts with the letter "M" too! So, for our birthdays, I made a cake that starts with "M" too. Mango cheesecake, that is!


Mango Cheesecake

OCT was really sweet and offered to bake me a cake. After making so many birthday cakes for others, I felt rather pampered having someone made me one for my special day. We decided on something simple, yet special. What would be better than cheesecake right? That way, OCT doesn't have to worry about all the "beating, mixing, folding, icing, confusing" instructions an elaborate cake entails. I wanted a mango cake, because that reminds me of home. In the place I grow up, every household has at least one mango tree! Mango is such an indiscrimating fruit that it practically grows anywhere you throw the seed. Alright, I may be wrong on the second part. Or perhaps even the first part about every household having at least one mango tree. But for Sabahans, we are bound to have friends/relatives who have mango trees. And the mango from A's garden might taste different from B's garden. I beg not to pretend as an expert in this aspect, I can only assure you that I was a happy girl when a ripe, peeled, carefully cut mango landed on my lap.

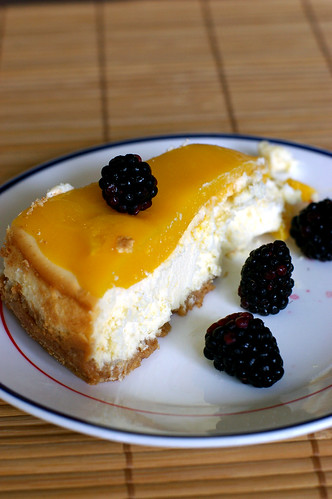
So mango always conjure up happy memory. And it is fitting for a birthday celebration. After some research on potential recipes, we settled on a basic baked lemon cheesecake from Bon Appetit with pureed mango as topping. The initial plan of incorporating mango in the cheesecake batter was thwarted after many negative feedbacks on the changed texture and taste of mango after baking.

A mango mousse would be nice, but the cream added might dilute the mango flavor. Besides I wanted the mango flavor to be intense and unadulterated. In order to achieve this, I decided to do as little to the juicy sweet mango flesh as possible.

Mango Cheesecake

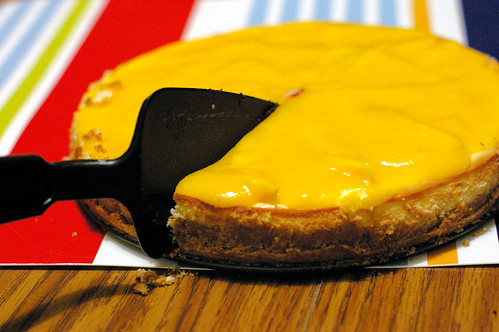
Maybe a mango mirror, I thought. With nothing more than a little gelatine powder, lots of mango pureed and sugar to taste. As little luck as I had with gelatin before, this actually worked! The mango mirror was firm when we cut the cake on my birthday!

Unlike other birthday cakes I made in the past, we left this cake unadorned. We didn't even bother to pipe "Happy Birthday" on top and the resulting cake, as you can see turned out to look pretty simple and unassuming.

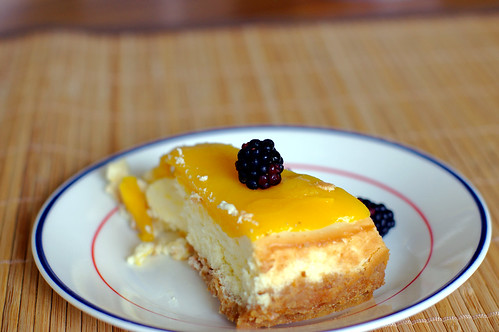
The resulting cake, is a low fat tangy lemon cheesecake with a sweet mango topping. I like it for many reasons. One being it's a mango cake, and of course the fact that OCT was very involved in the whole baking process. He crushed the crumb manually and even attempted to beat the cream cheese by hand! The later was aborted after we found that task to be insurmountable. Why should we while we have the trustworthy Kitchen Aid by our side?

So here's a mango cheesecake for Mandy and Malaysia's birthday. Selamat Hari Merdeka to my fellow Malaysians.

Mango Cheesecake

Note: Oh, and my friend Adeline and Sean were so sweet to give me a surprise just before we cut my birthday cake. Guess what they brought? A huge and most delicious (also the first) ice cream birthday cake for me!


ice cream cake
I was genuinely surprised when they turned up at our apartment. OCT did a great job by acting normal the whole night! I initially thought it would be a quiet night with simple dinner for my birthday like we always do on birthdays!


ice cream cake
Thanks Adeline and Sean for giving me my first ice-cream birthday cake and spending my last "20-something" birthday with me!

Read more...

Tuesday, August 28, 2007

Give me something cold for dinner

Tomato with Fresh Peach Basil Vinaigrette

I saw this simple recipe from the Southern Living magazine, and it immediately captured my attention. I have been wondering what to do with the fresh tomatoes I got from the farmer's market the past weekend. Normally, they would inevitably end up in pasta,my usual and not-so-creative salad or sandwiches. I mean, what else can you expect a humble tomato to do in spite of its many supportive roles in various cuisines.

Perhaps everyone deserves to be put under the spotlight once in awhile. And for the same reason, tomato was put on the spot, at the center of our dining table not many nights ago.The vines that bear all these tomatoes would be proud,if only they could see how pretty the bright, succulent tomatoes was, basking in the equally delicious peach and basil vinaigrette. And the smile and satisfaction they brought to their eaters' lips. It was a new taste to our palate, but a welcoming one. We ate simply that night, with only this salad and some sliced sourdough. The bread was the perfect vehicle to soak up all the remaining juice on the plate. Do we miss the meat? Not me. But I guess OCT probably thinks that another meat dish won't hurt...

I am submitting this anti-oxidant packed recipe to Cate's weekly ARF 5-A-Day. Be sure to check out the roundup later tonight!

Tomato with Fresh Peach Basil Vinaigrette


Tomatoes with Fresh Peach and Basil Vinaigrette
adapted from Southernliving

1/3 cup white balsamic vinegar
1 garlic clove, minced
2 tablespoons brown sugar
1/4 teaspoon freshly ground pepper
1/8 teaspoon salt
2 tablespoons olive oil
1 large peach, chopped
1 1/2 tablespoons chopped fresh basil

Whisk together first 5 ingredients until sugar is dissolved. Whisk in olive oil. Stir in chopped peach and basil. Serve immediately.

Yield
Makes about 1 1/4 cups (serving size: 1 tbsp.)

Read more...

A very rough guide for making scones

lemon raspberry chips scone

Even since I learned how to make scones last year, I always keep an extra batch of scone dough in the freezer. It's something handy to have, especially for Saturday morning when we don't feel like eating pancakes (our weekend breakfast ritual).All we have to do, is simply to heat the oven to 425F and transfer the scone dough from freezer straight to the oven. It's our sort of "fast food".

This recipe which I adopted from Bon Appetit made the scones baking process even faster and simpler than my favorite standby recipe. I like to make a batch of the dough and bake it fresh whenever the scone craving hits.

While scone isn't exactly the hardest pastry to make, please allow me to share with you my experience in making scones, on what works for me, for the benefit of others who haven't chartered into the scones territory. Yes friends,I am talking about you!

Oh, one more good news to get you started: you don't need a mixer or even a food processor to make scones! All you need is a mixer bowl and a pastry cutter. IF you are not willing to invest $3 for that, you can use 2 forks to stand in for the cutter too.

Here goes my very rough guide of scone making:

Rule 1:
Start with everything COLD. You want to be able to cut the butter into the flour, to the size of coarsemeal.So that when they bake, all the butter will melt and form multiple pockets in the scones, and give them the flaky texture.

Rule 2:
Handle the dough with TLC and as little as possible. Obviously you want your scones to be tender and crumbly and not rock-like. So, minimum handling helps to do just that.

Rule 3:
Freeze the dough for at least half an hour before baking. Remember the dough is handled minimally? It will tend to crumble and fall apart if you attempt to bake it immediately. What works for me, is to freezer the dough after I formed it into a circle. After it firms up, I will simply cut them into equal parts of triangle. Of course you can cut it with round cookie cutter, but I am too lazy to wash one more item.

lemon raspberry chips scone


In this batch of scones, I used dried cranberries,raspberries chocolate chips and lemon zest. The original recipe used meyer lemon zest and dried blueberries. I figured this recipe is so flexible that you can use any citrus zests and other dried fruits with great result. If dried fruit is not your cup of tea, replace it with chocolate chips. A trick which works for the finicky eater in my household.

Because this recipe makes a lot of scones for just the two of us, I always halve the recipe.

Lemon and Dried Cranberries Scones with Raspberry Chocolate Chips
adapted from Dec 2006 Bon Appetit

3 cups self-rising flour
1/2 cup plus 1 1/2 tablespoons sugar
3/4 cup (1 1/2 sticks) chilled unsalted butter, cut into 1/2-inch cubes
1 cup dried cranberries
1 cup plus 1 tablespoon buttermilk
1 1/2 tablespoons finely grated lemon peel
1/2 cup raspberry chocolate chips ( or semisweet/bittersweet chocolate chips)


Line large baking sheet with parchment paper. Whisk self-rising flour and 1/2 cup sugar in large bowl. Using pastry cutter or 2 forks (or use your fingers) to cut the chilled butter until pieces are size of small peas. Add dried cranberries and raspbeey chocolate chips and toss to coat. Mix 1 cup buttermilk and finely grated lemon peel in glass measuring cup. Pour buttermilk mixture into dry ingredients and stir until dough begins to form (some of flour will not be incorporated). Transfer dough to lightly floured work surface and gather together. Knead dough briefly, about 5 turns. Divide dough in half. Form each dough half into ball and flatten into 1-inch-thick disk. Freeze the dough for at least half and hour or up to a month.

When ready to bake, preheat the oven to 425F and like baking sheet with parchment paper. Take the dough out from freezer and each disk into 6 wedges.

Transfer scones to prepared baking sheet, spacing 1 inch apart. Brush tops with remaining 1 tablespoon buttermilk and sprinkle with remaining 1 1/2 tablespoons sugar. Bake until scones are golden brown on top and toothpick inserted into center comes out clean, about 25 minutes.

Makes 12 servings.

Note: Before I succumbed to the temptation of buying self rising flour, (which I don't use very often other than making these scones) I used all purpose flour to make half of the recipe. In place of 1.5 cups of self-rising flour,I used 1.5 cup of all purpose flour+ 2 tsp baking powder + approximately 1/2tsp baking soda + 1/4tsp salt.

Read more...

Friday, August 24, 2007

Recycling Idea

Matcha Cream Cheese TartsRemember I told you about the leftover cream cheese from my last batch of Matcha Brownie? After the brownie was baked, I decided to use the cream cheese mixture to make some mini tarts. Even though it was left with only a bit of leftover, I found myself getting 7 mini cheesecake tarts out of it. Wasn't too bad right?

Such is the beauty of recycling. Oh, and I must also mention that the tart dough was the leftover from another tart I made months ago. You can find its recipe here. I can't remember exactly when the tart dough was made, nor its initial purpose for existence. Anyway, I am certainly thankful that it's there at my disposal.

As far as I could recall, the tart dough had been used for a chocolate raspberry tart, a Nutella tart (which I wanted to blog, but keep forgetting)and now, in some mini matcha cream cheese tarts! Despite of making multiple appearances, there is still some remnant in the freezer which is enough for more than one tart shell!

Later this week, I used some for a little cookie project, which I shall keep the detail for another post. Because I am obsessed with everything green lately, please embrace yourself for some green posts ahead.

Matcha Cream Cheese Tarts Now on these gems made from recycled stuff. They are pretty great on their own. The filling was tangy with a little hint of matcha. Not overly grassy, because I used very little matcha. I love the fact that it suffices the craving for a piece of cheesecake, without the guilt of ingesting 1000 calories.However, it took all my mental strength for not reaching out for seconds, even when no one was watching.

Most of the Matcha Cheese Tarts were given away, which made me sad, now that I think of it....I should have kept them all to myself. Well,I am not one who will deprive myself, so I made something else to fill up the void quite promptly. It certainly lifted my spirit.

Because the cream cheese batter were in two separate ziplock bags, I had fun piping them out in different patterns. It was quite therapeutic and made me forget about the August heat, well, for a short while. But as you can see, I wasn't exactly creative in the piping department. The patterns are all pretty boring. Maybe I should make another batch of these matcha cheese tarts, and endeavor to make some funky and creative tarts? Alright, I confess I only want an excuse to make another batch soon.

Read more...

Wednesday, August 22, 2007

Korean Enoki Pancakes

Enoki pancake


This is a recipe I chanced upon on a chinese blog. Not only is she talented in baking and cooking, this blogger has also stayed at some interesting foodie capitals like Paris, Seoul and Taiwan. As much as I enjoyed drooling at her delicious-looking creations, I never attempted any recipe from her blog.

This Korean Enoki Pancake is indeed the first recipe I made from her beautiful blog. Because I absolutely adore mushrooms of all kinds, I figure I would give this interesting pancake a try. The moment I took a bite of the addictive appetizer, I was sold. It is unfathomable on why the simple combination of enoki mushroom, minced carrot, green onion, egg and flour can be so tasty. And more importantly, why didn't I think of this myself? Although the recipe makes 4-6 serving, I almost finished eating the whole plate on my own! Because certain ingredients that she used are not readily available in US, I took the liberty to make some adjustments.

Over the weekend, I have bought a packet of enoki mushroom from the Asian grocery store again, and there will be no doubt of where it will end up.


Enoki pancake


Korean Enoki Pancakes

1 pack enoki mushroom
1-2 tbsp minced carrot
1 large egg, slightly beaten
2tbsps finely chopped green onion (or more)
2 tbsps all purpose flour
salt and pepper, to taste

Remove enoki mushroom from its packaging and cut off the root. Rinse under water and pat dry. Cut the mushroom into half, lengthwidth.

Add carrot and green onion to enoki mushroom in a wide, shallow bowl, and sprinkle flour on top of all ingredients. Pour in egg and season with salt and pepper.

Heat a non-stick pan and add one tablespoon of olive oil. Divide the batter into 6 parts, and pour one part into the pan. Spread it out, like a fan until it's as thin as a piece of paper. Fry till one side become golden yellow, then turn and fry the other side to the same color. Do the same with the rest of the batter.

Serve immediately with asian chilli sauce. Or tartar sauce. (I haven't tried this out yet but figure it should taste lovely).

makes 6 portions.

Read more...

Friday, August 17, 2007

In the name of browniebabe

There are many events in the food blog world that I truly enjoy. Especially those that are desserts related. The reasons are obvious : beautiful, drool-worthy pictures, fantastic recipes for bookmarking, and simply put, a feast for the eyes! Ironically, I keep missing on two events that mesmerized me for months. Maybe it's my lack of confidence, or just my procastination, or quite possibly a mixture of both!Since this is my birthday month, I feel invincible and decided to tackle both. One at a time, of course.

One of the food blog event that I enjoy immensely is no other that Myriam's Browniebabe of the month! It's simply mind-boggling to see how creative other bakers are when it comes to something as humbly as brownie. You will know what I mean seeing these two past browniebabes'creations here and here.

Seeing what they have made, it made me feel impossible for anyone to make something that can surpass their achievements. But then we are talking about dozens of talented bakers out there, and you have to see the roundup at Myriam's Once Upon a Tart to believe that nothing is insurmountable for these fearlessly creative people. In fact, I have seen a few favorites from my daily blog-hopping.

So what's the point of submitting yours if you don't think you stand a chance to be the next browniebabe, you ask. That's a good question. For a start, it's my birthday month and hence I am wishful that lady luck is on my side. Secondly, I need to use up some of the best cocoa I bought before we move.(lame excuse)Third and most importantly, it's one good brownie that I believe will make the first brownie baker (whoever that is) smile and nod for approval in her grave.

Without further ado, I present to you, my first ever browniebabe entry- The best Matcha Cocoa Brownie.

matcha brownie


The recipe is adapted from none other than the chocolate queen Alice Medrich. I was very sceptical when I first saw the recipe a year ago. A brownie with no REAL chocolate? Are you kidding? The last brownie I made used almost a pound of chocolate, and here she is telling me that some cocoa powder will do the same wonder as those with a pound of chocolate, if not better. Of course I must admit I was pretty ignorance back then,haven't had my first taste of bakes from the best cocoa powder yet.

Here I am a year later, with more experience and faith with what wonder good cocoa powder can do. Hence I am ready to give Alice's Best Cocoa Brownie a try. No wonder people say, "a year older, a year wiser". I can certainly attest to that. Now, before we proceed, I must stress on the important of using the best cocoa powder you can get. For I am sure, disappointment would ensue had I used the same inferior stuff I used one year ago. SO, USE PREMIUM QUALITY COCOA POWDER in this brownie recipe. Period.

One thing I observed/learned from the past browniebabes is to be creative and come out with unusual but solidly great brownies/blondies. As good as Alice's recipe, I know it needs something more. I love marbled brownie, but there are lots of great versions out there, one being shared by Myriam .

matcha brownie


A bite of the brownie reminds me of the fudgy toffee candy from childhood. I wasn't sure where the toffee candy were made of though. But the fudgy and chewy texture of this brownie reminds me of that. And the cocoa powder does a great job in packing lots of chocolate flavor in the brownie. It tastes almost as if I have melted a pound of real chocolate in the batter. Because the matcha cream cheese is not marbled in the brownie batter, it is seen prominently on top of the brownie. Inspite of its vivid color, the matcha flavor here is mild. And can only be tasted if you leave it on the tip of your tongue. Don't ask me why.(because we have sensory nerves for different taste at different parts of our tougue. see here). A good way to introduce matcha to the uninitiated, I figured.

The amount of matcha cream cheese batter is too much for the brownie, so I used it to make some cheese tarts. But that will be for another entry.

With this, I leave you the recipe for my first entry for Browniebabe of the month, and may the best brownie wins!

matcha brownie


Best Matcha Cocoa Brownie
adapted from Alice Medrich's Bittersweet

For brownie batter:
10 tablespoons (1 1/4 sticks) unsalted butter
1 1/4 cups sugar
3/4 cup plus 2 tablespoons unsweetened cocoa powder (natural or Dutch-process)
1/4 teaspoon salt
1/2 teaspoon pure vanilla extract
2 cold large eggs
1/2 cup all-purpose flour
2/3 cup walnut or pecan pieces (optional)
Special equipment: An 8-inch square baking pan

For Matcha cream cheese batter:

1 block (225g) cream cheese, room temperature
3/4 tsp matcha powder
1/4 cup granulated sugar
1/4 tsp lemon zest
1 egg yolk (at room temperature)

Position a rack in the lower third of the oven and preheat the oven to 325°F. Line the bottom and sides of the baking pan with parchment paper or foil, leaving an overhang on two opposite sides.

For brownie:
Combine the butter, sugar, cocoa, and salt in a medium heatproof bowl and set the bowl in a wide skillet of barely simmering water. Stir from time to time until the butter is melted and the mixture is smooth and hot enough that you want to remove your finger fairly quickly after dipping it in to test. Remove the bowl from the skillet and set aside briefly until the mixture is only warm, not hot.

Stir in the vanilla with a wooden spoon. Add the eggs one at a time, stirring vigorously after each one. When the batter looks thick, shiny, and well blended, add the flour and stir until you cannot see it any longer, then beat vigorously for 40 strokes with the wooden spoon or a rubber spatula. Stir in the nuts, if using. Spread evenly in the lined pan.

For cream cheese batter:
Beat cream cheese with granulated sugar until light and creamy.Add in the eggyolk and beat until well mixed. Scoop out about 1/2 cup of cream cheese into a small bowl and stir in matcha powder. Pour the matcha cream cheese mixture into a small ziplock bag. Add the lemon zest into the remaining cream cheese, and pour into another small ziplock bag.

Using a scissor, cut a small hole on the edge of the ziplock bags and pipe out whatever pattern that strike your fancy on top of the brownie dough.

Bake until a toothpick plunged into the center emerges slightly moist with batter, 20 to 25 minutes. Let cool completely on a rack.

Lift up the ends of the parchment or foil liner, and transfer the brownies to a cutting board. Cut into 16 or 25 squares.

Chocolate note: Any unsweetened natural or Dutch-process cocoa powder works well here. Natural cocoa produces brownies with more flavor complexity and lots of tart, fruity notes. I think it's more exciting. Dutch-process cocoa results in a darker brownie with a mellower, old-fashioned chocolate pudding flavor, pleasantly reminiscent of childhood.

p/s: I just realized that the best cocoa brownie recipe is also available on epicurious.com and it garnered 123 solid reviews from those who have baked it. :)

Read more...

Thursday, August 09, 2007

Addicted to Salami

Yesterday,OCT's colleague dropped me an email requesting for a birthday cake tomorrow. Even though I have been volunteering cakes for friends' birthdays for some time now, having someone think of me as far as cake is concerned, is the first time. And you can imagine how flattered I am .

Of course, I graciously accept the honor. Even it's 100F out there, it's totally worth to turn on the oven. Well, I am not here to talk about the cake actually, since it's still in the making process.

Let's talk about dinner. Because I am going to put in 100% effort to make the brithday cake, we are going to have something simple for dinner. Yet something tasty to reward myself after the work. Giada De Laurentiis's Antipasto Salad comes to mind. We had it for dinner last week but OCT and I like it enough to bring it back to the dining table again. Besides, it will be in time to join Ruth's Presto Pasta Nights! One stones kills three birds, or rather one pasta satisfied many needs.

Whatever. These are only excuses for me to eat more salami. Besides butter, cream cheese and eggs, I now declare salami (or other form of cured meat) to be one of the "must have item" in our fridge. Well, I guess I am addicted to salami after eating some really good Genova Salami from the Italian neighborhood for the first time a few weeks back. Since then, I couldn't stop thinking about it, and week after week, we go back every Saturday to eat the shop's sandwich and salad. In which, there's a generous dose of salami involved.

When I first saw Giada's recipe, I know I am going to make it. And I tweaked it slightly by including some smoked salmon and omitting the green olive. A light and satisfying dinner for a hot summer night. This will be my contribution for Presto Pasta Nights .


Antipasto Salad


Antipasto Salad
adapted from Giada De Laurentiis's "Everyday Italian"

Red Wine Vinaigrette:
1 bunch fresh basil, stemmed and leaves chopped (about 2 cups)
1/4 cup red wine vinegar
1 clove garlic
1 teaspoon Dijon mustard
1/2 teaspoon salt
1/2 teaspoon freshly ground black pepper
3/4 cup extra-virgin olive oil
Antipasto Salad:
1 pound fusilli pasta
1/2 cup hard salami, cut into strips (about 3 ounces)
1/2 cup smoked turkey, cut into strips (about 3 ounces)
1/4 cup provolone cheese, cut into strips
1/4 cup grated Asiago cheese
2 tablespoons green olives, halved and pitted
2 tablespoons roasted red peppers, cut into strips
1/4 teaspoon salt
1/2 teaspoon freshly ground black pepper


Vinaigrette:
In a blender, add the basil, vinegar, garlic, mustard, salt and pepper. Blend until the herbs are finely chopped. With the machine running, drizzle in the olive oil until the dressing is smooth.
Bring a large pot of salted water to a boil over high heat. Add the pasta and cook until tender but still firm to the bite, stirring occasionally, about 8 to 10 minutes. Drain pasta.

In a large bowl, toss together the cooked pasta with the remaining salad ingredients. Drizzle with dressing and toss to coat. Serve.

Read more...

Wednesday, August 08, 2007

For the love of lavender

I can't believe that it's August already. It wasn't too long ago when I welcomed the nasty hot and humid July with sweaty arms! Maybe I was too busy consuming the luscious summer berries, which we lugged back from the farmer's market every week. Or being distracted by the countless recipes I have bookmarked to try with the abundant fruits, but keep putting off by the heat.

Either way, 0707 has passed, and I am glad that I have read the 7th and the last book of Harry Potter too. Not that it is any form of achievement, but nonetheless, I am relieved to know the ending of the story.

Anyhow, I digress. Instead of keep complaining about the hot weather that nobody needs reminding, let's talk about what is to love about July. Perhaps the fleeting season of cherry? The first peach, nectarine and plum that hit the market? And the most charming, blooming lavender?

Yes, lavender is one of the reasons that makes July heat slightly bearable. I simply love the sight of lavender and its scent when rubbed between fingers. There are studies that supported the many beneficial properties of its essential oil. And for that reason, lots of products incorporated lavender into their ingredient list.

Lavender SablesUnfortunately, I am no fan of such products, but I am guilty of being partial to any baked goods with lavender in it. So imagine how excited I am, when seeing a lavender sable recipe from this blog.

It is love at first sight, and I make it as soon as the temperature dropped a bit. As with the rest of the sables I made in the past, these lavender sables have a buttery and tender texture. If I were Hermione (my favorite character in Harry Potter books), I would gladly put a scent charm into this post, so that you get to smell the lavender sables when they first come out from the oven. The scent though heavenly, is difficult to put in words. I guess you have to bake some while I work on the scent charm.

I bake a few pieces to nibble with a cup of tea in the afternoon and freeze the rest of the dough. It proves to be a useful strategy. For one afternoon when OCT invites friends over at the last minutes, I effortlessly pull out the dough, slice it and bake under a 350F oven for less than 15 minutes. Not only that friends get to eat fresh from the oven lavender sables, our apartment is filled with the scent of lavender that lingers for quite a while.


Lavender Sables


Lavender Sable
Adapted from this blogandthis blog

1.5 cups and 1.5 tablespoons all purpose flour
3 tablespoons cornstarch
1 tablespoon dried lavender
7 oz (14 tablespoons)unsalted butter, softened at room temperature
3/4 cup confectioner sugar
pinch of salt
1 egg yolk
zest from 1 lemon

In the bowl of a stand mixer, beat butter on medium speed until smooth, add the confectioners' sugar and beat until well blended. Beat in the egg yolk, followed by salt, dried lavender and lemon zest.

On low speed, add the flour and cornstarch and mix just until flour is incorporated.

Turn dough out onto a counter, gather dough into a ball, divide in half, and wrap each piece in plastic wrap. Chill dough for 30 minutes in refrigerator.

Form each piece of dough into a log that is about 1 to 1 1/4 inches in diameter. Wrap logs in plastic wrap and chill dough for 2 hours in refrigerator. (Dough logs can be wrapped airtight and kept refrigerated for up to 3 days or stored in freezer for up to 1 month.)

When ready to bake, preheat the oven to 350F.

Once the oven is ready, slice the log into 1/4-inch thick and place on a lined baking sheet with 1/2 inch interval.

Bake for 12- 14 minutes, or until the sables are set but not brown. Tranfer and cool the sables on the rack.

Read more...

Sunday, August 05, 2007

Opposite Attraction

Remembering important dates has never been my forte. OCT used to tease me that his birthday is sometime between mid November to December because that's when he received his birthday presents and cards. Most of the time, it would be more than one month past the actual date.

After we were married, the situation improved tremendously. But that's probably because I can simply whisper "Happy Birthday Darling" without waiting for the postman to send my "overdue" well wishes across the pacific ocean. But I am still as bad at remembering date as I was. For instance, I didn't manage to send out a package of homemade biscottis in time for my best friend's birthday. Even though I have reminded myself countless time in the beginning of the month, that I must not forget the date (again!!). Thanks to Internet, I got to greet her a "wonderful birthday" before it's too late while the biscottis struggled its way to London.

And on another recent occasion, I forgot about our wedding anniversary until the day itself. Knowing what a sweet husband OCT is, I was almost sure he would have something special for me on this special day. That made me felt terribly guilty. What last minute trick could I pull off to camouflage my forgetfulness?

Anniversary dessert in the making


With time ticking away. there wasn't much time for deliberation. So I took a deep breath and decided to do what I do best. I would bake him a cake, preferably a healthy one too, because he wouldn't want to share his anniversary present with others (trust me, I know my husband!) With that in mind, I got my act together and made one of the low fat cakes I know we won't mind eating over and over again.

It is a recipe from Alice Medrich, from her out of print book- "Chocolate and The Art of Low Fat Desserts". The original recipe makes a beautiful marble cake. But I decided to make a constrasting black and white cake. Of which I think it symbolizes our union. We are two very different individuals whom when put together completed each other. Just like vanilla and chocolate. They just go well together.

Waist friendly Two Tone Cake


Unlike some of the low fat recipes that are cloyingly sweet and suffer from rubbery texture, this cake has a moist texture with soft, fine crumbs. I especially like the chocolate layer, where instant espresso powder is added to the Dutch-processed cocoa powder to enhance its flavor.

Waist friendly Two Tone Cake


A simple yet delicious cake to commemorate our second anniversary. And true enough, OCT kept the cake all to himself!


Black and White Chocolate Cake /Low Fat Chocolate Marbled Cake
Modified and adapted from Alice Medrich's "Chocolate and The Art of Low Fat Desserts"

2 cups cake flour
1 teaspoon baking powder
1/2 teaspoon baking soda
1/2 teaspoon salt
1 teaspoon instant espresso or coffee powder
1/3 cup Dutch-processed cocoa powder
1 1/3 cups sugar
1 whole egg
1 egg white
6 tablespoons unsalted butter
1 cup nonfat yogurt
2 teaspoons vanilla extract

Have all ingredients at room temperature. Preheat oven to 350 degrees with rack in the lower third of the oven. Arrange 10 heart shape silicon cupcake molds on a baking tray.

Use a whisk to combine four, baking powder, baking soda, and salt. Sift together. Set aside. In a small bowl combine the espresso powder, cocoa and 1/3 cup of the sugar with 1/4 cup of water. Whisk until smooth. Set aside. In another small bowl, whisk whole egg with egg white. Set aside.

Cut the butter into pieces and place in an electric mixing bowl. Beat for 1 minute to soften. Gradually add remaining 1 cup of sugar and beat at high speed for about 3 minutes. Dribble eggs in slowly, about 1 T at a time, beating constantly for about 2 minutes. On low speed, beat in a third of the flour mixture. On medium-high speed, beat in half of the yogurt. On low speed, beat in half of the remaining flour. On high speed, beat in the rest of the yogurt and the vanilla. On low speed, beat in the remaining flour.

Measure out 1 1/2 cups of yogurt batter and mix into the cocoa mixture. Set aside.

Scoop a heaping tablespoon of vanilla/ chocolate batter into each mold, and fill the molds up to 3/4 full with the rest of the other batter. Bake for 20- 25 minutes or until the cake starts to pull away from the sides of the molds and a toothpick inserted in comes out clean.

Cool for 10-15 minutes on a rack. Unmold the cake. Cool completely before serving or storing.

Read more...
Related Posts with Thumbnails