Showing posts with label tart. Show all posts

Thursday, August 05, 2010

Stone fruit tarts

peach tarts

I am a creature of habit. Whenever life hands me a lot of stone fruits, as in the past few weeks, I went straight into the kitchen and rolled out some sweet tart dough.

Probably it has something to do with the food I eat when I was growing up. Fresh peaches and other stone fruits were rare in Malaysia. I remember when mum needed to make a peach cake, she used the syrupy peaches that came from a can. So I am never a big fan of fresh peaches and apricot. Having said that, I still love stone fruits when they are baked. Safely nestled in the almond cream, in the confine of a sweet tart shell.

stone fruit tartlets

Pretty predictable and boring. That's who I am. But it doesn't change the fact that these tarts are delicious,and should be consumed on the same day they are made.

half eaten

Stone fruits and almond tart

You can use any kind of stone fruits, but I have a weakness for baked apricot. The whole kitchen, or rather my whole apartment, smells like a bakeshop the moment I pulled the tarts out of the oven.

sweet tart dough:
adapted from Desserts by Pierre Herme

2.5 sticks (10 ounces, 285g) unsalted butter, at room temperature
1.5 cups (150g) confectioners' sugar, sifted
1/2 cup (lightly packed)(3 1/4 ounces, 100g) finely ground almond powder or finely ground blanched almond
1/2 tsp salt
1/2 tsp vanlla bean pulp or pure vanilla extract
2 large eggs, at room temperature, lightly beaten
3.5 cups (490g) all purpose flour

Place the butter in the bowl of a mixer fitted with the paddle attachment and beat on low speed until creamy. Add the sugar, almond powder, salt, vanilla, and eggs and still working on low speed, beat to blend the ingredients, scraping down the paddle and the sides of the bowl as needed. The dough may loo cuddled- that's all right. With the machine on low, add the flour in three or four additions and mix only until the mixture comes together to form a soft, moist dough- a matter of seconds. Don't overdo it.

Gather the dough into a ball and divide it into 3 or 4 pieces: 3 pieces for 10 inch (26cm) tarts, 4 for 9 inch (24cm) tarts. Or, press the dough into one big disk and cut off as much as you need at the time that you need it. gently press the dough into disks and wrap them in plastic. Allow the dough to rest in the refrigerator for at least 4 hours or up to 2 days , before rolling and baking. Alternatively, the dough can be freeze for up to 1 month.

For each tart, place a buttered tart ring on a parchment lined baking sheet and keep close at hand. Work with one piece of dough at a time, keep the remaining dough in the refrigerator.

To roll and bake the tart shells:
Working on a lightly floured surface, roll the dough to a thickness of between 1/16 and 1/8 inch (2 and 4 cm), lifting the dough often and making certain that the work surface and the dough are amply floured at all times. (a well floured area makes rolling this rich dough easier) Roll the dough up around your rolling pin and unroll it onto the tart ring. Fit the dough into the bottom and up the sides of the ring, then run your rolling pin across the top of the ring to cut off the excess. If the dough cracks or splits as you work, don't worry- patch the cracks with scraps and just certain not to stretch the dough that's in the pan. Prick the dough all over with fork and chill it for at least 30 minutes in the refrigerator.

Preheat the oven to 350F (180C) and fit a circle of parchment paper or foil into the crust and fill with dried beans or rice. ( i usually skip this step after resting my rolled out dough in the fridge for about 1 hour).

Bake the crust for 18-20 minutes, for a big (9-inch ring), 10-15 mins for a small (3-4 inch ring),  just until it is very lightly coloured. If the crust needs to be fully baked, remove the parchment and beans and bake the crust for another 3 to 5 minutes, or until golden. Transfer the crust to a rack to cool.

Almond Cream
adapted from Baking: From My Home to Yours
3/4 stick (6 tablespoons) unsalted butter, at room temperature
2/3 cup sugar
3/4 cup almond flour
2 teaspoons all purpose flour
1 teaspoon cornstarch
1 large egg
2 teaspoon dark rum or 1 teaspoon vanilla extract

Beat the butter and sugar together until smooth. Add the almond flour, all purpose flour and cornstarch into the bowl.

Beat to incorporate all the ingredients in the bowl. Add in the egg and rum/vanilla extract and continue to beat. The cream is ready when it is homogenous.

Scrape the almond cream into a container and use it immediately or cover and refrigerate to be used within 3 days.

To make the tarts:

Spread a thick layer of almond cream in the baked tart shells. Arrange the sliced fruits on top. You dont have to press the fruits into the almond cream, because the almond cream will puff up in the oven, covering part of the fruits.

Sprinkle some almond flour on the fruits if you like, which will help to absorb some of the liquid released while baking, or you can simply omit this step.

Bake at 350F until the almond cream puff up and turn golden color. The fruit should be soft, and the almond cream firm. Depending on the size of your tarts, it may takes anything from 15-30 minutes. Check after 15 minutes if you are making small tarts and pull the tarts out when they are ready.

Read more...

Friday, June 18, 2010

Summer fruit tarts

005 copy


I love H Mart. The clean and spacious grocery store always have something exotic and intriguing for the adventurous to try. It is where I stock up on korean bulgogi sauce, kimchi, rice, Pocky and asian greens. It is also the place where I can get fresh berries for as little as a dollar a punnet.

fruit tarts

As we were planning to go for another fruit picking in the next few days,I really shouldn't be buying any fruits from the store. But my logic flew out of the window when seeing other customers surrounded a pile of neatly arranged berries with the board so big you can see it from miles away- "Raspberry 8oz- $0.99". Not  too far away from it, the blueberries and blackberries were selling for the same price. I put one punnet of each kind in my basket and  thought I was pretty good with self restraint. :)

fruit tarts

Once home, I rolled out some sweet tart dough and showed OCT how to make pastry cream. He was constantly bugging me to teach him something so he could brag in front of his colleagues.

fruit tarts


Less is more when dealing with fruits that are in season. So I made fruit tarts. Buttery sweet tart dough with a layer of luscious vanilla pastry cream. Topped that with lots of fruits. I made a big tart for a friend and some individual tarts for us. The mini tarts were so small that we each ate two.

Some kiwi and mangoes found their ways into my grocery basket without me realised, so I made a few tarts with them too. ;)

Summer Fruit Tarts

sweet tart dough:
adapted from Desserts by Pierre Herme

2.5 sticks (10 ounces, 285g) unsalted butter, at room temperature
1.5 cups (150g) confectioners' sugar, sifted
1/2 cup (lightly packed)(3 1/4 ounces, 100g) finely ground almond powder or finely ground blanched almond
1/2 tsp salt
1/2 tsp vanlla bean pulp or pure vanilla extract
2 large eggs, at room temperature, lightly beaten
3.5 cups (490g) all purpose flour

Place the butter in the bowl of a mixer fitted with the paddle attachment and beat on low speed until creamy. Add the sugar, almond powder, salt, vanilla, and eggs and still working on low speed, beat to blend the ingredients, scraping down the paddle and the sides of the bowl as needed. The dough may loo cuddled- that's all right. With the machine on low, add the flour in three or four additions and mix only until the mixture comes together to form a soft, moist dough- a matter of seconds. Don't overdo it.

Gather the dough into a ball and divide it into 3 or 4 pieces: 3 pieces for 10 inch (26cm) tarts, 4 for 9 inch (24cm) tarts. Or, press the dough into one big disk and cut off as much as you need at the time that you need it. gently press the dough into disks and wrap them in plastic. Allow the dough to rest in the refrigerator for at least 4 hours or up to 2 days , before rolling and baking. Alternatively, the dough can be freeze for up to 1 month.

For each tart, place a buttered tart ring on a parchment lined baking sheet and keep close at hand. Work with one piece of dough at a time, keep the remaining dough in the refrigerator.

To roll and bake the tart shells:
Working on a lightly floured surface, roll the dough to a thickness of between 1/16 and 1/8 inch (2 and 4 cm), lifting the dough often and making certain that the work surface and the dough are amply floured at all times. (a well floured area makes rolling this rich dough easier) Roll the dough up around your rolling pin and unroll it onto the tart ring. Fit the dough into the bottom and up the sides of the ring, then run your rolling pin across the top of the ring to cut off the excess. If the dough cracks or splits as you work, don't worry- patch the cracks with scraps and just certain not to stretch the dough that's in the pan. Prick the dough all over with fork and chill it for at least 30 minutes in the refrigerator.

Preheat the oven to 350F (180C) and fit a circle of parchment paper or foil into the crust and fill with dried beans or rice. ( i usually skip this step after resting my rolled out dough in the fridge for about 1 hour).

Bake the crust for 18-20 minutes, just until it is very lightly coloured. If the crust needs to be fully baked, remove the parchment and beans and bake the crust for another 3 to 5 minutes, or until golden. Transfer the crust to a rack to cool.

Vanilla pastry cream:

1 cup milk
1 plump, moist vanilla vean, split lengthwise and scraped
3 egg yolks
1/4 cup sugar
1/6 cup cornstarch, sifted. (1/2 of a 1/3 cup.Eyeball it using the 1/3 cup)
1.5 tablespoons unsalted butter, softened

To make the pastry cream:
Bring milk and vanilla bean( pulp and pod) to a boil in a small saucepan. Cover the pan, remove from heat and let the liquid be infused with scent of vanilla, for 10 minutes.

Fill a large bowl with ice cubes and set aside a small bowl that can hold the finished cream and be placed in this ice bath. Allow set aside a fine-meshed strainer.

Whisk egg yolks, sugar and cornstarch in a medium saucepan. While whisking, slowly drizzle a quarter of the hot milk into the yolks. Continue to add in the rest of the milk into the tempered yolks, whisking all the while. Remove the vanilla pod.

Place the saucepan over high heat and whisking vigorously, without stop, bring the mixture to the boil. Continue to whisk another 1-2 minutes, until you notice that the texture of th cream has thicken, and less liquidy, remove from heat. Press the cream through the sieve into the reserved small bowl. Set the bowl in the ice bath prepared earlier, and stirring frequently so that the mixture remains smooth, cool the cream to 140F, as measured on an instant read thermometer. Stir in the butter in two or three additions. Make sure that you don't add the butter in when the mixture is still hot. Or the cream would separate. Stir the cream occasionally until it is completely cool. It is ready to be used at this point or keep refrigerated, until you are ready to assemble the tart.

To assemble the tart:
After the tart shell is completely cool, put some pastry cream in the center and spread it out evenly. You can put as much or as little to your liking. Top it with lots of fruit and devour!

Read more...

Monday, October 06, 2008

Plum, Hazelnut & Chocolate Tart

plum, hazelnut and chocolate tart

I love reading food magazines. However in the recent months, the few that I subscribe prove to be a stack of disappointment. They no longer inspire me or make me dashed into kitchen to get cooking. All the recipes seem repetitive and pretty much similar to what they have already published in the past. In short, I find them boring *yawn*. Quite frankly, I am comtemplating to discontinue some of them.

Just when I almost lost interest in food magazines, I found the UK food magazines such as Olive and BBC Good Food at Borders. Boy are they interesting and my desire to cook has been resuscitated! How did they escape my radar for so long?! The recipes and pictures are refreshing. Admittedly, there are certain ingredients that may not be readily available in the US, but their food photography and the recipes are amazing. Suddenly, I have many ideas to try out. Along with a few recipes I bookmarked from the magazines.

One of them is this Plum, Hazelnut and Chocolate Tart from September issue of BBC Good Food.

sept 18 021

I am sold when the ingredient list consist of chocolate and hazelnut. It's one of my favorite flavor combinations.(Nutella, anyone?)The recipe also features plum, which is abundant at the moment. The recipe just sounds too interesting to be missed.

sept 18 017

I substituted the self raising flour that I don't keep with all purpose flour and some baking powder; and the muscavado sugar with brown sugar. The end result tastes more like a cake than a tart, but is delicious nonetheless. It is not as sweet as the desserts we are accustomed to, perhap because I have omitted the glaze suggested. But I think it works well as a morning treat or as a tea cake in the afternoon. I would probaby drizzle some melted chocolate on top the next time I make it. Or you could brush the tart with the suggested jelly in the recipe. Either way, a delicious treat is promised.


Plum, Hazelnut & Chocolate Tart
adapted from Sept 2008 BBC Good Food magazine

175g butter , plus extra for greasing
500g plums
175g light muscovado sugar ( I used light brown sugar)
175g all purpose flour
175g ground hazelnuts
3 large eggs
1.5 tsp baking powder
50g bittersweet chocolate, chopped
2 tbsp hazelnuts
2 tbsp redcurrant, damson or plum jelly

Heat oven to 350F (180C). Butter and line the base of a round 8 inch cake pan. Halve and stone 4 plums, set aside for later, then roughly chop the remaining plums.

Put the sugar, butter, flour, ground hazelnuts, eggs and baking powder into a large bowl and beat with a wooden spoon or electric hand mixer for 1-2 mins, until smooth and light. Stir in the chopped plums and chocolate, then tip into the prepared cake pan and smooth the top.

Arrange the halved plums over the top of the mixture, pressing them down lightly, then scatter over hazelnuts. Bake for 40-50 mins until the top is golden and the cake feels firm to the touch. Cool in the pan for 10 mins, then turn out, remove the paper and cool on a wire rack. Heat the jelly, then brush over the top of the cake before serving.

Read more...

Friday, June 20, 2008

Summer Mango Tart

mango tart

Summer is the happiest time for fruits lovers. There are so many berries, stone fruits and cherries in the market now that sometime I have difficulty deciding what to buy. Naturally, I am tempted to buy all of them! Under such circumstance, my better half would pull me back to reality by asking:
"Are you sure you can finish all these fruits?"
"Remember we still have some strawberries/raspberries/kiwi/blueberries...in the fridge?" and more importantly -
"Are you sure it's the peak season for cherries now? Will the price goes down next week?"

However, everytime we spot mangoes on sale, both our logics fly out of the window. And we load dozen of them into our shopping cart. You probably can tell from my posts on mango cheesecake,mango cream cake,mango clafoutis, mango mascarpone cake that we have a penchant for mango.

mango tarts

Our favorite way to eat mango, is simply eating it out of hand. I feel guilty burying the sweet and juicy mango under layers of cream and other stuff in cake and other baked goods.

IMGP9530

However when you have 12 mangoes in the fridge, ripening and begging to be eaten at the same time, it's ok to get creative and use some in a gorgeous tart like this. I use some of the dough leftover from the strawberry rhubarb tart to make the base, and Pierre Herme's vanilla pastry cream to fill it, before piling it up with lots of sweet mango cubes. Kiwi is optional, but I find that the green fruit adds contrast and color to the mango tart.

OCT brings it to the lab, and everyone seems to enjoy it, according to him. So much so that there isn't enough to go around, and the poor guy doesn't manage to eat a slice. I make a small one for myself and promptly devored it after taking a picture.

Unless you absolutely loathe mango, otherwise, how could anyone resist this?

IMGP9570


I am submitting this mango tart to Meeta's Monthly Mingle, in which the theme for the month is "Mango Mania"! Woohoo, I can't wait to see many more mango related posts popping up in the blogsphere in the coming month. :)

Mango Tart
1/3 recipe of sweet tart dough, baked and cooled
2-3 ripe mangoes, peeled and cubed
1 kiwi, peeled and cubed
for pastry cream:
(adapted from "Desserts by Pierre Herme")
1 cup 2% milk
1 plump, moist vanilla vean, split lengthwise and scraped
3 egg yolks
1/4 cup sugar
1/6 cup cornstarch, sifted. (1/2 of a 1/3 cup.Eyeball it using the 1/3 cup)
1.5 tablespoons unsalted butter, softened

To make the pastry cream:
Bring milk and vanilla bean( pulp and pod) to a boil in a small saucepan. Cover the pan, remove from heat and let the liquid be infused with scent of vanilla, for 10 minutes.

Fill a large bowl with ice cubes and set aside a small bowl that can hold the finished cream and be placed in this ice bath. Allow set aside a fine-meshed strainer.

Whisk egg yolks, sugar and cornstarch in a medium saucepan. While whisking, slowly drizzle a quarter of the hot milk into the yolks. Continue to add in the rest of the milk into the tempered yolks, whisking all the while. Remove the vanilla pod.

Place the saucepan over high heat and whisking vigorously, without stop, bring the mixture to the boil. Continue to whisk another 1-2 minutes, until you notice that the texture of th cream has thicken, and less liquidy, remove from heat. Press the cream through the sieve into the reserved small bowl. Set the bowl in the ice bath prepared earlier, and stirring frequently so that the mixture remains smooth, cool the cream to 140F, as measured on an instant read thermometer. Stir in the butter in two or three additions. Make sure that you don't add the butter in when the mixture is still hot. Or the cream would separate. Stir the cream occasionally until it is completely cool. It is ready to be used at this point or keep refrigerated, until you are ready to assemble the tart.

Assembling the tart:
Spread the desired amount of pastry cream into the tart shell, place the cubed mango and kiwi on top of the cream. Enjoy!

Read more...

Sunday, November 25, 2007

My third Thanksgiving in St Louis

turkey

Time flies and last Thursday marked my third Thanksgiving in St Louis. It seems only like yesterday when I confronted my first turkey breast. Although it was only 7 pounds, it was nonetheless the biggest piece of meat I have ever handled.

resting turkey

I remembered back then I was hesitant to invite anybody over as I wasn't sure my first turkey would be edible at all. When we finally decided to extend the invitations to friends, we didn't have a particular menu in mind. Needless to say, our first Thanksgiving meal wasn't a conventional one. Turkey breast with ready-made gravy and stuffing, uneven chunks of "mashed" potato, steamed vegetables and two quiches. I cannot recall what was dessert although I suspect it must be something made of chocolate.

Asparagus


That was how it began. That Thanksgiving dinner marked the beginning of many parties at our little one bedroom apartment, and the revelation of my pleasure from caring and serving others with home-cooked meals.

Thanksgiving is also a time I reflect on the kindness others have showered me, and their acceptance of me into their lives. I count my blessings and thank God for friends and family in my life. With that, I cooked and baked for the people I care. It has always been my way to say "Thank you" and "I love you".

normandy apple tart

These feelings were epitomized with the Normandy Apple Tart. The apple sauce was made painstalking by sieving over my only strainer, which was unfortunately too fine for such a task. The resulting apple sauce used for the filling of the tart was very smooth, making me feel that all the time and effort spent were worthwhile. I first saw the Normandy Apple Tart in Dorie Greenspan'sBaking: From My Home to Yours, and subsequently saw it made by Anita and Christine. Their beautiful tarts and the abundance of apples at the farmer's market inspired me to overcome my inertia to finally making it.

Normandy Apple Tart

Although mine didn't turn out as stunning as theirs, I gave myself a pat on the shoulder when our friends commented that the tart was delicious. The credit was all Greenspan's, who came up with the recipe; and of course the farmer who grew the apples.

Normandy Apple Tart

This Normandy Tart is not a difficult recipe, I believe anybody can make it with some prior planning and lots of patience. Although one can use the store-bought apple sauce, I agree with Greenspan that homemade apple sauce, (especially in this time of year) made a difference in the Normandy Tart. I don't have a mandoline, so I used a very sharp knife to finely slice the apples for topping.

Normandy Apple Tart

I baked the tart on the Thanksgiving morning, and believe that it would taste even better if I have the time to bake and serve it straight from the oven. The filling was a bit loose, but can easily be disguised with some fine ice cream (which I did!)

Normandy Apple Tart

Seeing that the topless tart has been selected as the theme for this month's "Waiter there's something in my ..." by Cooksister, I am submitting the Normandy Tart as my entry.

In case you want to know, these are what we had on Thanksgiving. The mostly Gourmet inspired recipes:
Stuffed Turkey with Lemon, Oregano and Red Onion (I used rosemary in place of oregano, and added in some white wine in the basting liquid)
Make Ahead Mashed Potato
Quick Stovetop Gravy
Roasted Japanese Sweet Potato with Scallion Butter
Italian Sausage and Bread Stuffing
Roasted Asparagus
Normandy Apple Tart
Alice Medrich Fastest Fudge Cake (as a backup in case the Normandy Apple tart was inedible ;p)

Asparagus


No photos on the meal, as I was a little behind the schedule, and I couldn't bring myself to let the guests wait on hungry stomachs!

Normandy Apple Tart
Adapted from Dorie Greenspan'sBaking: From My Home to Yours and as seen in Dessert First and Hot.Sour.Salty.Sweet and Umami

Pâte Sablée

1 1/2 cups flour
1/2 cup confectioner's sugar
1/2 teaspoon salt
9 tablespoon butter, very cold, cut into small pieces
1 egg yolk

Applesauce
2 pounds baking apples,(about 6 medium) such as Empire, Cortland, McIntosh, or Pippin
1/4 cup water, or more
1 tablespoon (packed) light brown sugar
1-4 tablespoons sugar (optional)
1/2 teaspoon pure Vanilla extract (optional)

Topping
2 medium-sized, firm apples,(preferably firm Golden Delicious or Granny Smith, not the mealy type you used for applesauce)
1 egg, beaten with 1/2 teaspoon water, for egg wash
1/3 cup apple jelly for glaze (I used apricot jelly)

To make the applesauce:
Peel and core the apples, and cut into chunks. Toss them into a 2-3 quart, heavy-bottomed saucepan. (or leave the skin on for a rosier color) . Add in the water and brown sugar, and stir to combine.

Cover the saucepan and cook the apples over the medium-low heat.Don't go far from the stove and stir the apples from time to time to keep them from scorching.

If the water is boiling away too quickly, add more by driblets. When the apples are soft enough to be mashed with a spoon, about 20-25 minutes, remove the pan from heat and pass the apples through a food mill or press them through a sturdy strainer into a bowl.

If the applesauce seems thin (if liquid accumulates around the edges), return the sauce to the pan and cook, stirring constantly, for a few minutes, until the sauce is just thick enough to sit up on a spoon. Taste the sauce , adding granulated sugar if you think it needs it (bearing in mind that the applesauce for this tart was not very sweet)and vanilla, if you want it.

Pour the applesauce into a container, press a piece of plastic wrap to the surface, and refrigerate until it is no longer warm before using. (The applesauce can be kept in the refrigerator for up to 4 days.)

For the tart shell:
Combine the flour, confectioner's sugar, and salt in a food processor and pulse a few times to combine. Add the pieces of cold butter and pulse until the butter is cut into pea-sized pieces. Add the egg yolk and combine in several pulses until the dough starts to become clumpy. Taking care not to overwork the dough. Turn the dough out onto a work surface, knead dough lightly to incorporate any dry ingredients that escaped mixing.

If you are using a pastry cutter, combine all dry ingredients and cut butter into the sizes of peas. Add in eggyolk and mix until all ingredients come together into a ball. Add in one or two tablespoons of cold water if the ingredients is too dry.

Butter a 9-in fluted tart pan with removable bottom.Lightly press the dough evenly over the bottom and up the sides of the pan, using all but one little piece of dough, which you should save in the fridge to patch any cracks after the crust is baked.

Freeze the tart shell for at least 30 minutes, preferably longer. Bake it in a 375 degrees.

To partially bake the tart shell:
Butter the shiny side of a piece of aluminium foil and fit the foil, buttered side down, tightly against the crust. Place the tart shell on a baking sheet and bake for about 25 minutes, until the shell is dry and lightly colored. If any places have cracked, repair with the extra dough. Let cool on a rack until room temperature.

For the tart:
When ready to finish baking the tart, preheat the oven to 400 degrees F.

Fill the tart shell almost to the top of the rim with the applesauce and smooth the top. Place the tart on a baking sheet lined with parchment or a silpat.

For the topping:
Peel,core and quarter two apples. Cut each apple quarter into about 7 slices.

Arrange the apple slices over the top of the applesauce in any pattern that strike your fancy, overlapping slices slightly as they will shrink a little after baking.
Make a egg wash by beating the egg with a teaspoon of water. Using a pastry brush,paint the egg wash over the sliced apples.

Bake the tart in the oven for about 50 minutes- it will look as though the applesauce and apples have risne a bit. The apple should be golden, a little burnt around the edges and soft enough to be pierced easily with the tip of a knife. If you'd like to enhance the color around the edges of the apples, run the tart under the broiler just unitl you get the color you're after. Transfer the pan to a cooling rack.

To make the optional glaze:
Bring the jelly and water to a boil. When the jelly is liquefied, brush a thin layer over the topof the tart with a pastry brush. Return the pan to the rack and cool the tart until it is just warm or at room temperature.

The tart can be served when it is only just warm or when it reaches room temperature. Try to eat it as soon as it is baked,to prevent it from getting soggy.

Read more...

Tuesday, November 13, 2007

By the power of Nutella

nutella

I was pleasantly surprised when Jennifer dropped me a congratulatory email last Sunday.And told me that I was one of the winners for the October 2007 DMBLGIT!

I can't tell you how excited I am, not exactly holding any hope for this simple homey picture to win me any award. I simply submitted the picture for fun. When I went to bed on Sunday night, I tried to figure what the judges see "enticing" in this picture.

Nutella Tart

Then I came up with a hypothesis. It must be the power of Nutella that lured them to cast a vote for me. Seriously, who can resist Nutella, right? The deliciously satisfying chocolate hazelnut paste that conjure up many happy memories must be the reason! I also deduce that a mouth watering name is important in food photography competition. For instance, one that starts with "Nutella".

nutella and bread


Anyway, I am thankful to the judges who selected my photo to be the overall third place winner among so many beautiful photos. On Monday night, I thought I would bake another batch of Nutella tart to commemorate the happy occasion. Instead of a 9-inch tart, I baked it into some 4-inch tart rings. It is the convenient size to give away. Not to mention it surely make the recipient feels special to have a delicious tart all by himself.

nutella tart

I wish I could give everyone who like this photo a piece of the tart. Since that is not possible, may I encourage you to give this Pierre Herme recipe a try.

For the complete roundup of October DMBLGIT, please visit Jennifer's blog-Bake or Break. Thanks Jennifer for being a great host. I can't wait to put up my badge on the sidebar! Oh yes, I am so vain. :D

Read more...

Friday, September 07, 2007

Something sweet for the weekend

Strength of a wine cork

Don't listen to people who tell you,"You are too small to achieve great things". Look at the wine cork, it has the strength to lift up a Nutella Tart which probably is a thousand times heavier than its weight.


Have you made any plans for the weekend? I am not sure about others, but I like to pack my weekends with lots of activities. Most of the time, ambitious plans which I ended up not achieving much.

Nutella TartIdeally, our weekend should begin with a hearthy homemade breakfast with coffee/orange juice. After which, we would take a 45 minutes walk to the park near our apartment and take in some fresh air. Then, we will make a trip to the farmer's market where we will be considered the early birds, and will get to pick the freshest, prettiest produce first without joustling with the rest of the customers.

Lunch will either be a picnic at the park, or a sandwich at our favorite spot in the Italian neighborhood. Then we would stroll around the neighborhood with freshly made cannoli on hand. Maybe we would catch an afternoon movie after that? It would be dinner time after the show.

Then I would leave OCT alone to play computer game, while I bake something in the kitchen.....

This, as I have mentioned, is my over-ambitious weekend plan.

A typical weekend usually begin when we wake up after we have slept to our hearts' content. I won't tell you the time, let's just say it would be too hot for a leisure walk to the park and the farmer's market will already be packed with people.

Then we will debate on whether we should go directly for lunch or make a detour home to put down our loot. On summer, it's generally too hot to do anything, so we normally head straight home and stay in the comfort of indoor air-conditioner.

And stay indoor for the rest of the day.

Boring, I know. This weekend, I make the same ambitious plan, and let's see how much I can accomplish.

Nutella Tart

I am going to leave you with this Nutella Tart I made awhile ago, from Pierre Herme's Chocolate Desserts Book. It's the tart Monsieur Herme developed for his wife who loves Nutella. Oh, how romantic! I wish I could tell him it's my favorite too. Too bad I don't speak French! Even if I could, I must transport myself to Paris first! Anyway, have a great weekend,you all!

Nutella Tart


Nutella Tart
adapted from Pierre Herme's Chocolate Desserts

The crust:
1 fully baked 8 3/4 inch (22cm) tart shell made from Sweet Tart Dough, cooled to room temperature

Keep the cooled crust, with the tart ring still in place, on the parchment-lined baking sheet.( The crust can be made up to 8 hours ahead and kept at room temperature.)

The Filling:
2/3 cup (200g) Nutella
4 3/4 ounces (140g) bittersweet chocolate, preferably Valrhona Noir Gastronomie, finely chopped
7 tbsps (3 1/2 ounces, 200g) unsalted butter
1 large egg, at room temperature, stired with a fork
3 large egg yolks, at room temperature, stirred with a fork
2 tbsp sugar
1 cup (140g) hazelnuts toasted,skinned and cut into large pieces


Center a rack in the ove and preheat the oven to 375F (190C).

Spread Nutella evenly over the bottom of the crust and set it aside while you make the ganache.

Melt the chocolate and butter in separate bowls either over-not touching-simmering water or in a microwave oven. Allow them to cool until they feel only just warm to the touch [104F (40C)], as measured on an instant read thermometer, is perfect).

Using a small whisk or rubber spatula, stir the egg into the chocolate, stirring gently in ever widening circles and taking care not to agitate the mixture- you don't want to beat air into the ganache. Little by little, stir in the egg yolks, then the sugar. Finally, still working gently, stir in the warm melted butter. Pour the ganache over the Nutella in the tart shell. Scatter the toasted hazelnus over the top.

Bake the tart for 11 minutes- that should be just enough time to turn the top of the tart dull, like the top of a cake. The center of the tart will shimmy if jiggled- that's just what it's supposed to do. Remove the tart from the oven and slide it onto a rack. Allow the tart to cool for at least 20 minutes, or until it reaches room temperature- the best temperature at which to serve it.

Makes 6 to 8 servings .

Read more...

Friday, August 24, 2007

Recycling Idea

Matcha Cream Cheese TartsRemember I told you about the leftover cream cheese from my last batch of Matcha Brownie? After the brownie was baked, I decided to use the cream cheese mixture to make some mini tarts. Even though it was left with only a bit of leftover, I found myself getting 7 mini cheesecake tarts out of it. Wasn't too bad right?

Such is the beauty of recycling. Oh, and I must also mention that the tart dough was the leftover from another tart I made months ago. You can find its recipe here. I can't remember exactly when the tart dough was made, nor its initial purpose for existence. Anyway, I am certainly thankful that it's there at my disposal.

As far as I could recall, the tart dough had been used for a chocolate raspberry tart, a Nutella tart (which I wanted to blog, but keep forgetting)and now, in some mini matcha cream cheese tarts! Despite of making multiple appearances, there is still some remnant in the freezer which is enough for more than one tart shell!

Later this week, I used some for a little cookie project, which I shall keep the detail for another post. Because I am obsessed with everything green lately, please embrace yourself for some green posts ahead.

Matcha Cream Cheese Tarts Now on these gems made from recycled stuff. They are pretty great on their own. The filling was tangy with a little hint of matcha. Not overly grassy, because I used very little matcha. I love the fact that it suffices the craving for a piece of cheesecake, without the guilt of ingesting 1000 calories.However, it took all my mental strength for not reaching out for seconds, even when no one was watching.

Most of the Matcha Cheese Tarts were given away, which made me sad, now that I think of it....I should have kept them all to myself. Well,I am not one who will deprive myself, so I made something else to fill up the void quite promptly. It certainly lifted my spirit.

Because the cream cheese batter were in two separate ziplock bags, I had fun piping them out in different patterns. It was quite therapeutic and made me forget about the August heat, well, for a short while. But as you can see, I wasn't exactly creative in the piping department. The patterns are all pretty boring. Maybe I should make another batch of these matcha cheese tarts, and endeavor to make some funky and creative tarts? Alright, I confess I only want an excuse to make another batch soon.

Read more...

Monday, June 25, 2007

The Pavlova from memory


I still remember the summer I first set foot in Perth. It was almost Christmas time and I felt like a melting scoop of ice-cream. The sweltering heat made me want to just stay in Uncle Michael's cosy house and not doing anything. Having said that, it was a memorable trip for many reasons, but one of the highlights, was the pavlova my aunt Kim served on Christmas morning.

I remembered how the faces of my little cousins lit up when they saw the pavlova. According to the very health conscious family, they ate pavlova (and bacon) only once a year on Christmas morning. Oh well, I wasn't in the position to comment on their habits, but I certainly didn't see what's the deal with this seemingly pale looking "fruit tart".

To be polite, I asked for a small slice not knowing what exactly lay ahead of me. And frankly, I wasn't exactly into anything that didn't have chocolate on it. But the first bite totally converted me! It was the most intriguing dessert I have ever eaten in my 19 years of life! How should I describe my first pavlova experience?

It was a generous stack of summer fruits on a bed of snowy white cream, supported by a sturdy meringue shell. Obviously, I had never heard of meringue at that time. So you can just imagine my excitement when I first put a tentatively small bite of pavlova into my mouth, and sensed the instant melting of meringue. It was a revealing moment. I quickly took a second bite, and the pillowy center of the meringue mixed with fruits reminded me of mashmellow with fruits. That was the coolest dessert I had ever eaten.

While I was having this revealing experience with my tiny slice of pavlova, the rest was promptly gobbled up by my relatives. It was quite sad that I couldn't have a second serving, and that pretty much sum up my pavlova experience. Pavlova is the kind of dessert that once tasted, one will never forget. At least, that is the case for me.

Many years have passed, and I never have another chance to taste pavlova again. I don't know why I didn't search for one the last time I was in Sydney. Perhaps I was scared of being disappointed by my memory. You know how sometime when you crave for something badly, it seems to be ten times more delicious than it actually is. So I didn't look for it.
Last week, while reading the Domestic Goddess Jeniffer's gorgeous blog, she asked other bloggers to post about their most craved, favorite desserts for the sweetest blog event that she is hosting. Naturally, pavlova came to mind. It was my most craved dessert that I couldn't believe I have waited so long to make!


Thank to the little nudge, I have finally reunited with my long lost love. And it didn't disappoint. I took the liberty to include Pierre Herme's lemon cream into the whipped cream, and used the berries I got from the farmer's market. It was a perfect ending for a dinner party we hosted last weekend. This is also my first entry to the Sugar High Fridays. Be sure to check out other food blogger's Sweetest Thing on Jennifer's blog on 29 June.

With the abundant of summer fruits, you shouldn't be surprised to see another pavlova popped up on my blog some time real soon!

p/s: sorry for the dull color of the photos. My batteries were low when I took these shots. :(

Pavlova with Mixed Berries

4 large egg whites, at room temperature
Pinch kosher salt
1 cup sugar
1/2 tablespoon cornstarch
1/2 teaspoon cream of tartar
1/2 teaspoon pure vanilla extract
Sweetened Whipped Cream, recipe follows
1/2 pint fresh strawberries, hulled and sliced
1/2 pint fresh blueberries
1/2 pint fresh raspberries
Chocolate curls (optional)

Preheat the oven to 250 degrees F.
Place a sheet of parchment paper on a sheet pan. Draw a 9-inch circle on the paper, using a 9-inch plate as a guide, then turn the paper over so the circle is on the reverse side. (This way you won't get a pencil mark on the meringue.)

Place the egg whites, cream of tartar and salt in the bowl of an electric mixer fitted with a whisk attachment. Beat the egg whites on high speed until firm, about 1 minute. With the mixer still on high, slowly add the sugar and cornstarch, followed by the vanilla extract and beat until it makes firm, shiny peaks, about 2 minutes.

Pile the meringue into the middle of the circle on the parchment paper and smooth it within the circle, making a rough disk. Bake for 1 1/2 hours until the outer side feel dry and hard when touched. Turn off the oven, keep the door ajar, and allow the meringue to cool completely in the oven, about 1 hour. It will be crisp on the outside and soft on the inside.

Invert the meringue disk onto a plate and spread the top completely with sweetened whipped cream. Spoon the berries carefully into the middle of the Pavlova, leaving a border of cream and meringue.


Sweetened Whipped Cream:
2/3 cup cold heavy cream
1 teaspoon sugar
1 teaspoon pure vanilla extract
1/3 cup lemon cream

Whip the cream in the bowl of an electric mixer fitted with a whisk attachment (you can also use a hand mixer). When it starts to thicken, add the sugar and vanilla and continue to beat until firm. Don't overbeat! Fold in the lemon cream.

Yield: 1 cup

Read more...

Wednesday, June 13, 2007

Farewell Chocolate Tarts

Before we went to Phoenix, I was on a mission to use up some of the expiring whipping cream. I was thinking of making a frosted cake initially, but thought that would not be realistic. Instead, I went to Pierre Herme's Chocolate Desserts for inspiration.

There are so many chocolate tarts recipes I have intended to try from this amazing book. But due to time constraint, I settled on the simple chocolate gananche, which could also be used as filling in tarts. Since I still have some leftover dough from the Chocolate Hazelnut Sables, I used them to make the mini tart shells. That way, I only needed to make the ganache and poured them into the baked shells. It's the simplest and fastest way to use up the whipping cream.

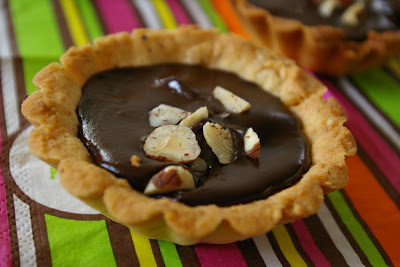
I also added some chopped hazelnuts to the baked tart shells before pouring in the chocolate ganache. For some reasons, I simply love the combination of hazelnut and chocolate since young. Maybe it reminds me of nutella. I have never heard of anybody who doesn't like nutella!

So this is my simple chocolate tart before we embarked on our journey to the desert. We gave away most tarts to friends and keep just two for ourselves. This is my sweet way to say "Goodbye!"

Read more...

Wednesday, April 04, 2007

Housewife has deadline to meet too!


Eventhough I really don't like to be called a housewife. Because I don't exactly do a lot of house work. And certainly not working and staying at home doesn't make me a "housewife" or "housefly" as one of my friends accidentally blurted out.

But if you must insist on calling me a housewife, then I guess there's nothing I can do to stop you. Just don't say that I am a boring housefly, and nobody gets hurt.

In case you think only people who are working or studying have deadlines to meet, then you are wrong. Housefly like myself have deadlines to meet too. It comes in the form of expiring dates of all kinds of dairy products. Like today. My buttermilk and heavy cream are expiring. My mission is to use up as much as I could, and keep wastage to the minimum.

Because of this, I have been baking frantically for the past two days. So far, I made a lemon cream cake, 1 batch of chocolate ganache for a birthday cake, some truffles and chocolate tarts. Despite of all the stuff that keep streaming out from my oven, I still have to throw away half a cup of heavy cream and one cup of buttermilk. Unless I stop typing now and get up to make a batch of scones, then maybe I can use up the buttermilk. But maybe not. I am too tired now.

Here's just some pictures of the truffles and chocolate tarts I made. It's my first time making truffles, and I believe this will not be the last time. Eventhough it isn't a complicated process, the end products are deeply and sinfully satisfying. I added 2 tablespoons of Caramel Bailey in mine but the flavor was too mild that it went undetectable. Guess I will have to add more next time. With some basic knowledge of truffle making, hopefully I can try some bold flavours in the future.

Actually truffles are nothing more than cream and chocolate. But the way a handmade truffle glides down the throat is unbelievably satisfying. No wonder they are alway associated with exobitant price tags.


The filling of the chocolate tarts used more or less the same ingredient as the truffles. Except that the percentage of chocolate used was different and it's alcohol free. I used the sweet tart dough recipe from the same book, the recipe is here.In fact after making 3 batches of chocolate ganache, I am a bit mixed up on what alterations I have made on different batches. I should have been more organized and recorded down all the alterations in different batches. Maybe next time.....


Truffles/ Chocolate ganache filling for chocolate tarts ( made 3 times in a day!)
adapted from Pierre Herme's Chocolate Desserts

9 ounces (260g) bittersweet chocolate, finely chopped
1 cup heavy cream
2 tbsp liquor (rum / bailey etc) optional
3.5 tbsp (50g)unsalted butter, at room temperature,cut into 4 pieces
Dutch processed cocoa powder, for dusting

Put the chocolate in a heatproof bowl that can hold all the ingredients. Bring the cream (and liquor if you are using any) to a full boil in a saucepan to a full boil, then pour the hot cream into the center of the chocolate. Working with a spatula, gently stir the cream into the chocolate in ever widening concentric circle until the ganache is homogenous and smooth. Allow the ganache to rest on the counter for about a minute before adding the butter.

Add the butter 2 pieces at a time, stirring gently to blend. When all the butter is blended into the mixture, pour the ganache into a baking pan or bowl. Put the pan in the refrigerator and when the ganache is cool, cover it with plastic wrap and chill for at least 3 hours. (or overnight)

note: you can use the soft ganache at this point to frost cake. Or put it in the fridge for later use. Just leave it out in the counter for it to soften before use.
Because I needed to use up my heavy cream, I made 3 batches, and kept one batch, covered in plastic wrap in the freezer.

When you are ready to shape the truffles, spoon a generous amount of cocoa powder into a bowl, and set out a baking sheet lined with parchment or waxed paper. Remove the truffle mixture from the fridge and scoop up a scant tablespoonful of ganache for each truffle; put the dollops of ganache on the paper-lined pan. dust the palms of your hands with cocoa powder and, one by one, roll the mounds of ganache between your palms to form rounds. As you shape each truffle, drop it into the bowl of cocoa powder or whatever topping you want to use (I used some chopped pistachio).

The truffles can be served as soon as they are coated or they can be stored in the refrigerator for a day or two, cover and away from foods with strong odors.

Read more...
Related Posts with Thumbnails