


Actually there are a few recipes that I wanted to share. But I am willing to let this entry jumps the queue, seeing that it's Thanksgiving this Thursday, and you may want some dessert ideas, other than pumpkin pie.
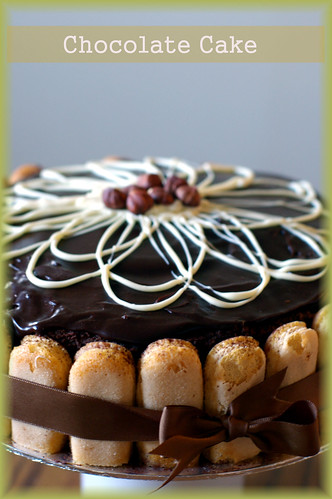
This is the chocolate cake I made for a dinner party last Friday. The cake and frosting is a combination I have made in the past. I feel more comfortable bringing a tried and true dessert to any party, as oppose to something new and potentially exciting. Call me inadventurous, I certainly don't want to use it as an opportunity to experiment with new recipes. Hey, it is my reputation at stake. Although I am not sure if I have one at the moment. Having said that, I am pretty sure the nice people in OCT's lab wouldn't mind being my guinea pigs. Which in a way,they already are, eating whatever I conjure most of the Fridays.
As much as I enjoy baking, cake decorating is something I dread. I can't pipe anything without being mistaken as a child's work. Cake decorating is undoubtedly one aspect that I need to work on. For the time being, my idea of decorating consists of microwave melted chocolate in a ziploc bag, and snipped off a tiny hole at one corner to trace a simple pattern.

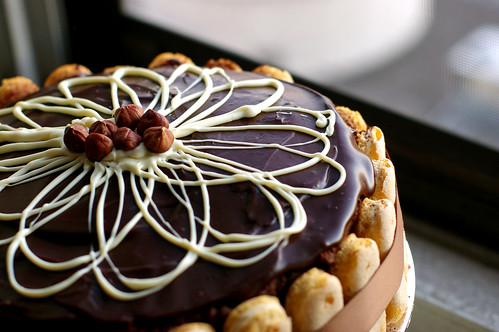
As you can see, my drawing is pretty untidy. There's even a puddle of white chocolate in the center of the cake, where the circles intersect. I had no choice but to cover it with some hazelnuts. Luckily, I always keep a selection of nuts on hand.
As for the lady fingers on the sides, they were there for a reason. Their mission was to cover the somewhat bare sides I left behind, after realizing I didn't make enough frosting to cover the whole cake. The pack of lady fingers is the hero that saved my day. :)
A ribbon tied around the cake make the recipient feel special, and hold all lady fingers in place.
This is just my 2 cents on how to decorate a cake without resorting to the piping bag and tips. So, what are you making for Thanksgiving?
Chocolate Lovers' Chocolate Cake
cake base and filling adapted from this recipe
cake
1 3/4 cups all-purpose flour, plus more for dusting
2 cups sugar
3/4 cup unsweetened cocoa powder
2 teaspoons baking soda
1 teaspoon baking powder
1 teaspoon kosher salt
1 cup buttermilk
1/2 cup vegetable oil
2 large eggs
1 teaspoon pure vanilla extract
1 cup freshly brewed hot coffee
Filling:(enough to fill one layer)
Whipped Dark Chocolate Ganache
(adapted from Alice Medrich's Bittersweet)
1 cup heavy cream
3 ounces 72% chocolate
2 teaspoons granulated sugar
For the ganache: (used as topping)
1/3 cup (3 oz) heavy cream
4 ounces best-quality bittersweet/dark chocolate
Decoration:
lady fingers, soaked briefly in syrup (heat some raspberry preserve and water in a saucepan, sugar to taste)
melted white chocolate
Make the cake:
Preheat the oven to 350°. Butter two 8-inch round cake pans and line them with parchment paper; butter the paper. Dust the pans with flour, tapping out any excess.
In the bowl of an electric mixer fitted with a paddle, mix the flour with the sugar, cocoa powder, baking soda, baking powder and salt at low speed. In a medium bowl, whisk the buttermilk with the oil, eggs and vanilla. Slowly beat the buttermilk mixture into the dry ingredients until just incorporated, then slowly beat in the hot coffee until fully incorporated.
Pour the batter into the prepared pans. Bake for 35 minutes, or until a toothpick inserted in the center of each cake comes out clean. Let the cakes cool in the pans for 30 minutes, then invert the cakes onto a rack to cool completely. Peel off the parchment paper.
Make the whipped gananche:
Heat the heavy cream and sugar in a small saucepan until it bubbles on the edges and immediately pour it over the chocolate. Allows the heat from the cream to melt the chocolate.Let stand for 10-15 minutes. Slowly stir to make sure that the chocolate has completely melted. Chill for at least 6 hours or overnight, and whip the ganache only when ready to use.
Make the gananche :
Bring 1/3 cup of heavy cream to a near boil in a small saucepan.When it is steaming well, remove it from heat and pour over the chopped chocolate. Stir or whisk until the chocolate is melted. The mixture should be smooth. Let stand until the ganache is warm enough to be poured over the cake.
Assemble the cake:
Set a cake layer on a plate with the flat side facing up. Evenly spread the whipped ganache over the cake. Top with the second cake layer, rounded side up. Spread a thin layer of the whipped gananche over the top and side of the cake. Arrange lady fingers immediately around the cake.
Pour the gananche to cover the top of the cake.Unleash your imagination and use the melted chocolate to sketch whatever pattern that strike your fancy. Refrigerate for at least 1 hour before slicing.
30 comments:
Such a beautiful cake! You are indeed a wonderful baker!
What a lovely cake - I think the ladyfingers and the ribbon make it so special. Great use of hazelnuts for the center of the flower - not a blooper at all!
Wow that is one gorgeous cake! Bravo!!
Ari (Baking and Books)
I don't think it matters, Mandy! That cake looks more precious and sweeter than any store-bought pristine monstrosity.
Mandy,
You're a pro, and such a natural at this! Your pretty cake must have been the talk of the party!
Have a great Thanksgiving, and catch you later! =)
lovely! i've always preferred 'imperfect' cakes to store-bought perfection. spoken frm the heart - n from someone who makes imperfect cakes too :)
Mandy, your cake is beautiful. The hazelnut accents, ladyfingers and ribbon are the perfect touches. Frankly, it's beautiful and personal, and with the slightly rustic quality, it looks even more lovingly homemade. While still being elegant and beautiful. Bravo!
Wow that is one beautifully decorated and put together cake! I love the brown ribbon around the edge. Had you not divulged the things that went wrong with it and what you did to cover them up, I would've had no idea. Everything looks intentional and well put together. I used to like to try out new recipes to take places but now I'm starting to stick to ones that I know are good so I don't freak out about whether people will enjoy it or not.
It's not always I enjoy being a "pig"...but....but...can I be your guinea pig? I'm sure I'll be fed well :D
Smart cover up. The icing looks pretty. As if, it was meant to be like that :D
So beautiful and yummy looking!
What can I say? You totally rock in the cake baking department. :)
I'm not normally a cake person but your cake is stunning Mandy!
I have no idea where to begin with cake decorating so it's great to have a few tips for covering up the bits that go wrong - Thanks!
Spectacular cake mandy. The showstopper of the party , I'm sure!
I am glad to hear that I'm not the only one who dreads decorating cakes!! I think that's why I make more cupcakes than cakes now... But your cake is absolutely gorgeous. I'm impressed!
I think your cake is divine!
I love how you decorated it, I'm gonna borrow your technique sometime!
Mandy... The cake looks delicouos. I am glad that I discovered your yummylicious blog...
But I have a small doubt, what happens to the fingers when you want to slice the cake. Once the ribbon is removed, will the fingers fall off?
I saw the first pic, and totally fell in love. How I wish I could do something as beautiful!
Your cake is lovely! I love the way you decorated it! The spongefingers and the pretty ribbon certainly dress it up...for a great party :)
Very creative and industrious! If you hadn't fessed up to not enough icing and a pool of white chocolate, we would never had know this to be anything but a truly gorgeous cake!
Well, don't they sya soemthing along the line of "necessity is the mother of creativity?". Idioms are different in my native tongue so feel free to give me the corrected version. All this to say that I love the ladyfingers used to cover the sides and your white chocolate flower is very, very pretty! Great job!
That has to be one of the most beautiful cakes I have ever seen. Lovely job!
couldn't say anything
it's a beautiful cake. gorgeous! amazing!
anh,
thanks!
holybasil,
I am glad I concealed it well. :p
Ari,
thanks!
manggy,
hhaha, I am glad you think that way.
bp,
thanks! I think OCT's colleagues like it. :)
terri,
hey, you can make the nemo cake, which I think takes lots of skill!
bri,
thanks!
eatme_delicious,
same here! I prefer to stick with T&T recipes nowaday. Take away so much stress off my shoulders.
tigerfish,
You always have a way to crack me up.
suganya,
hahaha, I am just glad that I have the ingredients required for the cover up.
peabody,
thanks!
Rasa Malaysia,
thanks!
sophie,
thanks! Hope the tips help. :)
veron,
thanks!
deborah,
you are surely not alone!
Patricia,
sure! I am glad you find the technique useful.
little corner of mine,
thanks!
sexy scheya,
the lady fingers didn't fall apart when the ribbon is removed. Because I applied a thin layer of frosting on the sides.
ovenhaven,
You are too modest. All your bakes look adorable.
happyhomebaker,
thanks!
aimei,
thanks!
tartelette,
I couldn;t agree more!
kristen,
thanks for the kind words.
Andaliman,
thanks.
Whoa~~~~~~ absolutely fabulous! I bet the host was overwhelmed by this gorgeous cake!
I like to do the faux charlotte too when I’m out of decorating ideas. It is easy but always impressive!
Vi
That cake is the prettiest thing! I like how you've incorporated the background in your pictures - whenever I do it myself, I feel it looks weird, but it works great in your photos. And shsh! on the I can't decorate. Sure you can!:)
(Love your blog btw - found you via BakingBites link to your Daring Baker's bread)
That's beautiful and it just goes to show that you can make something look even more beautiful than if you'd made enough icing to cover the whole thing.
I was first drawn to this post because of the beautiful photo, the great idea regarding the ladyfingers and the fact that I decorate cakes the same way. I made the cake last night and it was amazing! I did white chocolate whipped filling and everyone said it reminded them of a ho-ho. It was delicious! This will become my go-to chocolate cake recipe. Thanks for the idea! I am really enjoying reading your blog!
Thank you for saving my short-on-frosting day! Love it!
Lovely idea...tried to copy it with a vanilla cake, turned out lovely, though some people taught a three year doodled on the cake!
Wish I could post a picture.
Kavitha Garla..India
Post a Comment